Have you ever recorded an interview or captured film and then found that in the editing process your audio file is distorted? This DIT hint will take you through some basic steps to help you clean up your distorted audio file.
The first point to make is that it’s always a good idea to firstly check all your recording equipment and microphone to ensure that they are setup correctly, so that clean audio is captured in the first place.
Sometimes it’s not that simple, you may be in a hurry or you may have forgotten to get a set of headphones to monitor the sound.
How to use Audacity to remove distortion
To try and make this easier, I will make available an audio file that I recorded with distortion that you can download yourself and have a play with to clean up.
(Please note that this isn’t perfect and the aim of this blog post is to provide a relatively quick and simple solution – if your audio file needs to sound professional, you’ll need to potentially re-record it)
- To begin with, please download the following audio file: http://bit.ly/2mudRAO (note the content is irrelevant, please ignore what I am talking about!)
- Open up Audacity, then go to File > Open > Select the downloaded audio from the location you saved it on your computer.
- You should see a small waveform, play it and just listen to the distortion in my voice.

- You need to firstly zoom into the waveform a bit because we’re going to select a small sample of the waveform for analysis – so go to View > Zoom in. (you may wish to zoom in two or three times)
- Next click with the left mouse button and drag it over a small section of the waveform.
- With the selected section, go to Effect > Noise Reduction. This will open the Noise Reduction pane and you then need to click on ‘Get Noise Profile’.
- It may appear that nothing happens, but that’s okay. Now this time, go to Edit > Select all.
- Go to Effect > Noise Reduction > At this point you’ll need to be wearing headphones so that you can listen to the audio previews. Leave the standard settings in step 2 and click on Preview.
 At this point you may think that it still doesn’t sound too good. You’d be right! The advice I can give is to play with the settings in step 2 and keep previewing your audio file. It took me about three minutes to get the preview to sound acceptable and my settings can be seen below.
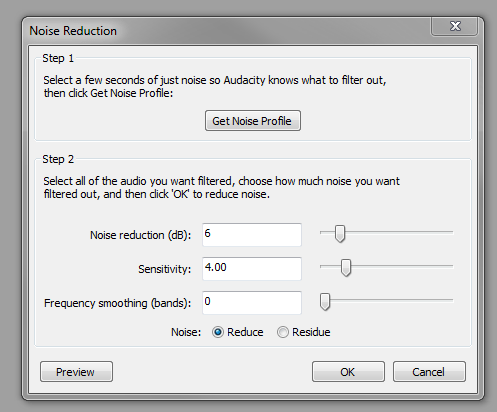 You may well be able to further improve this track by tweaking the settings and previewing the sound.
Have a go and when you’re happy click the OK button and it will process the changes.