Using Mentimeter in the classroom

Using technology in the classroom may seem daunting and also challenging, particularly using digital tools that may be unfamiliar and especially within a live teaching session.  So, how do you start, what tools are available and how can you use them?

This post is the second case study in the series focussing on the use of digital tools in the classroom.

Summary

Miles Smith, Lecturer saw the potential of Mentimeter whilst attending a conference and was impressed with the audience enthusiasm and feedback on the use of the tool.  Following on from this, he decided to use the tool, including Padlet with his students to aid reflection, discussion and as a method to test the students’ knowledge during the session.  Students have enjoyed the use of the tools to aid collaboration and as a resource that’s available as a reflective document after the session.

What is Mentimeter?

Mentimeter is an easy to use online platform for voting and collaborating, primarily used  to support engaging presentations.  It’s also used in an educational setting and can easily be introduced during a session to quiz students via a range of different question methods.  These include a word cloud, multiple choice, scales, matrix, open-ended and many more question types.

Watch the below film to find out more. (this video will have captions enabled in due course)

Activities

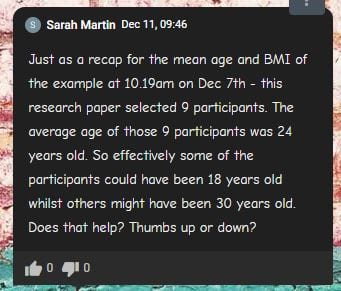
During the session, Miles started by engaging the students in discussion around a topic to get the students thinking.  He then used the open-ended question type in Mentimeter to open up a dialogue around the topic area that had been discussed.  Students then used the simple code to open their browser and access the question to answer the question, including using their smartphones.  Students then posted their views on the question related to the topic discussion.  Miles then opened up the session for further discussion around the responses made in groups.

Later on in the session Mentimeter was used to quiz the students about a certain factor that they felt was most influencing relating to the main question posted.  This used a different question type with set answers that the students could choose from.

multiple choice question

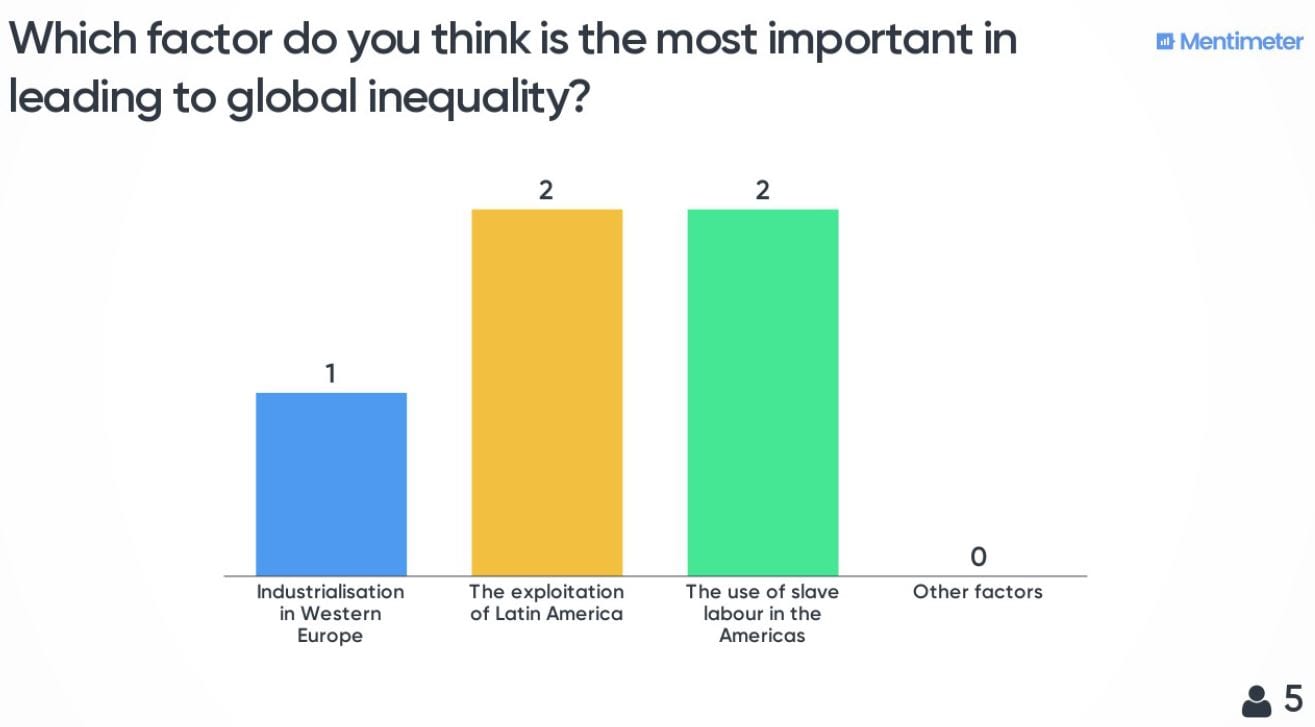
An example of the results from using the multiple choice question

Challenges

Miles couldn’t see many challenges in terms of using the software, it’s ease of use is a very positive factor in terms of setting up presentations and quizzes that can be used during a session.

One of the potential challenges or restrictions of a free Mentimeter account is that you are restricted to using just two slides in any given presentation.  Miles didn’t feel that this was a hindrance as it did mean that the tool could only be used sparingly as there could be a temptation to overuse its use in the classroom.

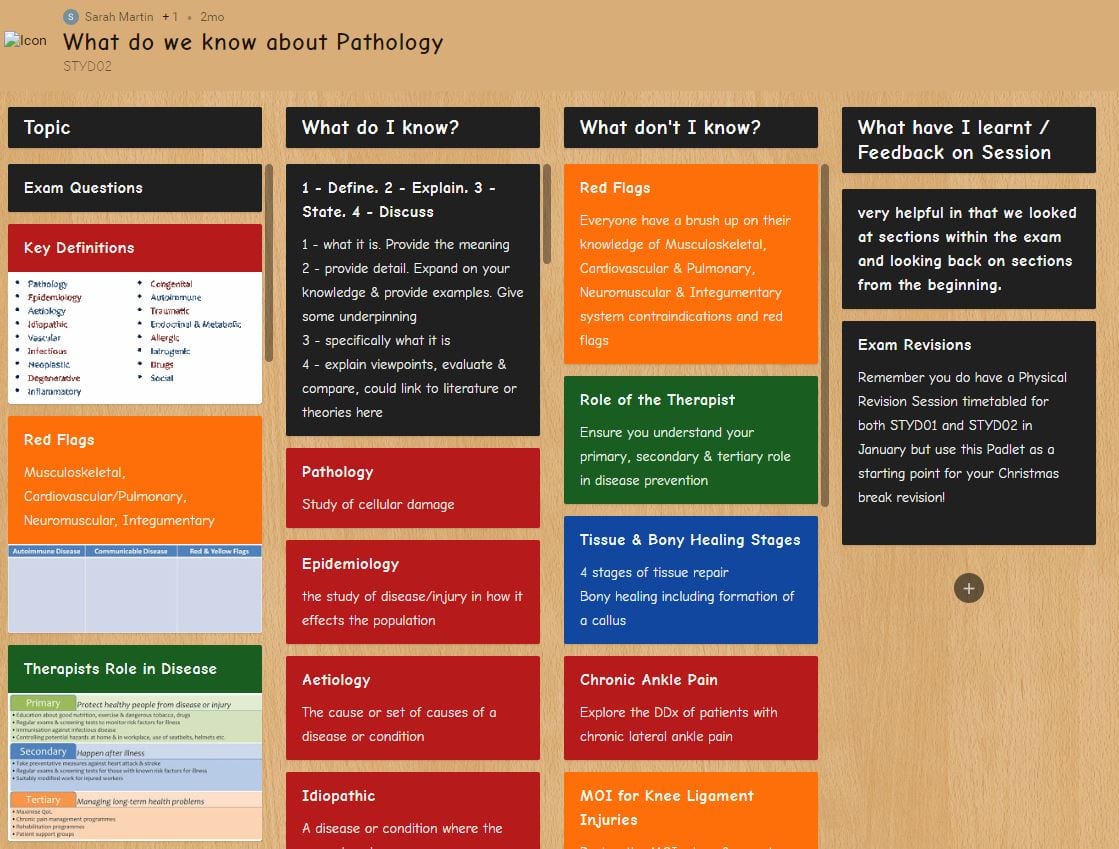
In terms of Padlet, Miles is still developing his use of the tool.  Some aspects felt a little clunky, which made it slightly challenging for the students in terms of posting content, which could be posted off-screen or needed to be moved into a better position in the Padlet.  You can select different types of template, which have different settings for example a single thread down the page, or templates that work in blocks, so this may alleviate some of these challenges.

Benefits & Outcomes

In terms of the session, the use of Mentimeter and Padlet aided communication and provided students with a more engaging and interesting experience.  Feedback on using the tool was instant and Miles was able to very quickly gauge his students’ understanding on a specific topic.

The students all seemed to enjoy the session and they could access Mentimeter from their browser through their laptop computer or their smart device easily.

None of the students had any difficultly accessing the tools and they were all actively involved in shaping the session in a positive way.

I think they liked to see their posts going up anonymously and then for those to be used and engaged with the tutor, Miles Smith

An important consideration is how the tools are used with the students, so if Padlet is used what is the nature of the task? How do you setup purposeful, collaborative tasks that are meaningful to ensure that they are communicative and not something that is about the students working independently and doing it themselves?

The session therefore was complimented by having that group interaction, with groups of two students collaborating on different topics and questions.  The technology and use of Mentimeter helped to reinforce learning and the Padlet board is also available to the students as a downloadable PDF in their LearningSpace.  This means that they can go back and review content.

It was interesting because it got them to really deliberate and consider different options to develop those critical thinking skills

More details

Head over to Mentimeter and setup a free account to get started: https://www.mentimeter.com

You can also find further digital tools available to try from our TELkit

Digital innovation in the classroom

Using technology in the classroom may seem daunting and also challenging, particularly using digital tools that may be unfamiliar and especially within a live teaching session.  So, how do you start, what tools are available and how can you use them?

This post features the first in a series of case studies focussing on the use of digital tools in the classroom.

Summary

Sarah Martin, Lecturer in Sports Therapy & Rehabilitation used Padlet in the classroom following on from a post by the Digital Innovation team, highlighting the benefits of digital technologies.  She used the tool as a collaborative space, which she setup for her students to engage with using their smart devices during the sessions.  Within the Padlet boards, Sarah setup colour-coded sections to inform, guide and challenge her students’ knowledge during the sessions. As a result, students were able to anonymously engage in activities and the boards could be accessed at any time or place to aid retention and reflection for the subject.

What is Padlet?

Padlet is an online tool for creating digital boards, which teachers can use to create interactive activities and reflective spaces.  The Padlet boards integrate well with smart devices and students can add content, such as text, images, videos and audio clips.

Teachers can use Padlet to hold live Q & A sessions with students and test the students’ knowledge.  It also works well as an anonymous space that students can request feedback on related to something they are unsure about. So, rather than raising their hand in class, which not everyone is comfortable with, the student can ask what they like.  The space is also captured and recorded and teachers can create on-the-fly screencasts to demonstrate a particular aspect of their teaching or to answer a board question or request from the students.

Watch the below film to find out more. (if you need captions, just click on the CC icon in the video tools)

Digital innovation in the classroom from University of St Mark & St John on Vimeo.

Activities

Sarah setup two different Padlet boards, one for an ‘introduction to correlations’ and another for ‘what do we know about pathology’.

For her introductions to correlations Padlet, she colour-coded different sections, which informed the students about what type of section it was, this included:

  • Black coloured sections for information
  • Green coloured sections for guidance materials
  • Red coloured sections for tasks

The idea being that students could read information about their subject area, then seek guidance via embedded screencasts & media followed by tasks to test their knowledge.  Sarah could then monitor the activity live via a thumbs up or down option on each section.  So if the student added a thumbs down, Sarah would know that a student found something difficult to follow or understand.

Thumbs down pic

Thumbs up or down?

If a student added a thumbs down, she could then follow this up by providing a quick screencast or text response.  In addition to the provision of the Padlet board, Sarah also opened up a Moodle chat area – this allowed students to chat with each other and also ask instant questions.

Padlet board

Example screenshot of one of the Padlet boards

Challenges

QR code

In terms of using Padlet, it was extremely easy to use and the students could simply scan a QR code, generated by Padlet through the Marjon mobile app.  This made it accessible for anyone accessing the padlet on a mobile device.  Padlet has been optimised for mobile and works in the browser, but there’s also a dedicated app as well.

The only real challenge was personal engagement, so students were using their phones and devices to communicate to the screen a lot.  This didn’t prove to be an issue really because the students all worked collaboratively together in groups and then once all the findings had been posted on Padlet, they put the devices down and talked about the activities.

Benefits & Outcomes

Students were able to collaborate and utilise their mobile devices to interact in the session. This encouraged a more interactive and engaging experience for them.  Although the session was by its nature more activity-based, the tool enabled those students that were less confident to actively get more involved and voice their questions.  This in turn provided a more inclusive environment and improved participation.

It works really nicely as an interaction, Sarah Martin.

It’s actually a really nice way of capturing everything that they’re doing, Sarah Martin.

The students themselves also posted messages that highlighted their own positive experiences of using Padlet.

Enjoyed the interactive session. Thanks!

More details

Padlet accounts are free to create, but the premium or educational version is not yet available to staff.  If staff would like to have access to the full features of the software, we have created an expression of interest form.  With sufficient numbers of requests, we can make a case for purchasing the licence for the university.

If you’d like to try out Padlet, you can create a free account and start using it – you get access to x3 boards with the free account. Just visit the website: https://padlet.com

You can also find further digital tools available to try from our TELkit

REPLAY: A lot more than just Lecture Capture…

The more the team uses the REPLAY system the more impressed we become with its features and what opportunity this brings for enhancing the learning of students. Alongside the features we are more familiar with, including automatic and ad hod recordings and the ability editing them afterwards, the team have been investigating some of the REPLAY systems other features.

Live webcasting

REPLAY has a live stream option that enables both ad hoc and scheduled sessions to be live streamed to students enrolled on the module or specific individuals during the session, which opens up the opportunity for engaging with students outside of the lecture environment. REPLAY also has some very good built in discussions tools, including a live Q and A feature, which can connect students unable to attend the session with the learning experience.

At the moment it is possible for staff members to request sessions to be webcast on a module or session basis, however, starting in September it will be possible to request modules to be live cast through timetabling.

For more information of Live webcasting view our guide or contact the team.

Panopto app

The Panopto app allows students and staff to access REPLAY recordings from their mobile device. It gives easy navigation between modules for students, as well as allowing them to search recordings for specific content.


For staff members, the Panopto app opens up the possibility to capture content where ever you are using your mobile device and uploading it directly into a module or your own folder. 

The app is available for iOS and Android, for information on installing the app visit our guide.

Students recording to REPLAY

The system has a setting that allows students to record content into a specific module assignment folder. This folder is specific to the module and the recordings can, by default, only be viewed by the tutors. Students can therefore record content using the desktop application and upload content directly to REPLAY.

This feature could be used by students who film their own presentations and allows them to upload to REPLAY to be marked by tutors. There is also an option to make recordings visible to other students on the module afterwards.

If you would interested in using the Student Assignment Folders please contact the team to discuss.

Adding quizzes to a recording

The online editing tools with REPLAY allow you to remove and add all kinds of content, including other videos, presentation files or merging of sessions. It is also possible to add built in quizzes to a recording. You can add quizzes to specific points in the recording and they can be particularly useful for testing student knowledge.


For information on adding a quiz to your recording visit our guide.

Replay Smart Search Feature

With the recent update to Replay (Panopto) the Smart Search feature is now better than ever.

Smart Search gives you the ability to instantly find and fast-forward to any word spoken or shown on-screen, in any recording. Simply type in a word of interest in the search for all your recordings or within a recording itself and jump straight to where it was mentioned.

When recordings are created Replay (Panopto) automatically indexes ever word displayed on screen or spoken using Automated Speech Recognition and Optical Character Recognition. These systems will pick up any word written in a presentation, spoken or typed during the session, shown on a webpage and even hand written on a screen or whiteboard.

This adds incredible search-ability to recordings without the need for manually entering information or tags. The Panopto website has some great FAQs on the Smart Search feature.

Have a look at the video below to see this great feature in action.

There are various help guides and videos available on the TEL Help Area for using Replay, if you would like additional support please contact MeLT.


TEL Tools: Turnitin GradeMark – Colour coded comments

TEL Tools is going to be a new regular feature on the MeLT TEL Blog.

With so many TEL (technology enhanced learning) tools out there, it can be difficult to choose the one that will be the most suitable for what you need and there are also lots of features within a tool that you might not know about.  To support you with this, the MeLT team are working on a series of short TEL Tools videos to showcase a range of tools and features. The aim of each video is to show you in a nutshell what the tool/feature does and how to use it.

The first TEL tool video looks at how colour coded comments can be used when marking assignments in Turnitin GradeMark.

For more information about Turnitin Grademark and other tools visit the Marjon TEL Help  Blog or contact the team: email: elearning@marjon.ac.uk | Ext. 5673 | Room 108


Google Slides Real Time Questioning

Google’s answer to powerpoint, ‘Slides’ has been upgraded today with an app that allows students to send questions in real time to the presenter.

It looks like a nice feature that allows the audience to post questions via the app.  Other audience members can vote the questions up if they want to hear the answer too.  Anonymous questioning is  possible.

Google Slides Q&A update

Google Slides Q&A – Image from Google Docs Blog – https://docs.googleblog.com/2016/05/slidesQA.html


Google released this video which shows the system in action.

There is also a red dot function that acts like a laser pen when presenting from a computer.

Read more about the app release here: https://docs.googleblog.com/2016/05/slidesQA.html

The ‘Slides’ application is part of the Google Apps for Education.  These apps are available to all Marjon Staff.  Please contact Zac Gribble (zgribble@marjon.ac.uk) if you would like to know more.


Clevertouch Screens

Some teaching spaces have now been equipped with the ‘Clevertouch’ screens to work either alongside or replacing projectors.

These screens can be used in the same way as the projectors using the lectern laptops to manage the content. They can also be used to interact with the content.

Please view the POV video below to see the basic functions of the screens. We are keeping the videos as raw as possible to give the most true to use example.

You will find more videos and a list of rooms with the clevertouch screens installed at elearning.marjon.ac.uk/clevertouch.