Email Queries
As a student at Marjon University you are provided with a University email account. The University will use this address to communicate with you so it is most important that you ensure that you check your mail in this account regularly.
To access your University Email account point your web browser at https://webmail.marjon.ac.uk or follow the link from any other University web service. You will need to login using your Marjon University username.
Keeping Some Free Space in your Mailbox
The University provides you with as much mail storage space as is reasonably possible. If that space fills up the system will no longer be able to place new messages in it and you may miss out on important messages. For this reason it is important to occasionally look through your old messages and delete those you no longer need. You also need to remember to empty the ‘Deleted Items’ folder before any space is freed (Tip: right click on ‘Deleted Items’).
Forwarding Email
If you prefer to use a different email address you can have messages forwarded to that address. At the top right of the webmail page there is an ‘Options’ menu. Select ‘Create an inbox rule’ then ‘Create a new rule for arriving messages’ to redirect the message. If you do this, please note that the University can accept no responsibility for the failure of an email message to arrive at the external address.
Email FAQs
What is my University email address?
University email accounts are created in this format: studentnumber@marjon.ac.uk For example if your student ID is 20061234 your email address is: 20061234@marjon.ac.uk.
The University Email is protected by a secure connection; once you are logged in you can check the server identity by double clicking the small padlock icon at the bottom of the browser window.
How do I access my University email account?
The link to your email account can be found in various locations. Links are available on Learning Space, the University Website (on the black bar at the bottom of the website under the Staff and Students heading) and the Hub.
How much storage space is available on my email account?
It is your responsibility to keep the email account secure and manage the content in it to stop it filling up. The Email system is not a file store, it is for sending & receiving messages, student email accounts have a maximum limit of 300Mb.
There are limits to the amount of data your account can hold & you are encouraged to regularly delete messages & attachments you no longer need. Any information you need to keep should be downloaded & saved elsewhere.
If you are having problems using either system, please contact Computing Services (computingservices@marjon.ac.uk)
I can’t log onto my email account – why?
There are three reasons why you may not be able to log onto your email account:
1. Forgotten your password
2. Locked out after numerous attempts
3. Email server not available
Forgotten Password or Locked out – what do I do?
If you have registered with Password Reset Manager:
1. Follow the link to the Password Reset Manager section on our website and enter your student ID. Click on the ‘Next’ link.
2. Now correctly answer the questions you previously set up (CaSe SeNsItIvE remember), click Next.
3. Enter a new password of at least 14 characters (Using a mix of UPPER and lowercase, numbers and symbols)
4. Then re-type the new password in the “Confirm new password” box.
5. Click Finish
If you have NOT registered with Password Reset Manager: You will have to contact Computing Services and ask them to reset your password (computingservices@marjon.ac.uk).
Email server not available?
We may occasionally have an unexpected problem with the server. You will need to wait until the problem has been resolved before accessing your email account. If you are having problems, please contact Computing Services (computingservices@marjon.ac.uk)
How do I know the message I sent is going to reach its destination?
You can never be absolutely certain that the message will reach the recipient but there are a couple of ways to find out if it has.
Before sending your message you can set it to ask for an automatic read and/or delivery receipt by clicking “Options” and selecting “Request a delivery receipt” and/or “Request a read receipt”.
Many email systems will honour this request and return an email to you to tell you that your email has been delivered to and/or read by the recipient but some do not and some people may not let their email system return a read receipt when they open your email. If it is important then it may be better to ask the recipient to acknowledge the email themselves. It’s all a matter of judgement.
I sent a contact an email message last week and it hasn’t arrived?
There can be a number of reasons why an email fails to reach its destination:
1. You may have incorrectly addressed the email, in which case the receiving mail server may or may not generate a non delivery receipt (NDR) message.
2. The receiving email server may have been offline or temporarily unavailable or your message may have been classed as spam by the recipient system and moved into a quarantine area.
3. Your message may have contained an attachment larger than the limit set by either our mail servers (10Mb) or the recipient’s mail servers.
I get a message saying the recipient is not known; what does this mean?
As you probably know, email addresses can be divided into two parts before and after the @ sign as in username@destination. Receiving a ‘Recipient not known’ message usually means that the destination part of the email address you used was correct but the username was incorrect or the users account might have lapsed (or perhaps that you put the right username but sent it to the wrong destination!).
Please check that the email address you used is correct or try contacting the person by some other means to verify their email address. If you are sending a message from your Marjon email account to somebody else at Marjon and you are not sure of their email address you can put in their real name and click the ‘Check Names’ button before you send. If the server recognises the name it will automatically add their email address to the message.
I’ve got a message saying I can’t send because I’m over my size limit. What does this mean and what can I do?
When your mailbox gets close to its maximum size (300Mb) you will receive a System Administrator message advising you that it is getting too full. You need to remove items from email folders to reduce the size of your mailbox back to below the quota set out above.
The first place to look is your “Deleted Items” folder which is where mail initially goes when you delete it from the Inbox. Right click on the “Deleted Items” folder (position the mouse over the folder and click the right hand button) and select the “Empty Deleted Items” option from the pop-up menu.
If that does not free up enough space then consider deleting some messages from your Inbox or other folders then emptying “Deleted Items” again. If the mailbox is left unattended, the system will initially stop you sending mail and finally stop you receiving mail.
I’ve deleted an email that I find I now need; how can I get it back?
It could still be in your deleted items bin. If you open the folder you may find it still in there and you can Recover it. If the bin has already been emptied, go to Tools > Recover Deleted Items from – you may find your item in here. Highlight the relevant item and press restore – this will restore your deleted item.
How many attachments can I send with my email message?
here is no maximum number of attachments you can send at any one time as long as the maximum total in size is 10MB or less.
Setting up email on an android device
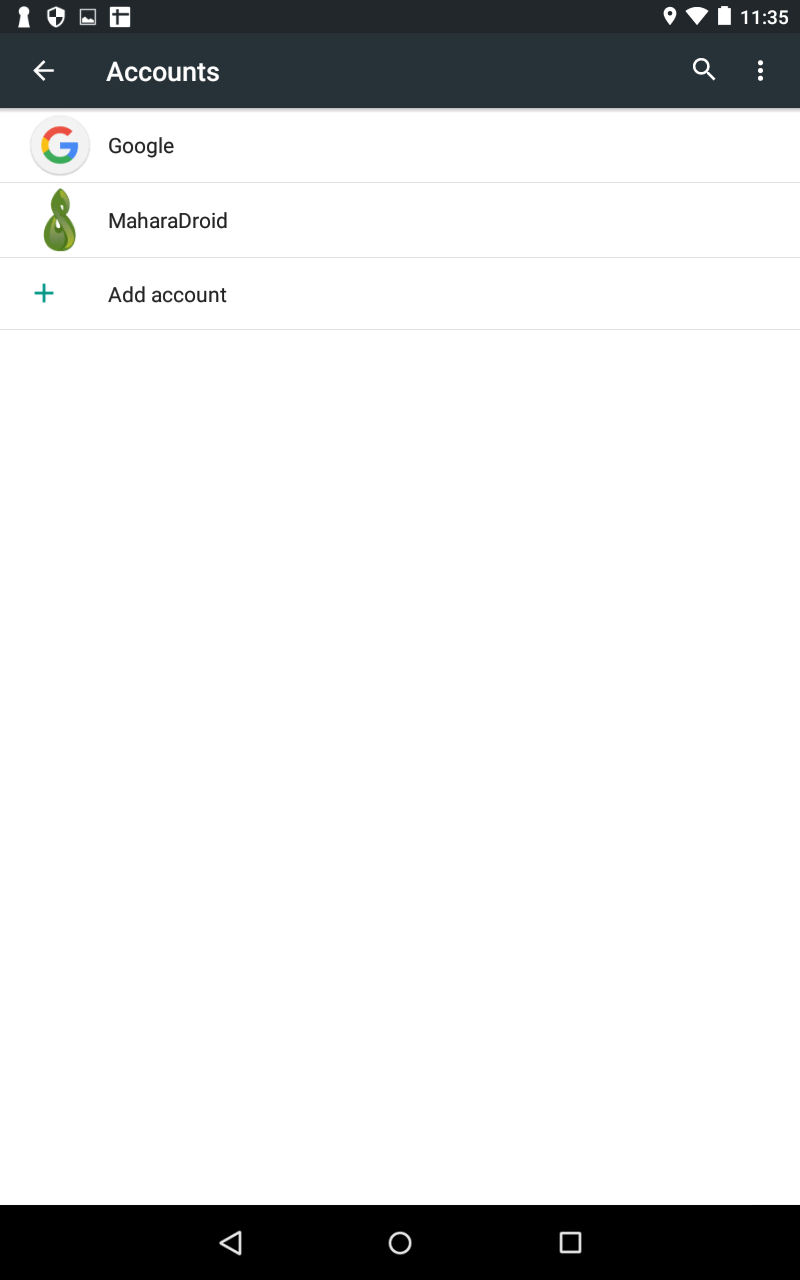
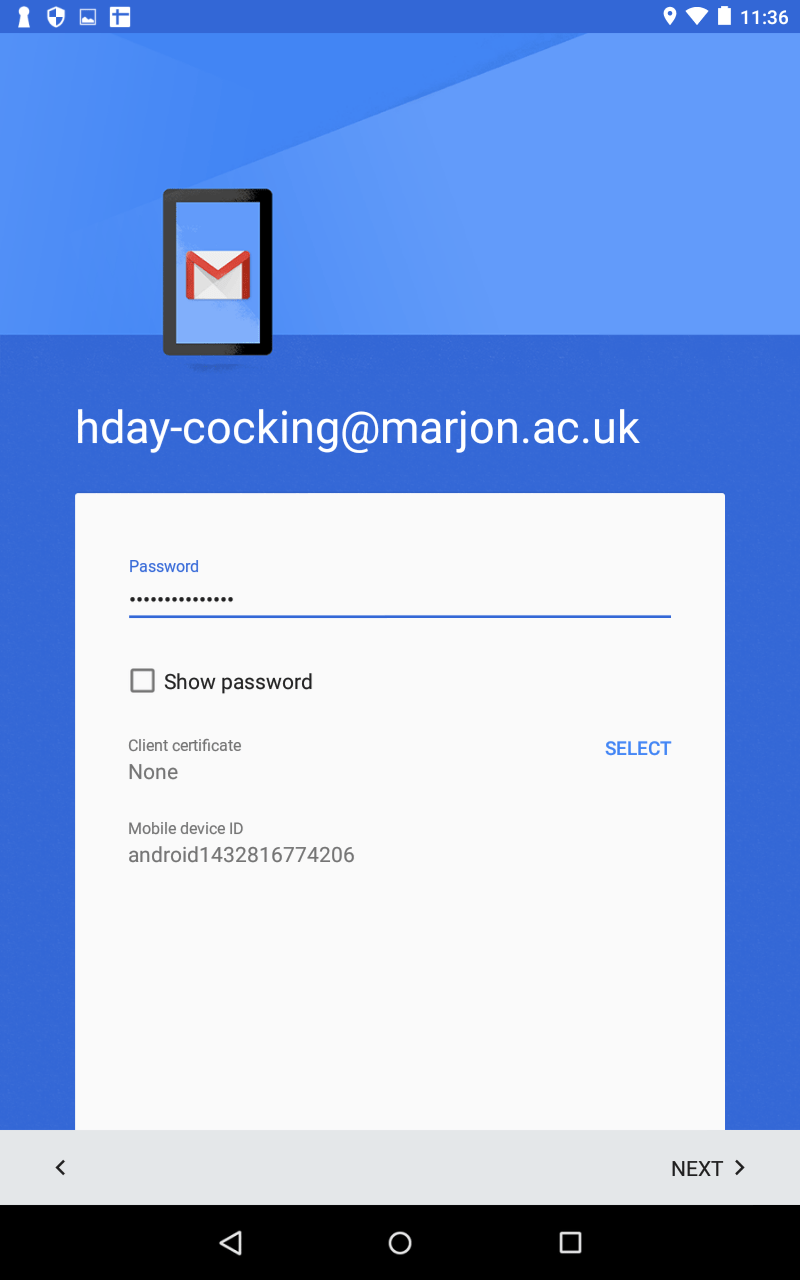
1. Go to the Settings option and select Add Account
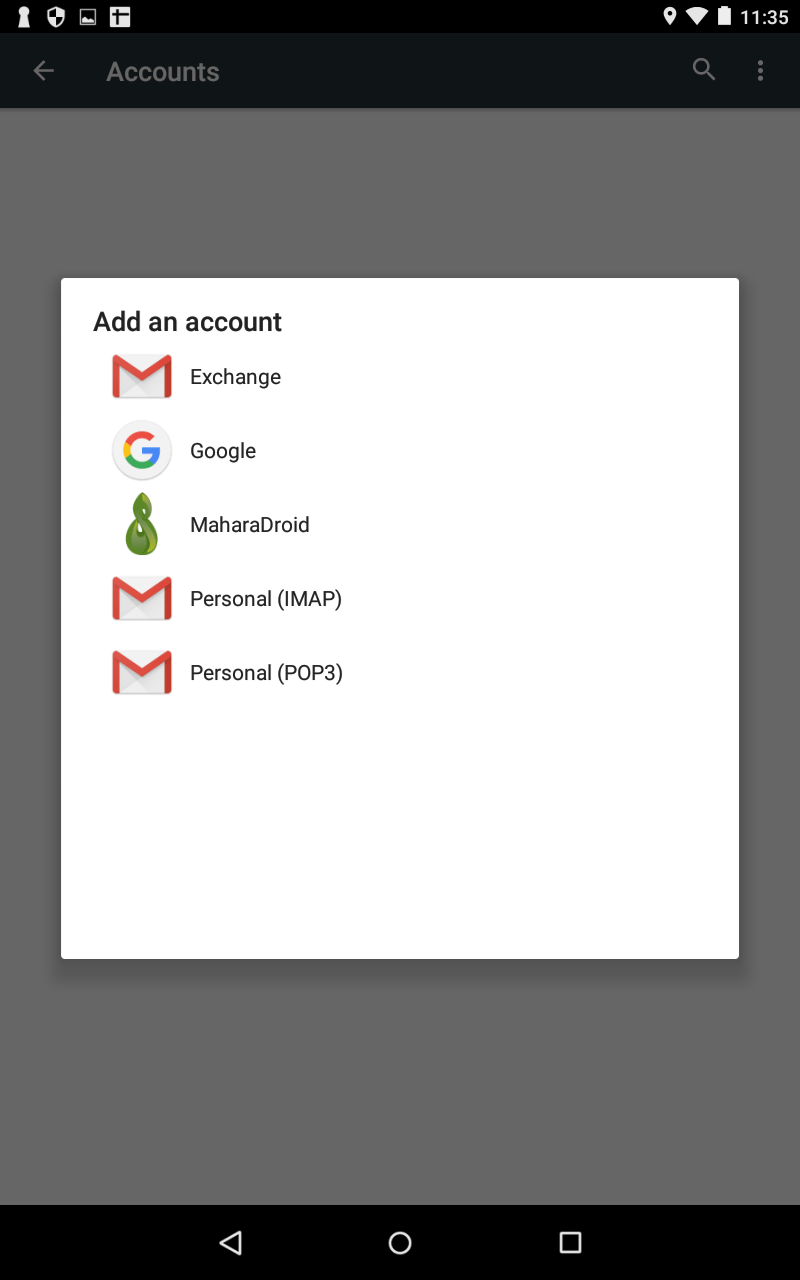
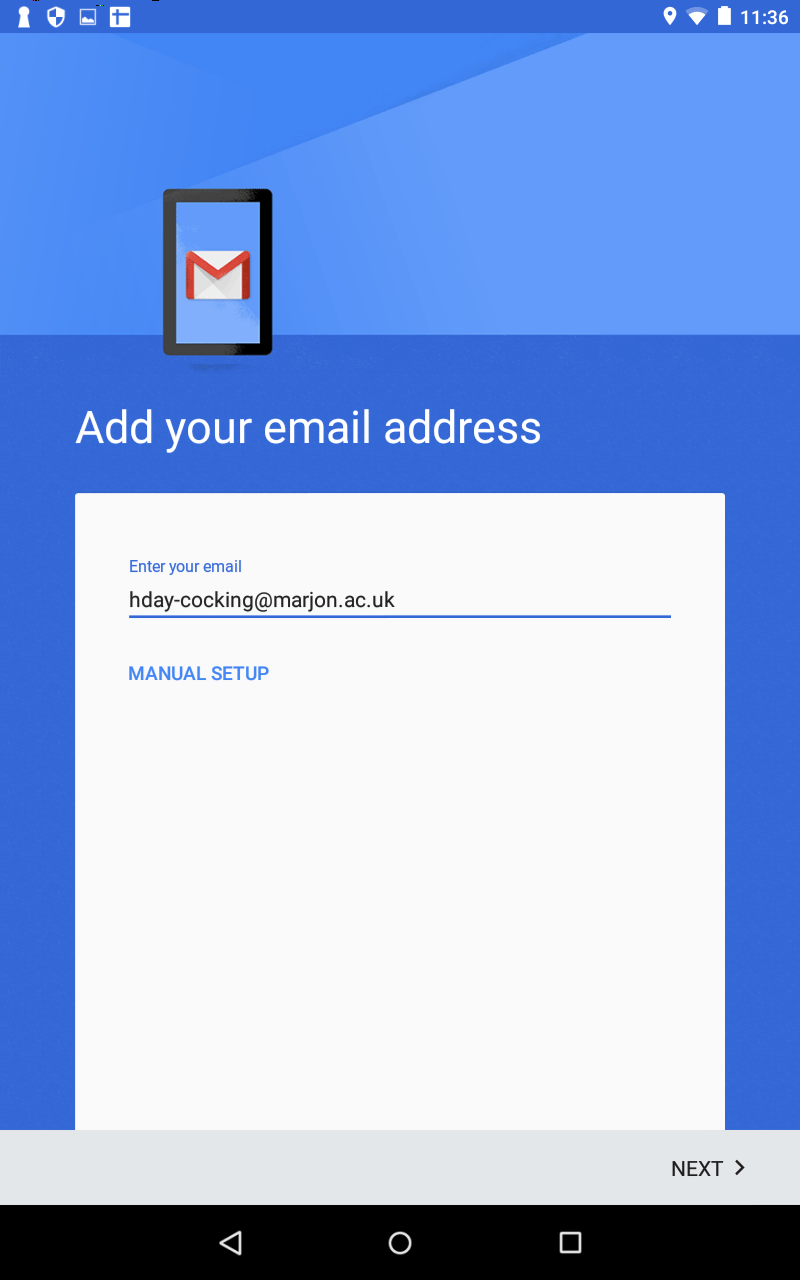
2. Select Exchange and enter your email address before selecting ‘Manual Setup’
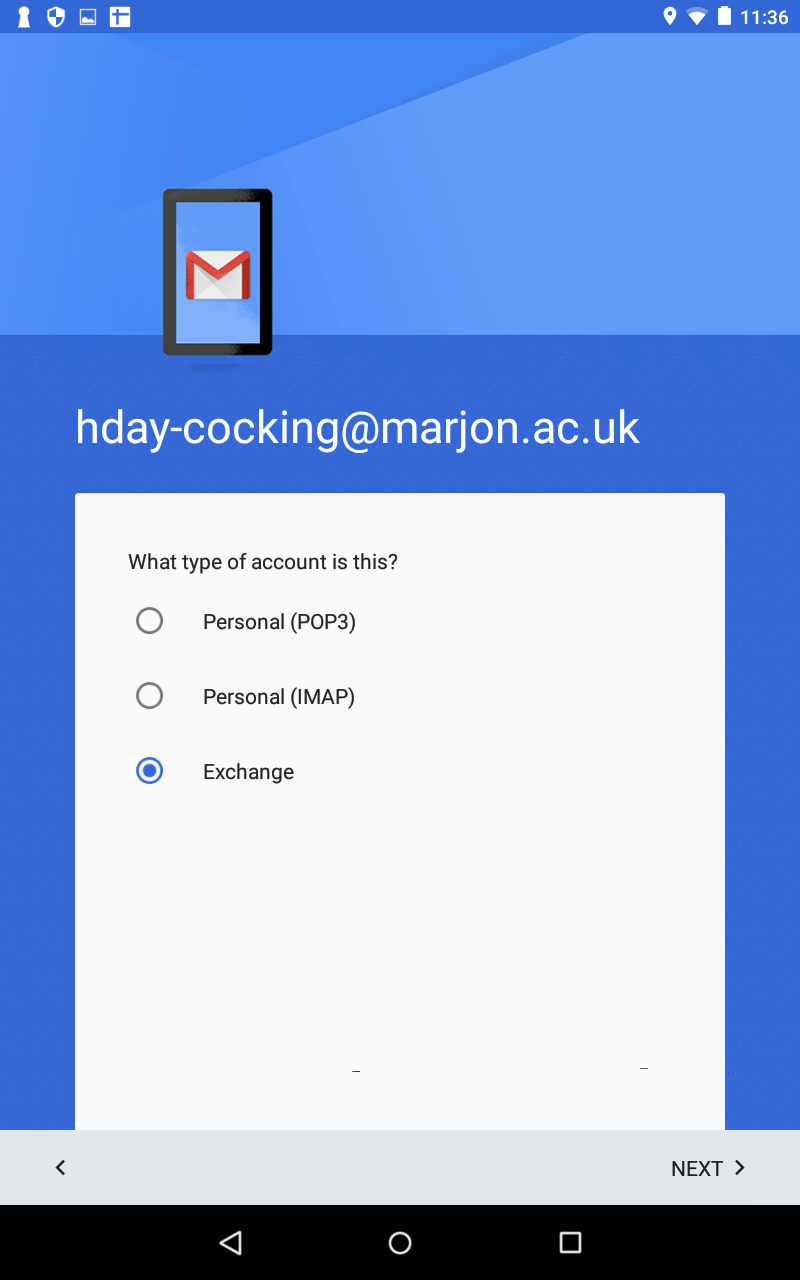
3. Select Exchange as the account type and enter your password
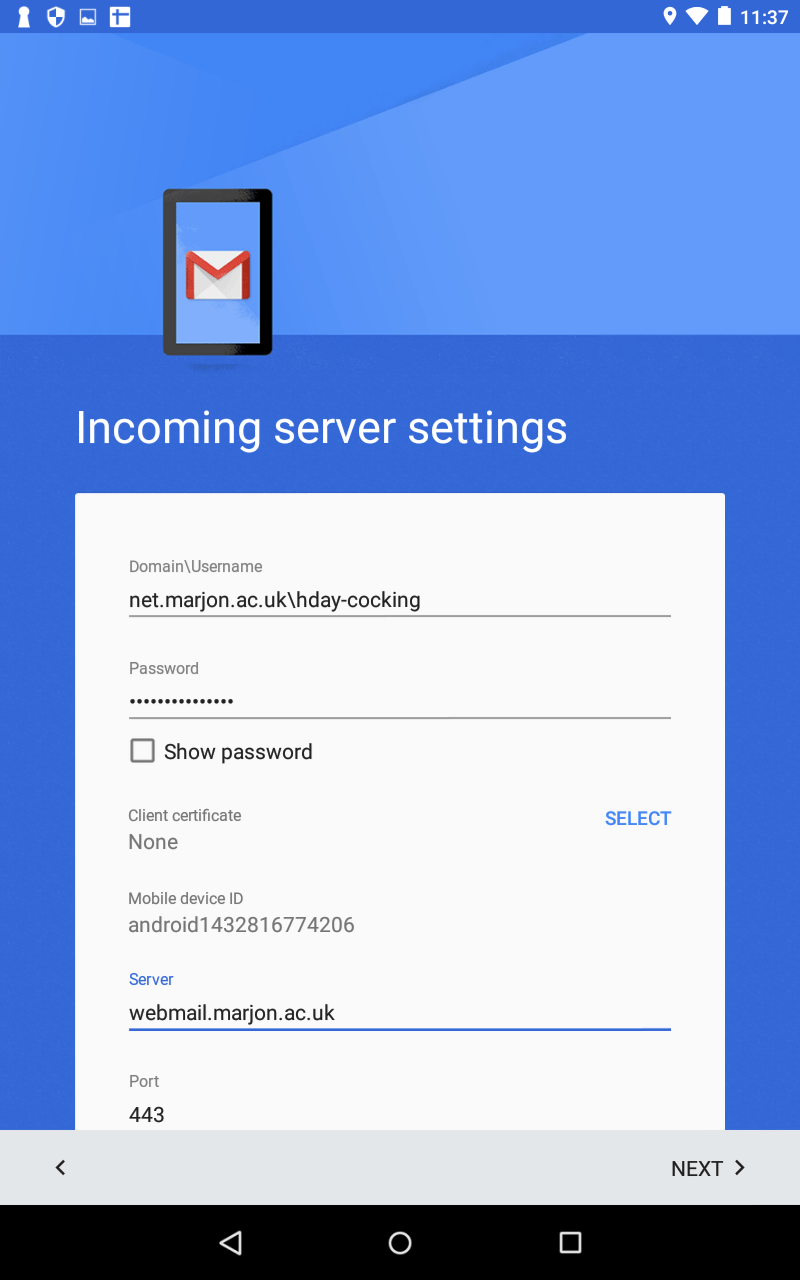
4. On the next screen there will be details relating to the domain and server. You will need to edit/remove the information already shown and replace with:
Domain\Username: net.marjon.ac.uk\StudentID or Username
Password: This will already be filled in but should contain your normal password
Server: webmail.marjon.ac.uk
Leave the rest of the details as they are.
(If you are having issues due to the change over of the email server see the bottom of this post)
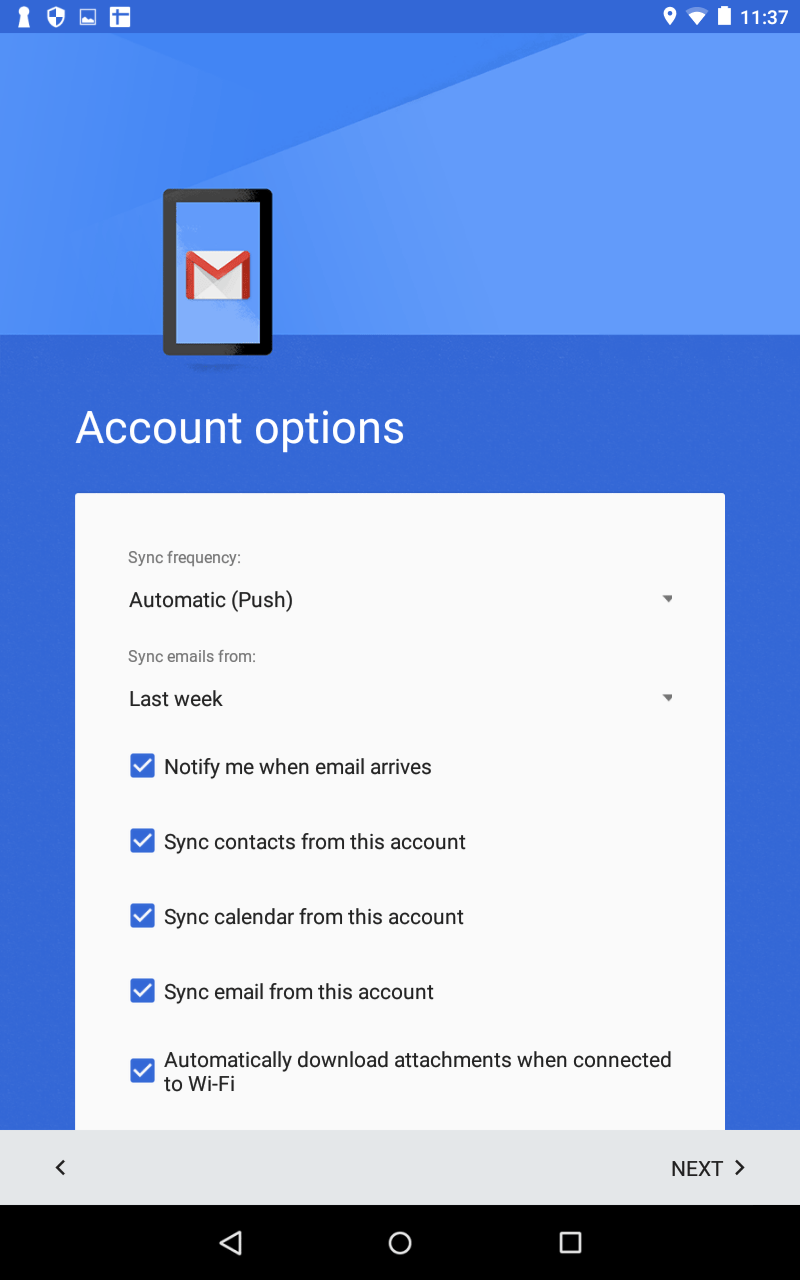
5. Click on Next
6. Select Next.
Setting up email on iPhones and iPad
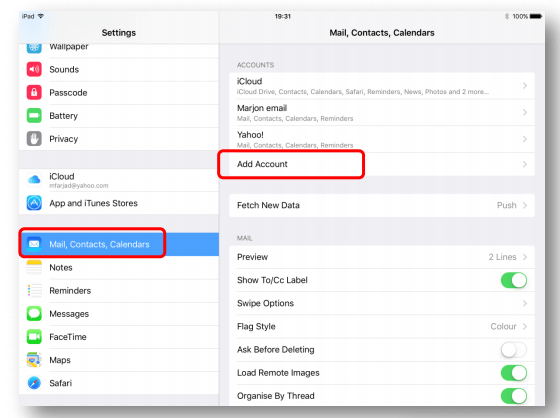
1. Go to the Settings option and select the Mail, Contacts and Calendars section: Select the option to Add Account.
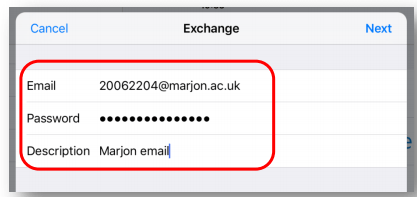
2. Select Exchange and enter your details: Click on Next
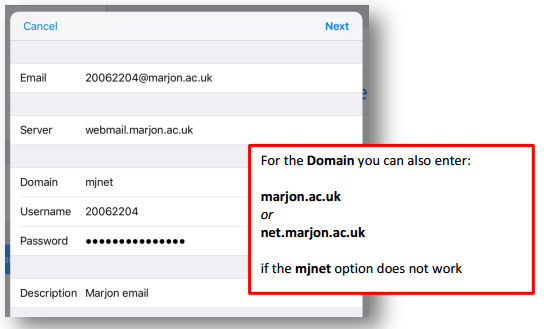
3. Complete the details for the Server and the Domain – making sure that all the other details are also correct as shown below.
4. Select Next
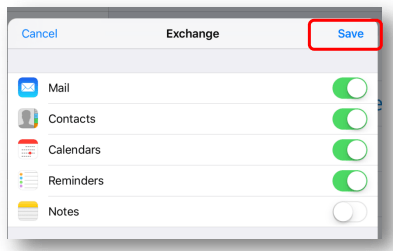
5. Select the items you want to sync – if you select the Contacts you will have access to the Marjon Global Address Book (students and staff) and if you select Calendars you will have access to your Marjon Outlook Calendar.
If you get an option to select a time limit to sync select the option to sync as regularly as possible.
If you can’t see a Sync option, don’t worry and go to the next section.
Don’t forget to Save.
If the sync option was not available – return to the Settings and select Mail, Contacts, Calendars. Select the Marjon email account and change the Mail Days to Sync option to the lowest option available.
Check your Outlook Time Zone – Office 365
It is important to check that the Outlook time zone is set to UK time, otherwise you may accidentally make an appointment for a random time such as midnight!
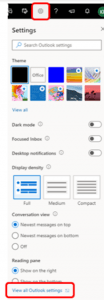
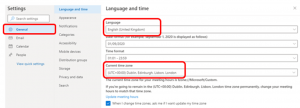
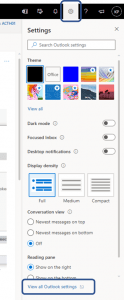
To check your Outlook time zone, go to the Settings icon located on the top right of the screen and select View all Outlook settings at the bottom of the page
Select Language and time from the General section and check that the language is English and the time zone is set to London. Don’t forget to Save the changes.
Forum post notification emails not coming through?
Why are forum notification emails not arriving in my inbox?
When you are enrolled on a Marjon Canvas course, you should receive an email notification each time a member of staff posts to to the News or Announcements forum.
If you aren’t receiving email notifications then the most likely cause is that your Outlook account has blocked the ‘no-reply’ emails pushed out by LearningSpace.
What can I do to resolve the issue?
To check if this is the case and to resolve the issue, please follow the guidance below:
1. Login to webmail with your Marjon username/password – (access from the staff and students link at the bottom of the Marjon homepage, login to Office 365 or enter https://webmail.marjon.ac.uk into your browser)
2. Click the settings icon (top right)

3. Click View all Outlook settings (bottom right)

4. Click Email then Junk email

5. Look at the Blocked senders and domains section
6. If noreply@marjon.ac.uk is listed, click the trash icon to remove it from the list

7. Then click Save

How to Set Automatic Replies in Outlook 365 Web Version
To set automatic replies in Outlook web version, follow these easy steps:
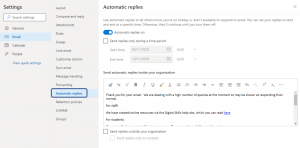
Within your inbox go to settings and click ‘View all Outlook settings’
Select ‘Automatic replies’
Ensure ‘Automatic replies’ is turned on and insert text
NB: The default is to ‘Send automatic replies inside your organisation’. To send outside your organisation check the ‘Send replies outside your organisation’ box and insert text.
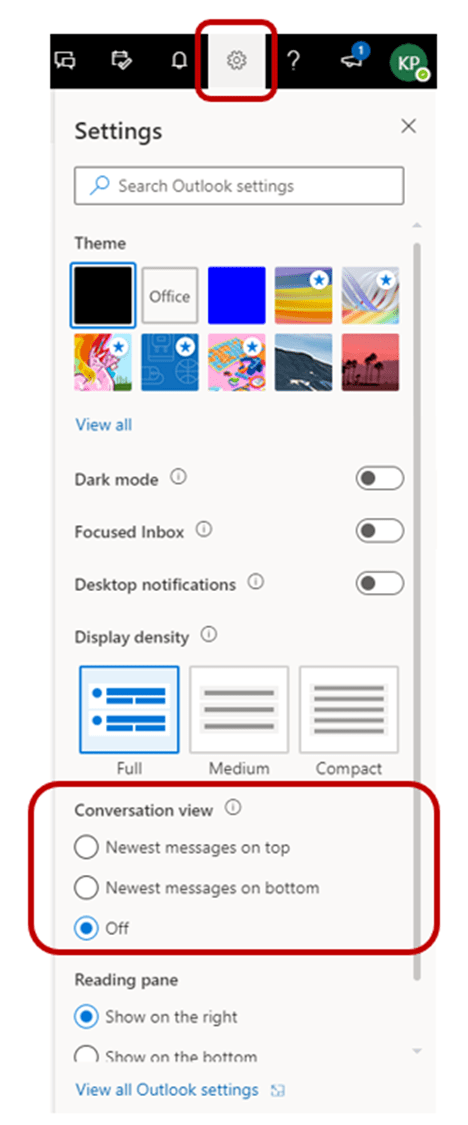
How to disable Conversation View in Outlook Office 365
Wi-Fi
Accessing Wi-Fi
What is the network name for Wi-Fi?
Wireless internet access is available across the campus and you can connect most devices such as laptops, tablets and smartphones. Search for MarjonWifi from the list of available networks.
How do I connect to the Wi-Fi?
Access the internet and wait for the log in prompt screen to appear. This is to confirm that you are Marjon student or staff. Log in using your network username and password. Remember to tick in the box to accept the terms of use.
Will it remember my login details?
Yes – it will remember you. This network will ask you authenticate with username and password, but unlike the mjcampus (the old wifi which was removed in April 2016) it will remember your device connection on the network. This will mean you will be requested to logon to the wireless a lot less frequently. You will have to remind the system who you are, for example if you return to campus after being off-site for a week.
Faster Connections
We have upgraded the links in the majority of access points to connect at speeds ten times faster than before. Previously access points used 100 Mbit/s connections, now these are using 1 Gbit/s for greater speed.
More Coverage
We have added more Access Points (AP). These are the devices that look like smoke alarms you will see all over campus. Additionally, we are able to monitor the areas that get the most wireless usage have been actively building up the number of APs around the buildings. If there is somewhere you work and find coverage is not as good as other places; let us know, and bound by the laws of physics, we will look to improve what we can.
High density wireless technology
APs in larger rooms have additional capacity for more devices to be connected at higher speeds. Modern mobile phones with 802.11ac technology can use multiple radio connection to the access point for greater speed.
Consoles and TVs
Additionally, the MarjonWifi network can be told to understand those devices that have been difficult to connect to the wireless. Traditionally gaming devices and TVs do not recognise the standard process of using a browser to ask for authentication details, so do not request this information, and are unable to connect. If you have one of these devices, let us know the MAC address and we can teach the system to accept your device. Please contact the helpdesk for more information.
Problems connecting to the Wi-Fi
We request that students do not use Wi-Fi hotpots on their smartphones while on the campus as this can interfere with our Wi-Fi access points, degrading the service for other students. You should also ensure your device has an up-to-date and active anti-virus / spyware package, to help us reduce issues with the network. If you experience any problems connecting your device to the Wi-Fi, please contact Computing & Media Services for some additional support.
Cloud Storage
Drives – Access your files from from anywhere
Drives allows you to access all your files no matter where they are and makes them accessible from one simple interface. So if you want to access files on your N: drive or One Drive etc., you can use Drives to access them whether you are on campus or off-site.
Access your drives
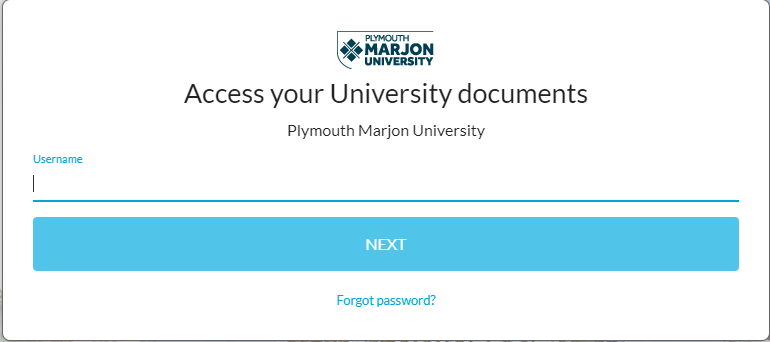
1. Open your browser and enter: drives.marjon.ac.uk
2. Enter your username, click next and enter your password to login to Drives
Access your files
3. You will see a link to your N drive and any existing cloud service drives that you have set up with your Marjon account
4. To access files click a drive – e.g. Home [N drive] and navigate to the file you want

View or download a file
5. Click the file you want
6. Then click view or download

Upload a file
7. Navigate to the folder you want to upload to
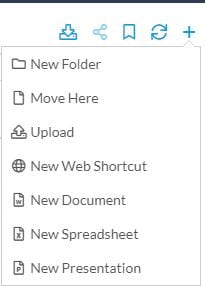
8. Click the + icon
9. Click upload

10. Navigate to and select the file you want to upload
11. Click Open
SharePoint/OneDrive document access & embedding
[Note: some of the guidance here may not align with classroom laptops depending on whether these systems have the latest updates, if you have any concerns please contact Computing Services]
Access to documents and permissions can often be a little confusing when you need to share a document from OneDrive or a SharePoint space. This guide has been written to try and help explain access and how you can make it work for a number of possibilities.
In terms of module Teams any files added to a module team and indeed any recordings will be saved to the module team SharePoint space.
Any documents you upload or create online in the cloud are saved to your own personal OneDrive space.
OneDrive
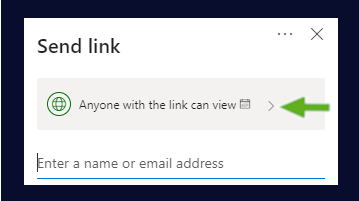
Any document or presentation created in the cloud via www.office.com will be saved into your personal OneDrive space. By default the sharing options for any OneDrive document will display as ‘anyone with the link can view’. If you need to setup specific access to documents created or uploaded to your personal OneDrive space then you will need to change the access permissions. This could be if you need to collaborate with colleagues an co-create documents.
1. Go to www.office.com
2. Go to OneDrive
3. Find the document that you want to share with colleagues and select the three dots
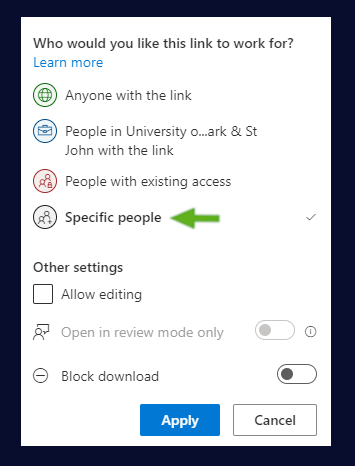
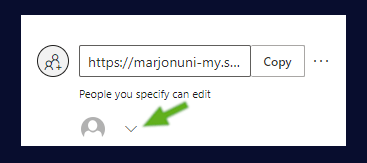
4. Click on ‘Share’ > Then select the permissions bar as below and chose ‘Specific Access’
Note: If you want your colleagues to be able to co-collaborate then check the box ‘Allow editing’
5. When you are ready click on ‘Apply’
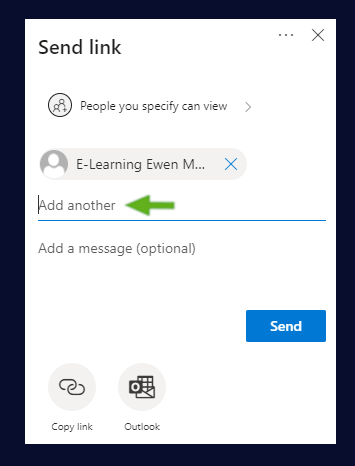
6. Enter the email address for the person you wish to share the document with and repeat this to add in further colleagues. Then click on ‘Send’ (include a description, if you wish to add a message)
7. Your colleagues should receive an email notification with a link to the online document
Tip:
If you select the three dots and click on ‘Manage access’ against any OneDrive files – you can see who has direct access.
Module Teams
In terms of module teams, any files added to a module team will be uploaded to the module SharePoint site. All students listed as members of the module team will have access to any files uploaded to the team, plus recordings made.
We recommend uploading any additional files, such as presentations and Word documents to the ‘Files’ area for the module team rather than using your personal OneDrive space. This is because if you use your personal OneDrive space, you will need to add individual access permission to students.
Uploading files to your module team
1. Visit your module team in Teams
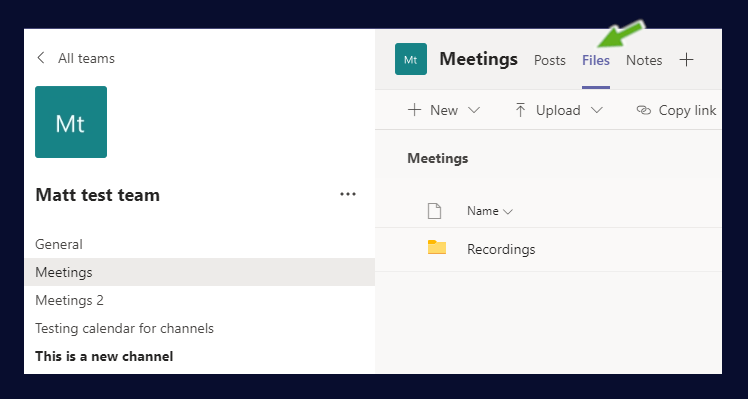
2. Visit the ‘Files’ tab at the top (or any other appropriate channel where you wish to add your files)
3. You can create folders by using the ‘+ New’ drop-down menu – or simply upload your files to the space by selecting the ‘Upload’ option
The above method is quicker and more efficient if you have documents that you want only those students on the module to be able to have access.
Watch a video to learn how
Embedding documents from the cloud
If you wish, you can embed documents from you OneDrive space, follow the steps below to learn how.
1. When viewing the live document select ‘File’ > ‘Share’ > ‘Embed’
2. Copy the Embed code and paste this into the code view area within any LearningSpace topic using the editor
Watch a video tutorial to see how
Remote Working Guidance
Accessing IT resources remotely
Should the need arise you are able to connect to some IT resources from home, from a non-Marjon supplied laptop, PC or tablet. *(if you have a Marjon supplied laptop, please read to the bottom)
If your own device does not have the office applications installed then you can download them from www.Office.com using your Marjon login details. If you are unable to install the software you can utilise Word, Powerpoint and Excel in the web browser.
For both Email and Drives you will need to log in using your normal username and password:
Email – access to your email and any shared email
Open this link in your web browser: https://webmail.marjon.ac.uk
(If it doesn’t work please try https://outlook.office365.com/owa/marjon.ac.uk)
Drives – will give you access to shared folders on the network (including your N: Drive):
Open this link in your web browser: https://drives.marjon.ac.uk/home/files?no_krb5=1
If you do have a laptop supplied by us it may be worth testing you can connect to the VPN from home. This requires a small application install (NetExtender) Please read the information online to find out how to install the app. (plus you may need to get your university laptop unfrozen if you need to install any programs)
If you are member of teaching staff, you are able to access Marjon Canvas as normal off campus. If you are required to record teaching content whilst off-campus, you are able to download the Panopto Desktop recorder or use the Web browser.
If you are using Microsoft Teams, you are able to make internal to internal calls to colleagues. (This can be done via your laptop (or PC with a microphone), but is easier to do if the app is installed on a mobile phone)
To do this: open the Teams app, find the person you want to call and press the phone icon.
For more detail follow the guidance available which shows how to call from the computer or app
There are further guides available on this site.
Accessing emails
To access your email off-campus you can do this via LearningSpace, through the Marjon website or via your Office 365 account online.
1. Head to the main website > Click on ‘Staff’ or ‘Current students’ on the top right of the page (accept any privacy messages)
2. Click on ‘Email’
Office 365:
1. Visit your online Office 365 account via: https://www.office.com/ > Sign in to your account (using your standard credentials)
2. Click on the icon for ‘Outlook’
Via your mobile device:
1. If you have the Marjon mobile app, login to the app and select ‘Marjon mail’
2. If you don’t have the app head to your browser and type in: https://webmail.marjon.ac.uk
Required skills to work remotely
Required skills to work remotely
If you need to work off-campus or at home the information and guidance below will help you to do so and provide you with guidance on how to do this effectively. The following skills have been identified as skills that may be required to work at home.
* Ability to access emails off campus
* Ability to access files/upload/edit files remotely
* Ability to use Microsoft Teams (please see Teams training section)
* Ability to setup out of office reply on emails
* Ability to install software e.g Office applications and Panopto recorder
* Ability to connect via the VPN
* Ability to reset your password using the Password Reset Manager
Ability to access files/upload/edit files remotely
To access you N: drive off campus you can use Drives, which will enable you to access your files in the browser.
1. Go to LearningSpace > Click on the ‘Services’ menu and select ‘Drives’
2. You’ll need to enter you standard login and password to access Drives and if you’re logging in for the first time it will ask you to enter your password again.
3. When you have logged in, you’ll see a link to your N: Drive – this will show all the content, which you can access from home
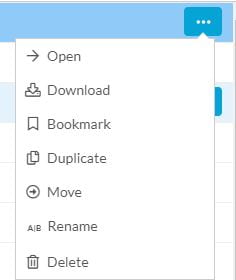
4. If you select a file, you’ll see a three-dot icon on the right-hand side – clicking on this will reveal further options, such as ‘download, open, rename’
5. You can also upload files from your computer at home and create folders by selecting the ‘+’ icon in the top right-hand side of the screen
note: Drives also works on a mobile device.
Editing files remotely
To access and edit files remotely you can do this through Drives – and then link to your Office 365 account, or simply go directly to Office 365.
To edit any file from your N: drive remotely in the browser, please follow these instructions:
1. From your Drives account click on the file you wish to edit
2. Select ‘Edit with Microsoft Office 365’
3. The document will open in Microsoft 365 (if you’ve not logged in, then you’ll need to) > You can then work on the document in your browser
Editing through Microsoft 365
1. Login to your Microsoft 365 account online (via www.office.com) > Enter the same login credentials you’d use for access to LearningSpace
2. You will see a number of Microsoft programs available to work from.
3. To use them, simply click on the icon – Create a new document, presentation or other document
Note that documents will save your work automatically and files will be stored into your OneDrive area for access.
Extensive support guidance can be found on the Microsoft website.
How to setup out of office reply on emails
To setup your out of office email replies whilst you are away on leave, please follow the below guidance:
1. In the desktop version of Outlook, go to ‘File’ then ‘Automatic Replies’
2. Switch the bullet from ‘Do not send automatic replies’ to ‘Send automatic replies’
3. Check the box for ‘Only send during this time range:’
4. Select the dates you are unavailable
5. Enter a message – we’d recommend that this is provided in a similar format to the below:
Thank you for your e-mail, I am currently on leave and unable to reply.
I will respond to your e-mail as soon as I can on my return to work or within 1 working day of my return to work. I will be back at work on the…
Enter any useful text here and include if there is a resource, support guide or platform that may be of use.
Include an alternative contact email or phone number for your colleagues or someone that could help in your absence.
6. Click on the other tab ‘Outside my organisation’ – repeat the same above message or tweak according to your needs.
7. Click on ‘OK’
Install Microsoft Office
1. To install Microsoft Office, login to your Office 365 account
2. Click on the ‘Install Office’ drop-down menu
3. Select the first option for Office 365 – this will activate a download
4. You’ll need to click on the bottom setup link, then say ‘yes’ and keep online during the installation process.
Install the Panopto recorder
1. To install the Panopto recorder head to LearningSpace and find a module page
2. On the Reply block you’ll see a download option for either Mac or PC, click on the system you need.
3. This will start the program download (will appear at the bottom of your browser)
4. Once it has downloaded, click on it to start the installation process.
5. Reboot your machine to complete the installation process
Running a live webcast from Panopto
If you’d like to run a live lecture remotely – you can by setting up a live webcast.
Follow the guidance from our live webcast post to learn more. – ADD LINK LATER
Follow the guidance on how to edit a capture. ADD LINK LATER
VPN & Netextender
To access the VPN go to www.marjon.ac.uk
1. Scroll to the bottom of the page > accept the privacy message
2. Click on ‘Staff and students’
3. Select VPN access > Login with your Marjon credentials (ensure MJNET is selected)
4. Click on Netextender
5. Select Download > Install the SMA connect agent
6. When the agent has installed, click on ‘installed’ > Then select ‘open SonicWall SMA connect agent’
To remote connect to your work computer, please follow the guidance.
Follow the tutorial video below to see how to access the VPN.
