How to start LPM
The Lynx Pro Meeting software gives added functionality to the Clevertouch screens, including allowing you to make annotations, take screenshots, use onscreen PowerPoint controls all of which will be shown on the repeater screens within the room. The following short guides and videos will gives you an introduction into the main features of the Lynx Pro Meeting software. Use the links below to jump to specific parts of this guide.
If for any reason the software is not already installed on the teaching room computer it can be found at the following location : M: Public > MJNET > Teaching Room > Clevertouch > LynxProMeetingSetup. If you unsure about this then please contact computer services.
Once the software is installed you can run it by simply double clicking the icon on the desktop. This will take you to the LPM workspace area, this is where you can make notes, edit images and use built in backgrounds and forms.
Drawing on the desktop
Once you have opened the program you can return to the desktop or whatever is being shown on your computer by pressing the  button. This will allow you to use the tools available through Lynx Pro Meeting with what you are showing on your computer. Any annotations made while on your computer will be shown on the repeater screens in the teaching room.
To start using the drawing tool click on the pencil tool  . This will open the pen tool and you can make annotations by using either your finger or the screen pen to draw. You can change the colour of the pen by pressing on the pencil icon again. This will allow you to choose a colour from the 3 set by default.
Taking a screenshot
There are 3 different types of screenshot you can take, each of these will record what it shown on your screen and put it into the LPM workspace for you to view and edit. You can choose to take a screenshot of the whole screen, a rectangle portion of the screen or a freehand selected part of the screen using the buttons below.

Once you have taken a screenshot you can use the tools available in the workspace to zoom, scale and edit the image and also save it.
Drawing on the workspace
There are various ways to use the drawing tools within the workspace area. By selecting the pen tool or nightpen  you can draw freehand on the workspace. You can also use the palette
  options to change the colour of the pen.
Deleting drawing/clearing slide
There are 3 options within the rubber menu.
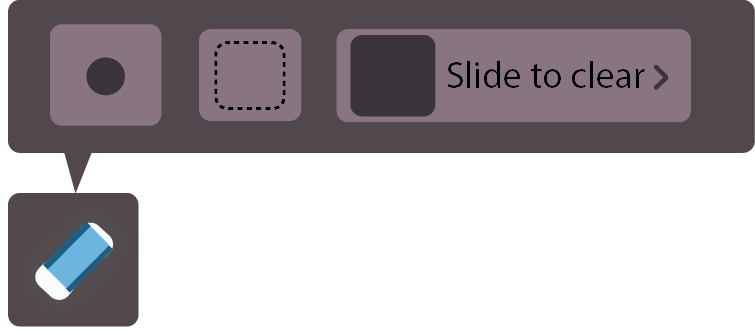
You can choose to use the select rubber tool, this will allow you to press to select which bit of the drawing to delete. The box select tool will allow you to circle the area you want deleted and the slide to clear tool will clear all of the drawings on the slide. You can also rub out sections of your choice by using your full hand on the board.
Adding a new page
The workspace can have multiple pages for you to work on. You use the extra options in the toolbar to add, remove and navigate through the pages. To add a page use the add button  .
.
Adding tools to the toolbar
There are extra tools that you can choose to add to the toolbar in the workspace. This can extend what you are able to do within the workspace. You can add extra tools by dragging to extend the toolbar and select up to 10 of the options.
Using the text tool - keyboard and freewrite
There are 2 different ways to add text using LPM, available from the text tool menu.

Using the type tool you can use the inbuilt onscreen keyboard to type text directly into the box. You can use this option to change the colour, font and size of the text. Once you have added any text you can move, rotate and scale the text.
The other option for adding text is the freehand tool. This tool will convert any words written by dragging your fingers on the screen into text.
Using inbuilt forms and backgrounds
There are various inbuilt backgrounds and forms that you can draw and type directly into in LPM. These can only be accessed within the workspace.
Using the pattern tool  you can open and add text to built in forms including a Venn diagram and a SWOT analysis chart.
Using the Background color tool you can change the background colour but also open built in backgrounds, including diagrams of various sports pitches, which can be annotated onto.
Saving images and workspace files
You can save any content within the workspace to open again or as images using the menu button  .
.
Using the powerpoint controls
When using powerpoint while running LPM you can use the same drawing tools as normal but also use the specific powerpoint controls to progress through your slides.
The whiteboard
Within the LPM software there is a whiteboard feature which can opened using the whiteboard button  and accessed at anytime using a virtual handle at the top of the screen.
The timer
There is a built in timer feature which you can set a time for and leave running while continuing with your session.
The calculator and calendar
There is a built in calculator which can be used to do simple on screen calculations. The results of these calculations will also be stored in the workspace. There is also a built in calendar.
Exiting LPM
You can choose to keep LMP running and minimise the controls or you can use the exit button to close the program.
