[Back to Student Training page]
Panopto may be used for video resources that are embedded into your Marjon Canvas module, it may also be used for your video assessment work.
Accessing Panopto recordings from Canvas
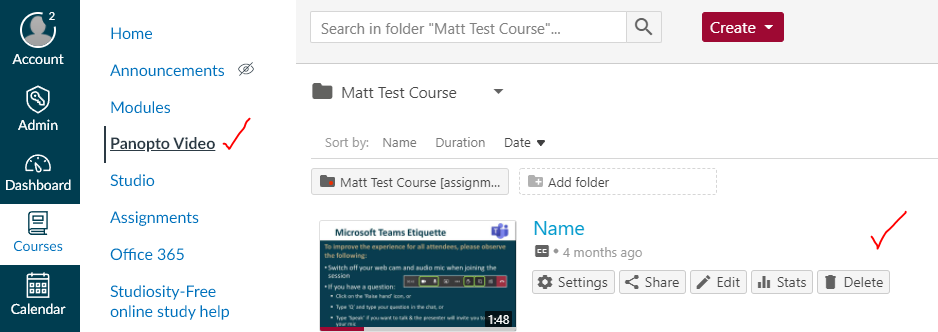
If your lecturer is using the Panopto space in your Marjon Canvas courses, then they will appear within the below area as highlighted in the screenshot:
If your Panopto recordings are not appearing in this space, please speak to your lecturer in the first instance.
Watch a video tutorial to learn more
Installing and using the Panopto mobile app
You can view recordings and lecture content from your mobile device using the Panopto app for Android and iOS.
This app allows you to view all the recordings in the modules that you are enrolled on. It also allows you to download recordings to view offline.
Panopto App
Go to the Panopto help page and view the video for further guidance.
Logging in
To download the Panopto app, go to the App store (iOS) or Play store (Android) on your device and search for Panopto
Click Install. Once it is installed click to open it

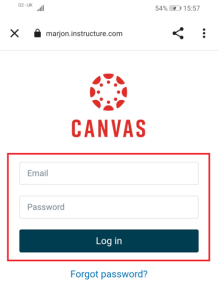
When you first open the app you need to enter the site URL to link to your Marjon account. Do not sign into Panopto
Click the three vertical dots in the top right-hand corner

To set your Panopto site, enter the following address: marjonuni.hosted.panopto.com


You will then be prompted to sign in with Canvas. Enter your Marjon email address and password and click the Log in button
Once you have signed in using your credentials, you will be taken to the app homepage
Navigating the app
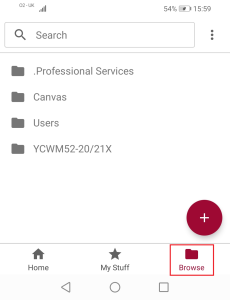
At the bottom of the app, you will see three icons corresponding to the three main sections: Home, My Stuff and Browse
Home
In Home, sections include:
Continue Watching: Videos you have started
What’s New: Videos that are new on the site
Click on any video to play it

My Stuff
In My Stuff, sections include:
Shared with Me: Videos that have been shared with you by others at Marjon
Recently Watched: Videos that you have recently watched, including those you may not have finished watching
Bookmarked: Your bookmarked videos, if you have created bookmarks while viewing
My Folder: Videos from your personal folder
Offline: Videos you have downloaded to watch offline in the app
The videos that appear on this tab relate directly to your activity on Panopto

In Browse, you can see all the top-level folders that you have access to
Click on a folder to open it. You will now be able to see all the videos in that folder

You can see any subfolders at the top of the page. Click on a subfolder name to navigate to that folder

Click on the arrow in the upper left-hand corner to go back to the parent folder

Searching videos
You can use Search at the top of the app to search through the video library

In the search bar, enter your search term

Panopto’s Smart Search Feature will search all recorded content and will look for specific videos, folders and content that match the keywords used
You can select the main search result for a video to play it from the beginning. Or you have the option to start playing the video at places where the search term appears
You can choose to view Content or Folders which include the keywords

Copying a video link
You can copy a link to a video if you need to send it to someone else
Click the three dots to the right of a video title

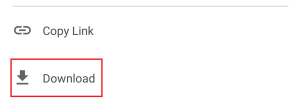
On the pop-up menu, select Copy Link to copy the direct link

Downloading a video for offline viewing
Click the three dots to the right of a video
On the pop-up menu, select Download
When the video has successfully downloaded a tick icon will display

Viewing a video offline
Select the menu icon My Stuff at the bottom of the app
Under Offline Videos, tap a video to view it

Deleting a downloaded video
In My Stuff, click the three dots to the right of a video

Select Delete from Downloads

Recording with Panopto
If your tutor has created a Panopto assignment folder for you to upload video or audio files to, you also have the option to record with Panopto from within the assignment folder. Watch the video, download the guide or follow onscreen instructions below to find out how to access, record, edit and upload to Panopto.
View/download: Recording with Panopto guide
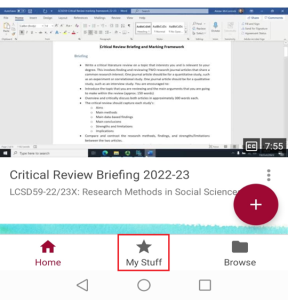
Access the Panopto assignment folder
- Open your Canvas course
- Click the Panopto Video link in the course navigation menu
- Click the Assignment folder to open
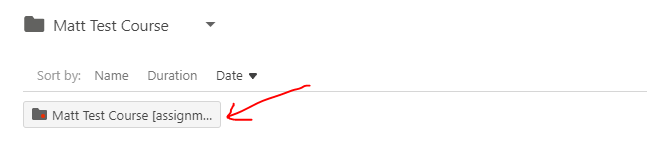
Note: The assignment folder will be located above lecture recordings. The name will vary (depending on what your tutor has named the folder) but if you hover over it you should see [assignments] at the end of the name – see student presentation videos in the screenshot example below:
Uploading video and audio files
- Follow steps 1 – 3 above
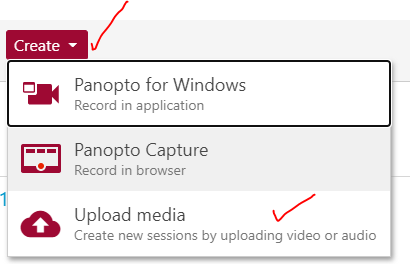
- Drag and drop your video/audio file into the space indicated or Click the Create button:

- Then drag and drop or click to locate the video/audio file on your computer:

Record with Panopto in browser (no installation required)
- Open the Panopto assignment folder
- Click the Create button and select ‘Panopto Capture – record in browser’

Video and Audio
- If you have a webcam this should be automatically selected to use for video and audio. If not or if you want to select different sources, click the relevant Audio and Video tabs and select from options available:

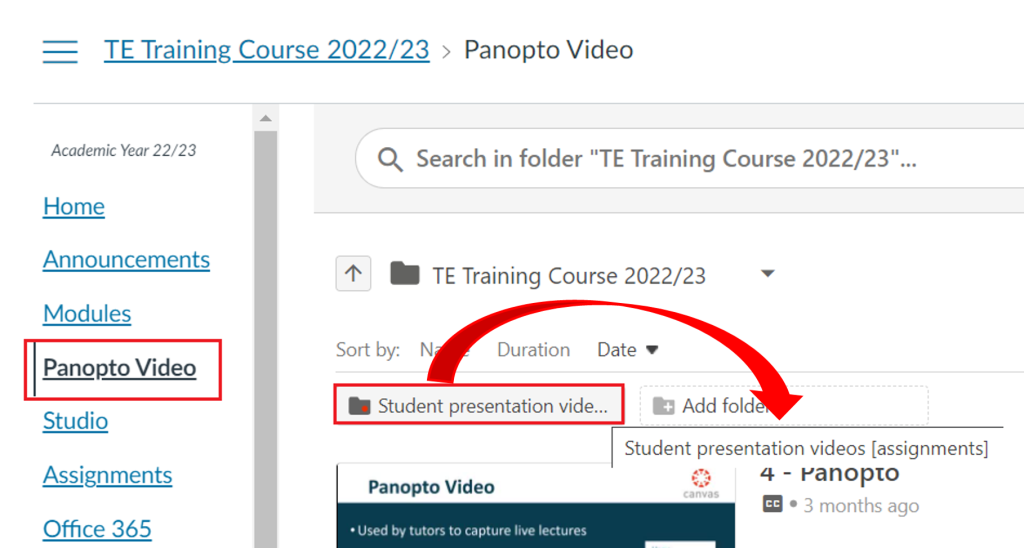
Recording Options
- Click the cog icon (bottom right)
![]()
- Select recording options – in the example below separate streams and picture in picture have been selected
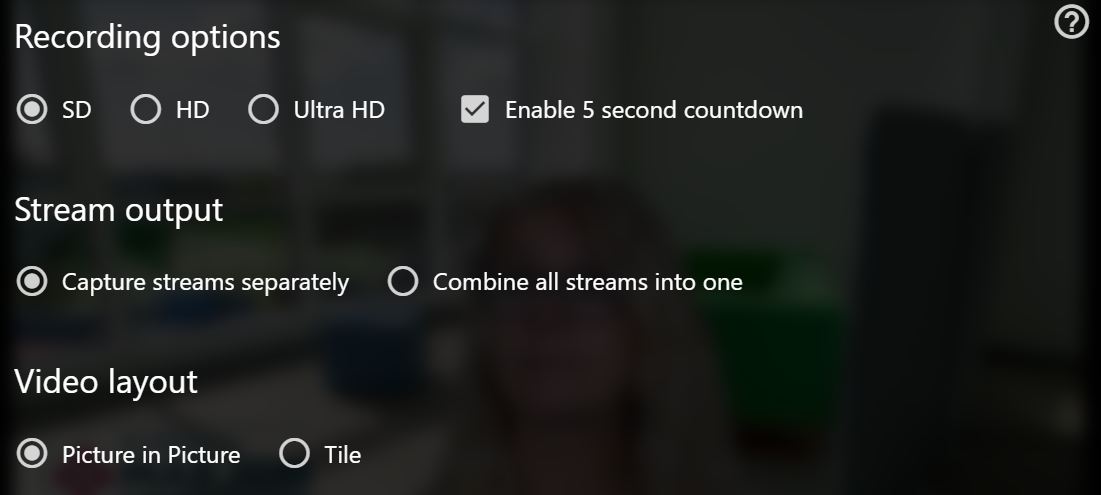
Background
- Scroll down to Background section (beneath recording options)
- From here you can upload a background image (Add custom background) or choose the ‘Blur’ option:
- Once selected, click the X icon to close
Sharing your screen and recording
- Click the Screens and Apps tab

- Select what you want to share: Entire Screen, Window or Chrome Tab
Entire screen has been selected in the example below (make sure to click onto the preview image to select). This is ideal for presentations and will continue to capture if you need to link out to another file or website etc.
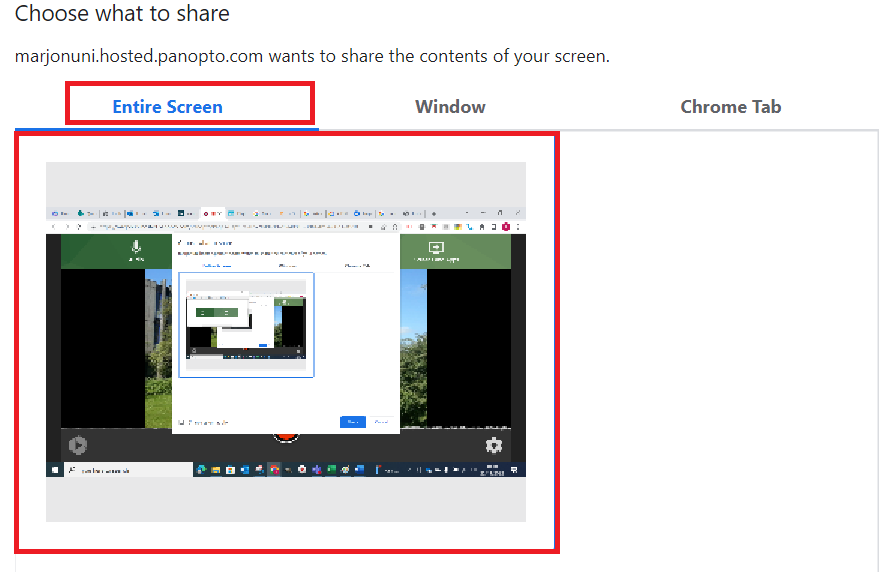
- Once selected, click Share
- Open what you want to be captured (e.g., presentation or webpage)
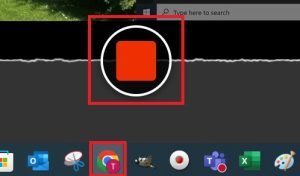
- Click the Red record button and click ‘hide’ to hide the Panopto sharing message – you will see a five second countdown until capture begins

- Put presentation into presenter mode and begin talking through your slides etc
- When you have finished, click the chrome icon in taskbar (bottom of screen), go to the Panopto tab and press the red icon to stop recording
Play back, record new or edit recording
Important! You need to leave the browser tab open while the recording uploads to the Panopto assignment folder to be processed.
When you stop the recording, you have options to play, edit, redo or start a new recording.
Play and rename your recording
- Click the play button to play back the recording. If you’re happy with it, enter a name for it and wait for the upload to complete.

- Check whether the recording has uploaded successfully by opening the Panopto assignment folder
- You will see your recording in the folder and can play it from there when processing is complete

Redo
Choose this option to delete the recording and start a new one:

Record New
Choose this option if you have another recording to make
Edit a recording
The edit tool allows you to cut out the beginning and end of a recording as well as sections in between these two points.
- Click the Edit button
- Then click the scissor (cut) icon – this will display a grey vertical line at the beginning and end of the recording in the timeline
- To cut the beginning and/or end of the recording, left click the relevant grey line and drag to the point in the timeline that you want to cut to:
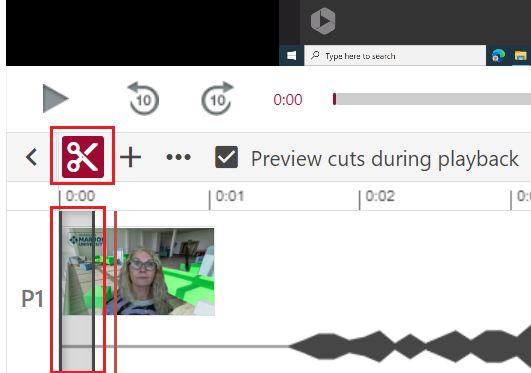
- To cut sections within the recording, click the play button and pause at the point you want to cut from
- Then left click and drag to the point that you want to cut to:
Note: The sections of the recording that you have cut will still be visible in the timeline, but will appear ‘greyed out’ and will not playback when saved
- Click Apply to save
Delete a recording
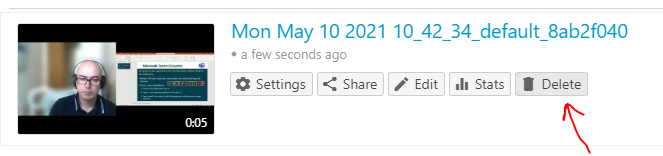
If you have more than one recording in the Panopto video folder, you will need to delete versions that aren’t to be assessed. To do this:
- Open the Panopto assignment folder, locate the recording and hover your mouse over it to reveal settings (share, edit, stats and delete) options
- Then click Delete:

Recording with PowerPoint
Canvas Studio
Canvas Studio is a great app to use to record presentation or poster videos. Recordings are easy to capture in Studio and can be downloaded as MP4 files which are suitable for submitting to Panopto.
Go to the Canvas Studio page to access the tutorial guide and video.
PowerPoint
Another option is to record your presentation or poster with narration in PowerPoint and then save as a video file. This method works well, but it can take a while for the video file to be generated.
1. Connect a headset with microphone to your laptop/PC
2. Open your completed PowerPoint
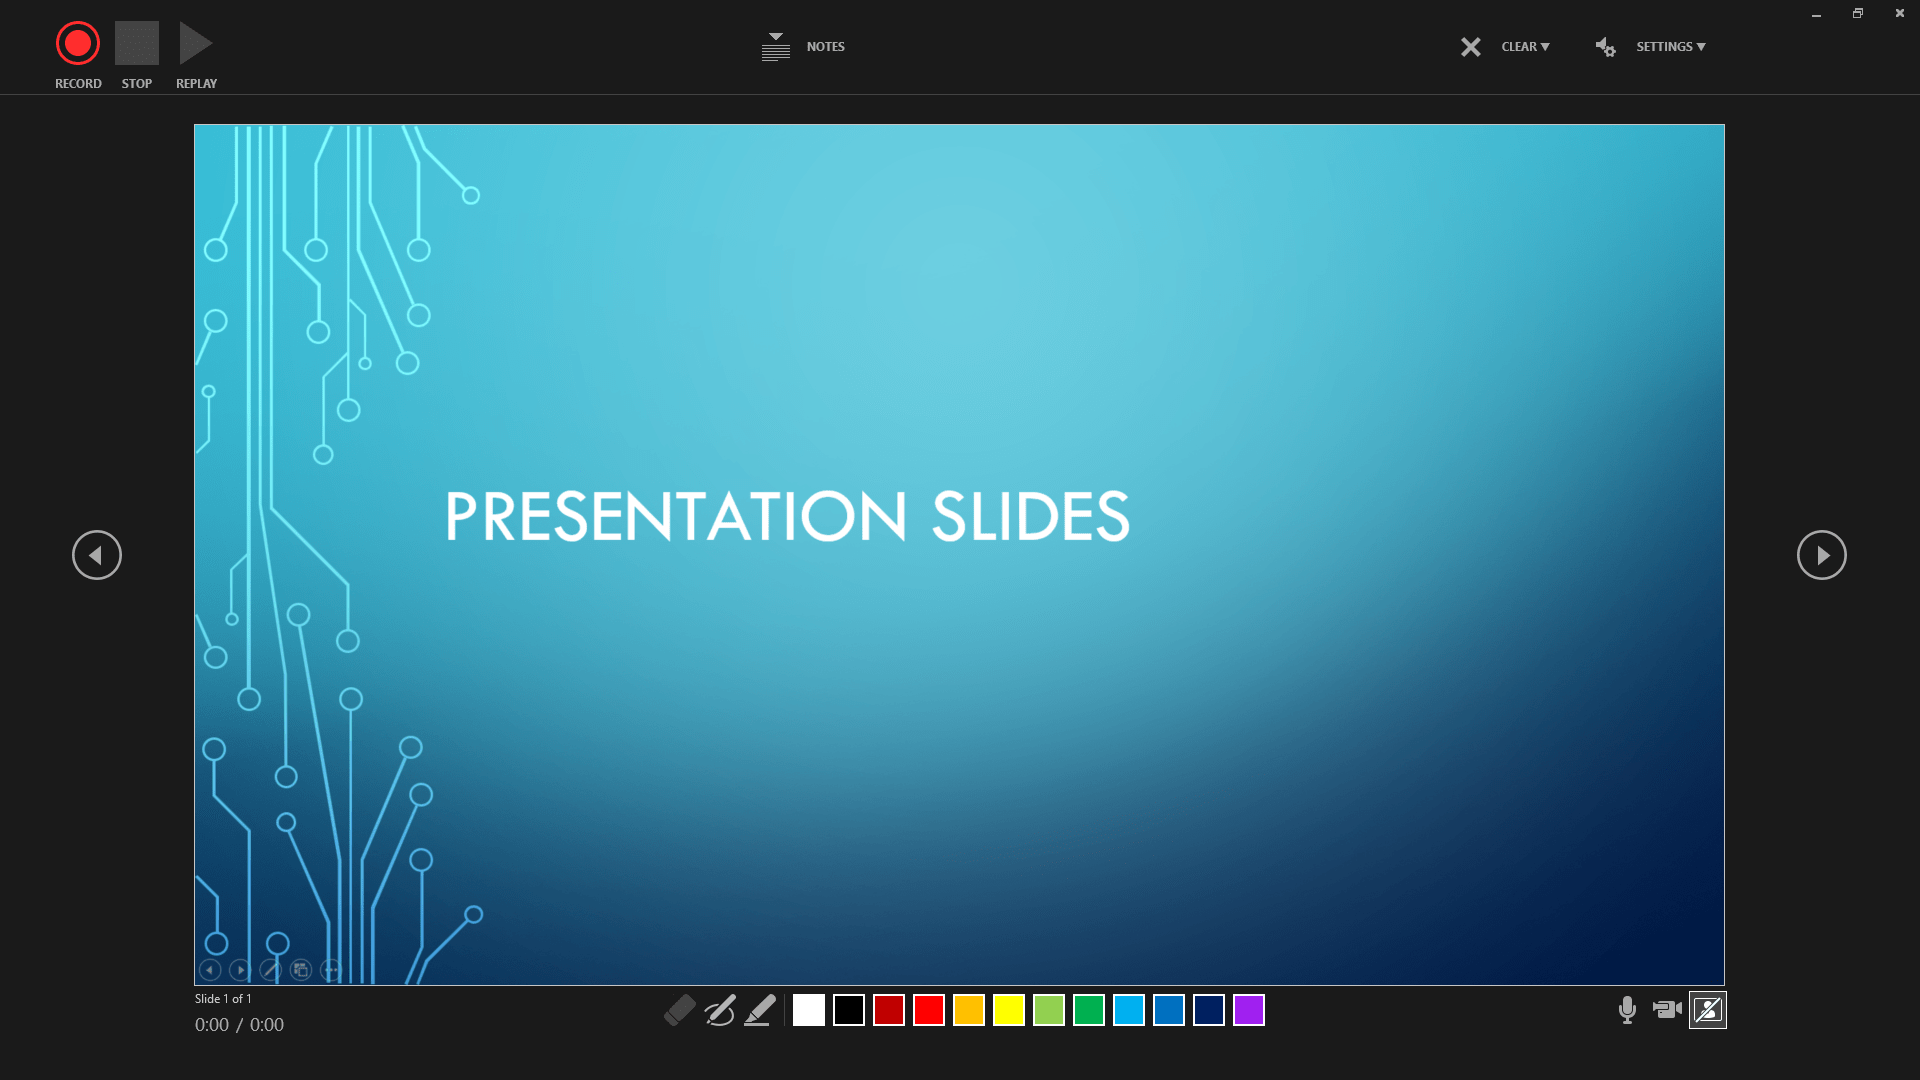
3. Click Slide Show – Record Slide Show – Click the downward arrow ‘Record Slide Show’ and select ‘Record from beginning’

4. A preview screen will appear as below
5. Select ‘Settings’ and check that your microphone headset is selected correctly and press the record button
6. If you wish you can capture your web camera, but disable the camera to stop capturing your web camera (note the avatar icon is just a preview of your camera, this will not stop your camera from recording)

7. Talk through the slides. If you have animations on the slide click to advance them
8. To go to the next slide, click the right-hand arrow to advance to the next slide
9. To pause the recording, just click on the ‘Record’ button and it will pause. Re-start the recording by pressing the record button again
10. When you have finished recording, simply click on the stop button
* When you have finished recording your presentation, you’ll notice a speaker icon on each slide that shows audio has been added
* When you click the speaker icon a play bar appears for you to playback your slide audio
* If you want to clear your narration and start again – go to Record Slide Show – Clear – and select from options to clear narration on current slide or all slides
* Play slide show from beginning will play slide show with narration
(If you are using Office 2016, after you have completed recording, just click on the X to exit the recording window. To playback, go to Slideshow > From Beginning. To clear narration or timings, go to ‘Record Slide Show > Clear
To see how to record video in an earlier version of Powerpoint 2016, there is a helpful video tutorial available on YouTube.
Note: If you need to upload your presentation to Panopto, you must save your recorded slides in a usable format, preferably .mp4
To save your presentation with narration as a video:
* Click File – Save as and select Windows Media Video (.mp4 or if not available .wmv)
* (If using Office 2016, go to File > Save as > Select the folder to save to and select .mp4 file type and save
* If using a Mac – please save as a .mov or .mp4 video format
Panopto - Acceptable video formats & how to convert video files
If you are recording a video to upload to a Panopto Assignment folder, Panopto will accept most common video formats including AVI, MP4, MPG, WMV, MOV, QT, ASF, 3GP, WMA, MP3 and M4V but there are some video formats that it won’t accept including MPV files.
If you are using a Mac or other iOS device and recordings are set to output MPV files, you may be able to change the settings or export your video as an M4V file. If you’re unable to do that you will need to convert your video to a M4V file so that you can upload it to Panopto. Watch the video, download the guide or follow onscreen instructions below to find out how to convert a video file using HandBrake:
View/Download: Acceptable file types & how to convert video files
Handbrake
![]()
Handbrake is a free application that can be used to convert most video formats including MPV files.
How to download and install Handbrake
There is information and a link to download Handbrake on the Marjon TELKit which can be accessed as follows:
- Go to MyMarjon
- Scroll down and click Student QuickLinks
- Click Marjon TELKit
- Select Handbrake
The page contains brief information about Handbrake, a video tutorial, a guide and a download link
- Click the ‘download Handbrake’ link
- Then go to you downloads folder, locate Handbrake and double click to launch
- Follow onscreen instructions to install Handbrake
How to convert video file to M4V format in Handbrake
- Open Handbrake
- Click ‘Open a single video file’ or drag and drop your video file in the area indicated

- Select MP4 as the output format and check ‘web optimised’ and ‘align A/V Start’ checkboxes
- Click browse and navigate to the location you want to save the file to, then enter a name for converted video

- Click the ‘Start Encode’ button

- A green bar will display to indicate progress as the video is encoded

- When the encoding has finished you will see a ‘Queue Finished’ status and will then be able to access the video from the folder you saved it to

Uploading a video or audio file to a Panopto Assignment folder for assessment
In addition to using Panopto (REPLAY) to record lectures, some tutors may request that you use Panopto as part of the assessment process, for example to upload a PowerPoint or poster presentation video or maybe an audio file. This short guide will take you through the steps required.
Note: Panopto will only accept video or audio files.
For more information see Video and Audio File formats accepted by Panopto
Uploading your video or audio file to a Panopto Assignment folder
1. Go to your relevant Marjon Canvas module course and click ‘Panopto Video’ in the course navigation
When the folder opens, you’ll see any recordings that your tutor has shared with you and above them you will see the assignment folder.
Note: Your tutor will have named the assignment folder so it will be different from the example shown below
2. Click into the assignment folder
3. This will open the relevant space
4. Click the ‘Create’ button and select ‘Upload media’
5. Then drag your video or audio file into the area indicated or click into the area to navigate and locate the file
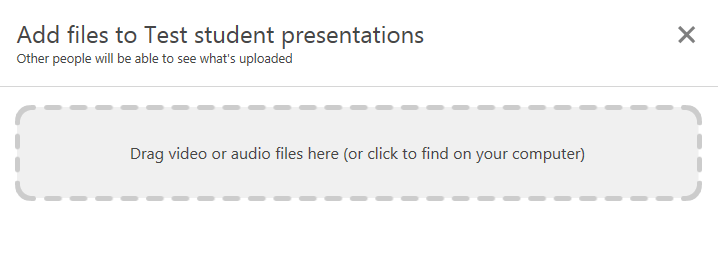
6. A message will appear to let you know when your upload is complete
If you have uploaded the wrong file, hover over the name of your file (e.g. in the screenshot below) and click the ‘bin’ icon to delete it
Watch a video tutorial to see how
