What is an MFD?
MFD stands for Multi-functional Device. These are all-in-one printers, scanners and photocopiers
Where can I print?
The MFD are placed throughout the campus, generally next to open-access areas such as the 24 hour
Computer Room or the Library (and even in the Sports Centre).
The larger MFDs will print and photocopy A3 paper. The smaller MFDs will only print and photocopy in A4.
If you are unsure, open the compartments below to check which paper sizes it accepts.
Which MFD do I use?
As long as you’re connected to the Marjon network you can use any MFD; just walk to the nearest MFD,
swipe your Library card and collect your printing. The system is secure, and only YOU can release
documents you send to print.
In other words, if you are using someone else’s login (which you shouldn’t be doing in the first place) and
release a print job; you wouldn’t be able to release the print card with your library card.
If I don’t print a document immediately, can I print it later?
If you send a document to print, and forger to release it; the print command will remain for 3 days. After 3
days the print job will disappear and you will have to re-print the document
What if the MFD runs out of paper?
Paper is stored in the bottom compartment of all MFDs. The paper is regularly replenished. If the
compartment is empty please ask a member of Library staff, or SITS team (if in 24 hour computer room) for
more paper.
Using the MFD for the first time
The first time you print you’ll need to register your Library card with one of the MFDs by swiping and typing
in your network password.
You must first associate your Library card with the MFDs if are printing for the first time. Once you
have done this, using the MFDs will become much easier as you will only need to swipe your
Library card instead of having to enter your Student ID and password each time.
Swipe your Library card (normally located on the side of the MFD) when you see the screen
below:

Click on User Name to manually log in.
Enter your Student ID (your 8 digit student number) using the screen or the keypad on the
right – select OK when done.
The screen will tell you that the authentication has failed. You will need to associate your ID with your
printing account before you can print.
Click in the Password section and enter your password – select OK when done.
A message should appear confirming that your ID has been associated with your print
account.
At this stage, log out (top left) and then try logging back in by swiping your library card. This is
the best way to check that all working well. You may need to enter your details one more time
if it hasn’t registered correctly the first time.
If there are no problems – job done! You can now access your printing account by swiping
your Library card each time. Much easier than having to enter your username and password
manually!!
Printing Set-up
What is the default printing setup?
The printers are defaulted to print double-sided in black and white. To change these options to single sided
or to print in colour, see the headings below:
How to print on single-sided paper
1. Select the File tab/ and click on Print
2. Ensure the Printer is set to Cloud Printing… and select Printer Properties
3. Select OK
How to print in colour
1. Select the File tab/ and click on Print
2. Ensure the Printer is set to Cloud Printing… and select Printer Properties
3. Select OK
Remember colour printing costs 16 pence per side (it will be the same price if you print single or
double-sided).
Why are Word documents with Section Breaks harder to print
Printing specific pages of a Word document that has various page numbering formats can be a bit tricky.
A typical example would be a dissertation. If you wanted to print a specific page of the document (for
example page 1) the printer would only print the front cover as it is logically the first page of the document.
Whereas there are two further pages numbered as page 1 within the document as well!
In order to create a document with various page numbering formats, you must insert ‘Section Breaks’. By
identifying the different sections of the document, you will be able to print easily.
Before you start printing…
Open the Word document. Go to the Status Bar (the grey bar at the bottom of the Word screen – displayed
below).
The Status Bar will now display the section as shown below:
Printing specific pages of a section
1. Locate the page/pages you wish to print and take note of the Section number and the page number.
2. Go to the Print command and place the cursor in Settings/Pages box
3. Right click anywhere on the Status Bar and select Section
| Printing Options: | What to enter in the Pages box: | Example: |
|---|---|---|
| Printing a single page | Type the page number, followed by the section number |
p1s3 |
| Printing multiple pages | Enter page number and section number as shown above but separated by commas |
p1s2, p1s3, p4s3, p9s3 |
| Printing a range of pages | Enter page number and section number and represent the range by using the hyphen |
p10s3-p21s3 |
| Printing multiple pages and ranges of pages |
You combine the commas and the hyphens to print multiple pages and ranges in one go |
p1s2, p1s3, p4s3, p10s3- p21s3, p56s4-p59s4 |
| Printing pages that have more than one section on the page (This refers to pages that contain continuous section breaks and are mostly used for line numbering) |
The easiest option is to click on the page and select ‘Print Current Page’ Alternatively you could enter all the sections that are on the one page – see the example |
p56s4,p56s5,p56s6 this will print one page only (p56) but all sections contained on the page must be entered |
Here’s another example from a student’s dissertation; note that there are NO spaces after the commas or
hyphens:

If you are printing a dissertation remember to print single-sided – and select the correct option to print in
Black and white or Colour. Refer to the guide entitled ‘Printing on single sided paper or printing in colour’
in this section if you are unsure how to do this.
Releasing a print job
When you are printing a document, make sure to select the printer as ‘Cloud Printing…’. If the Cloud Printing option is not visible, use the drop-down arrow to find the printer.
Swipe your Library card to log onto the MFD and you should see the screen below:

Select Release My Prints
To print out only one document from the list: click on the document you wish to release and then select Release Selected from the options below:

NOTE: selecting the Release All button would have printed ALL the listed documents.
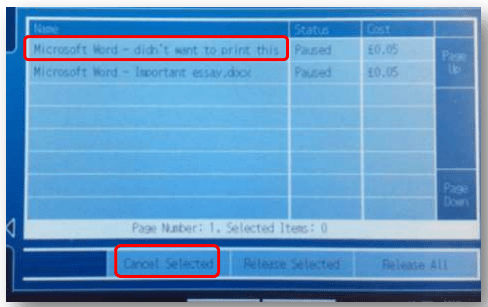
How to cancel a print job
Click on the document you want to delete and then select Cancel Selected from the options below:
What is the cost for printing and how can I purchase print credits?
Paper is provided within each MFD, however printing is charged to cover the costs of ink.
You will need to purchase print credits for printing and photocopying:
Paper size and cost per side:
A4 – Black and White – 5p
A4 – Colour – 16p
A3 – Black and White – 12p
A3 – Colour – 32p
When you first join the University as a new student you will receive £3.00 of free credit for printing.
What is the cost for photocopying?
The cost of photocopying is exactly the same as listed above.
What is the cost for scanning?
It’s free! You can scan documents in PDF format or jpeg image format to your N drive, or you can email the scanned documents to your university email address.
Where do I purchase print credits?
You can purchase print credits online or during office hours from the Library Issue Counter – the credits are swiped onto your Library card. If you forget your Library card, make sure you provide your student number. Payment is accepted in cash or card (card transactions must be over £2.00).
To purchase credits online follow the link below and enter your student number and date of birth. You will be sent a confirmation email once your payment has gone through.
http://www.marjon.ac.uk/students/pay/
Can I check my print credit balance online?
You can check your credit balance online using your Student ID and password. Follow this direct link to access your Papercut account: http://svr-benedict.net.marjon.ac.uk:9191/user
If using an Android or Apple device use the following link: http://www.marjon.ac.uk/studentlife/computing-and-media-services/our-services/mfd/
Your print credit balance is also available on screen when you log onto the MFD’s using your Library card.
Printing from iPad or iPhone
Can I print directly from my iPad or iPhone? Download the application at:
http://svr-benedict:9191/ios/install and follow steps at:
http://www.papercut.com/products/ng/manual/ch-iosprinting-app-ios If you have any problems, speak to a member of the Computing Services team in the 24 hour Computer Room
