Welcome to Microsoft Teams training for staff – you should find everything you need here to get started and use Teams effectively. We’d recommend that you go through all the ‘essential skills’ resources as a minimum requirement. Additional skills have then been provided to go through useful skills like how to run breakout rooms and accessibility options.
How to setup Teams in Canvas
Setting up new academic Teams
Setting up your new Teams
If you plan to use MS Teams with your students, you need to set it up within your Canvas module courses. This guide takes you through the steps required:
Microsoft Teams training site available from this link.
1. Login to Canvas via: https://marjon.instructure.com
2. Head to the course that you want to add a Microsoft Team to
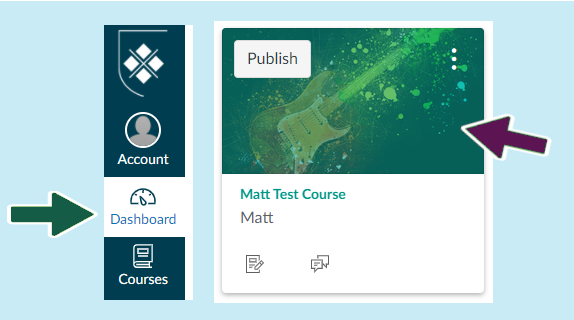
3. In the course navigation menu you will see ‘Microsoft Teams Meetings’ and ‘Microsoft Teams Classes’
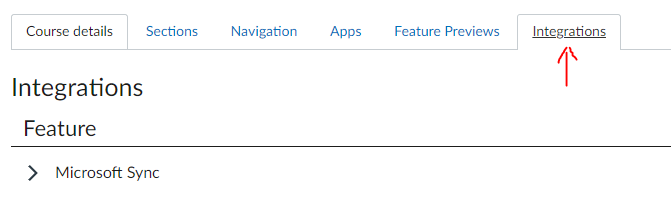
4. Before you can use either of these you need to set up enrolment synchronisation between Canvas and Teams, so click on ‘Settings’ then select the ‘Integrations’ tab
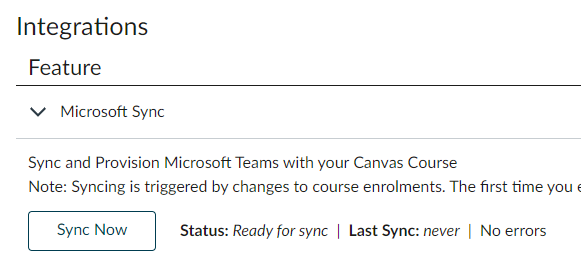
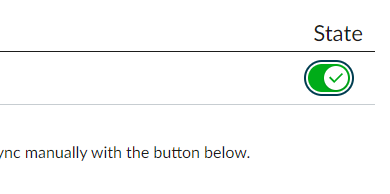
5. Select the slider button beneath ‘State’ to activate synchronisation then select the ‘Sync Now’ button. (click the > arrow on the left to open up the extra text) which will start synchronisation for the Team. Your module Team should be ready within a few minutes with enrolled users automatically added
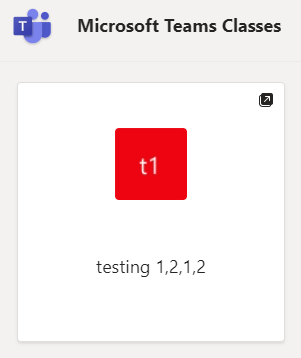
6. You will receive an email notification when synchronisation is complete and if you then click ‘Microsoft Teams Classes’ in the course navigation menu, you will see your new Team
7. When you click the Team it will send you to a new browser window where you can open in Teams. You should then see your new team.
Note: This will be unavailable to students until you click on the activate link at the top of the Team as below
![]()
Note:
You may notice that the class team is visually different to the manually created Teams of previous years. This is because it is the default Team layout that has been enabled with the Teams plugin and not something we can change.
Setting up Teams meetings in Canvas
Click ‘Microsoft Teams Meetings’ in the course navigation menu
NOTE: You should setup all meetings using Canvas not the Teams app
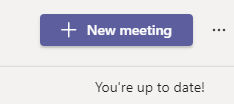
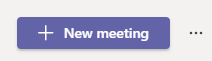
1. Click on ‘+New Meeting’
2. Enter the meeting details as required
3. Save meeting
Note:
1. Teams meetings setup using Canvas will not appear in the class Team in the Teams app
2. Any recordings made from a meeting setup using the Canvas Teams plugin will not save to the class Team. They will only show in the overall chat space in the Teams app on the left-hand side. You can also access your Teams recordings via your OneDrive. Login to www.office.com, open OneDrive and scroll to a folder called ‘Recordings’.
3. Teams recordings are automatically deleted after 60 days. For help on how to download recordings Teams guidance for ‘making your teams recording available in your Marjon Canvas course.
Recommendations
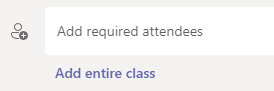
1. You can ‘add entire class’ via Canvas by using the sync button when creating new meetings in Canvas:
Tip: You should also make links available to any Teams meetings in Canvas as well.
Creating Teams meetings in your Canvas course
Creating Teams meetings in your Canvas course
1. Open the Canvas course and select ‘Microsoft Teams Meetings’
Note: You should create all module related Teams meetings with students within the relevant Canvas module course. This is the preferred route, as opposed to setting up a meeting using your personal Outlook calendar/or the Teams app. The reason is that the meeting will be housed within the Marjon Canvas course team and viewable within the team for all student members.
2. Select ‘New Meeting’
3. Complete the standard details as required.

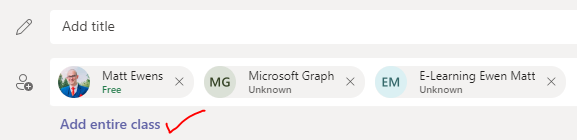
4. Select the ‘Add entire class’ option
Note: If you have a regular online meeting, you should select the ‘Does not repeat’ drop-down and select a re-occurring option as required.
5. When you are happy, click ‘Send’.
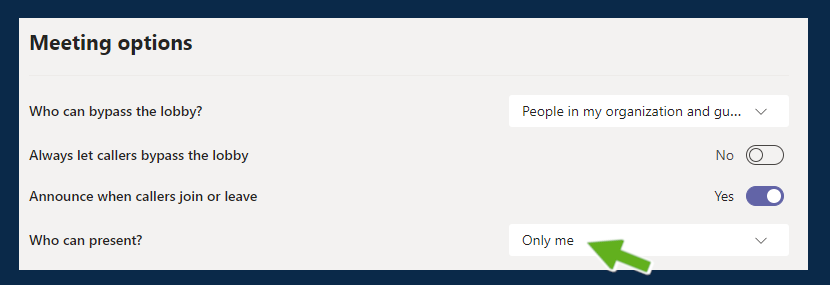
6. You should now setup the meeting permissions: click into your new meeting and you should see the joining link and also a new link called ‘meeting options’ – click on ‘Meeting options’
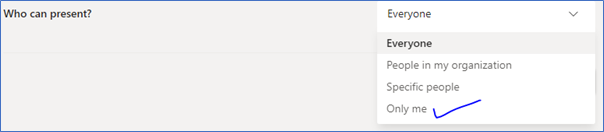
7. You will be taken to a page, with further options – ensure that you select the ‘who can present’ drop-down and set it to ‘only me’ (or specific people if others need to present in your meeting)
What happens next?
Students will receive an automated email notification and the event will be added to their Outlook calendar with a Join link
The meeting event will also display in the MS Teams Meetings area of your Canvas course, so students can access meeting details and Join Link from there too.
Essential skills
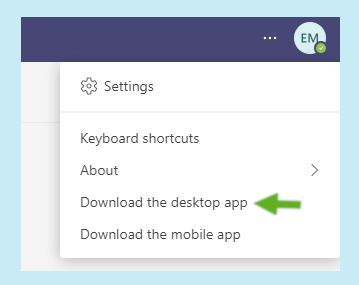
Download the Teams app
1. Login to your Microsoft Office account online via office.com (Marjon username & standard password)
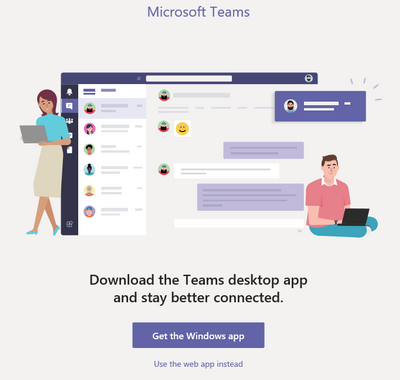
2. Visit the Teams space – if this is the first time you are visiting Teams the image may look like the below
3. Select the ‘Get the Windows app’ button and follow the prompts to download and install the software on your machine
4. If you have logged into the Teams space online, then you can download the app by clicking on the three dots as below
Resources
Watch an instructional video tutorial to learn more
Learn a basic understanding of the platform
In general most of your Teams interactions will take place in the ‘Chat’ space between individuals and the ‘Teams’ space. The Teams space is where you should hold module-based Teams sessions or meetings. Each module will have its own Team for each academic year.
1. From within Microsoft Teams, head to your specific Teams area and visit one of your module teams.
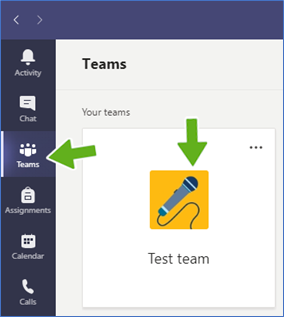
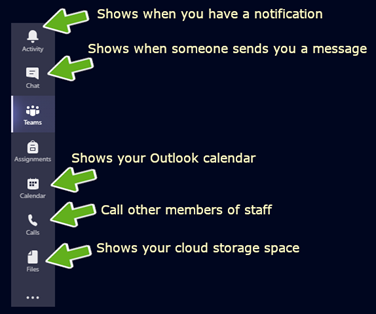
2. The diagrams below show the description of all the basic functions in your team space. The ‘General’ channel is where most of your interactions with students will take place.
Profile and channel options
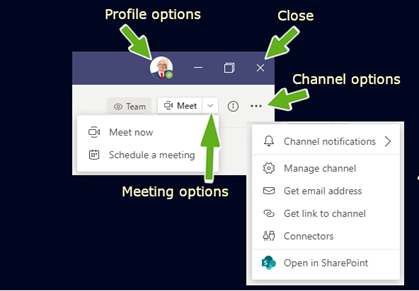
Conversation toolbar
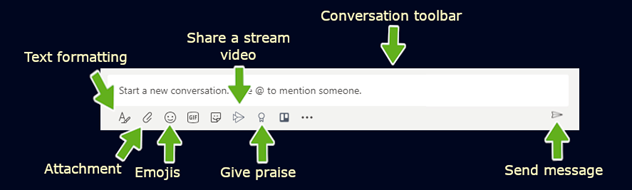
3. Have a go at sending a message to a Team or colleague, simply type in the space and either press the return key on your keyboard or click on the ‘send message’ button as illustrated above.
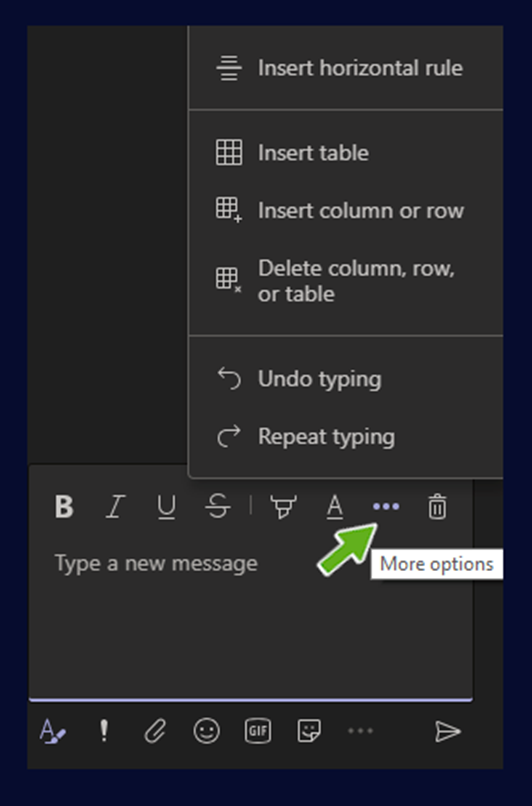
4. At various points in your Team space you’ll see the three dots icon, this is related to more options.
5. Click on ‘more options’ for your team, as shown below:
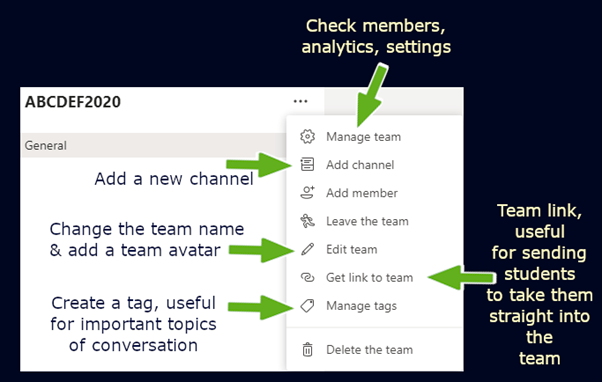
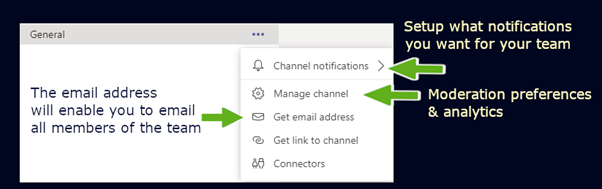
6. Hover your mouse over the ‘general channel’ – you’ll notice ‘more options’ appear for your general channel.
7. On the top of your team space, select ‘Files’ > this is a useful space where you can add folders and more. Note that every time a file is added into the conversation space, it will automatically become available in the ‘Files’ area

Tip: Clicking on ‘General’ will always take you back to the conversation posts wall
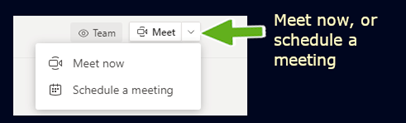
8, If you look up to the top right-hand corner of the Teams window, you should see a ‘Meet’ option. Clicking on the drop-down menu will reveal the ability to ‘schedule a meeting’ including the ‘live’ meeting option.
9. Finally, the toolbar on the left-hand side of the screen will also enable you to access a general chat area outside of your Team. This includes a calling feature, so you can call people and also your calendar, which is linked to your Outlook calendar. (this can also be used to setup Teams meetings, which you can also do from within Outlook)
The diagrams below show the above features with an overview of the options available:
Resources
Watch an instructional tutorial to learn more
Preparing for your session, meeting or lecture
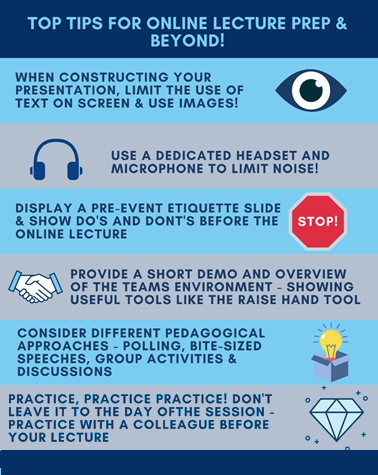
In order to provide a quick flow for this guidance, please refer to the below top tips for online lecture preparation:
How to present in Teams
1. When presenting, select the ‘share tray’ icon and then select how you’d like to present – for example, ‘Desktop’ will present everything you see on your computer, so if you navigate to a browser then a PowerPoint your students will see this.
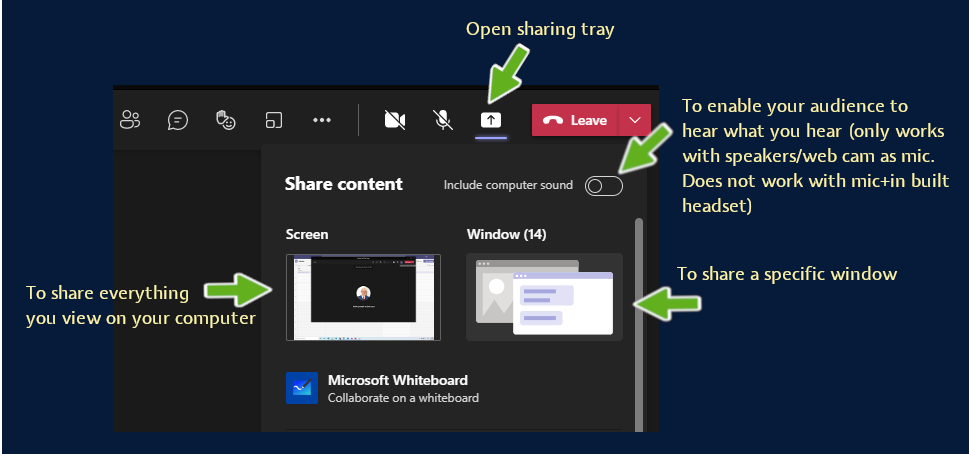
2. If you wish, you can upload your PowerPoint presentation from your computer by selecting ‘Browse my computer’ (You can also search your One Drive or browse Teams and channels) – note: you may need to scroll down to reveal the below option

(note: you may need to scroll down to find ‘browse’ option)
Checking your audio/camera settings
3. To check your audio settings and configuration in Teams, click on more actions (three dots) and then ‘device settings’ (note, you can also check prior to entering a meeting)
4. You can then check your settings from the right-hand side of the screen
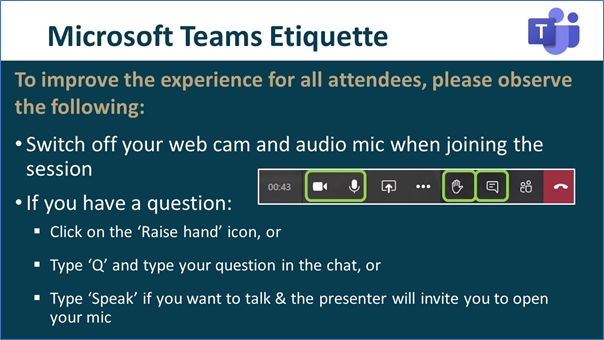
Display a pre-lecture slide with etiquette tips
5. Create an etiquette best practice slide to display before your online lecture, this will help to inform students about positive behaviour and give them useful pointers in terms of how to raise their hand for example. Take a look at the below example, which you are free to download and use.
General tips
6. You may also want to provide a short 1-5 minute overview of the Teams environment to help show students how the tool works and what to expect from your online lecture.
7. Presenting online is different to face-to-face. Consider breaking up your lecture talk into bite-sized parts. Why not lecture for 10-15 minutes, then invite students into groups and have a discussion – or poll? You could even use tools like Padlet, if you wish to create online activities. Students may become tired online more easily than face-to-face, so perhaps a 40 min – 1 hour talk may be more difficult for them to digest.
(more information and tutorials will become available to help you explore blended learning, asynchronous/synchronous pedagogies in the future, please keep tuned in to communication channels)
8. Do use images in your presentations (check out pixabay.com for copyright/attribution free images).
9. For any students who have hearing issues or disabilities, ensure that you point them to the live captions tool within ‘more actions’ (note this feature is not available in the browser, students will need to download the dedicated ‘Teams’ app

10. Use the background effect for privacy reasons, if you need to hide your webcam display behind you
Practice, practice, practice!
As the saying goes, practice makes perfect. Team up with colleagues and setup practice lectures with them to help you familiarise with the platform.
* Do: record a test session
* Do: Practice presenting using the sharing tray
* Do: Check the different options available within ‘more actions’
Resources
Watch an instructional video to learn more
Running the Teams meeting, lecture or session
Tip: We’d recommend that you use a computer or laptop to hold your online Teams lectures, using the dedicated Teams app. If you use the browser version you will not have access to useful tools like captions or background effects.
1. Now that you have launched an online lecture, you will need to learn how to use the tools available. The toolbar is set at the top of the window, in the right-hand corner of the screen.
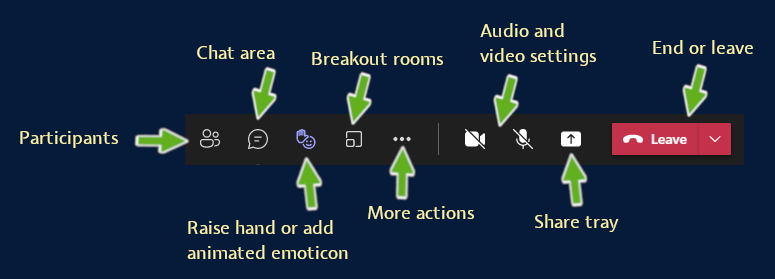
The participants area:
2. Select the ‘participants area’ – this will show who is present in your lecture, session or meeting.
Tip: Clicking back on the icon will hide the area.
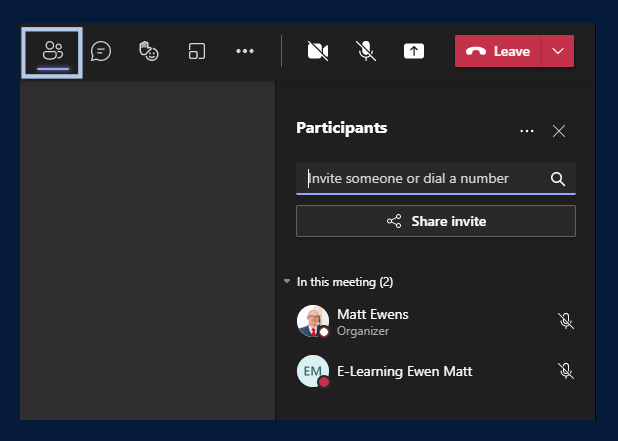
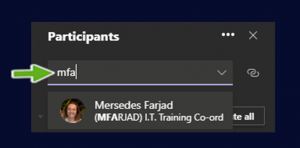
3. You can invite students directly (if they may be struggling to get in) by typing their name in the search box, once clicked it will automatically call them (best to provide a joining link prior to the meeting however).
4. There is a useful ‘mute all’ button available, which we would recommend you activate to limit the background noise and students can also use the ‘raise hand’ tool if they want to speak. There are additionally animated responses that can be selected – these will flash on screen for all participants to see.
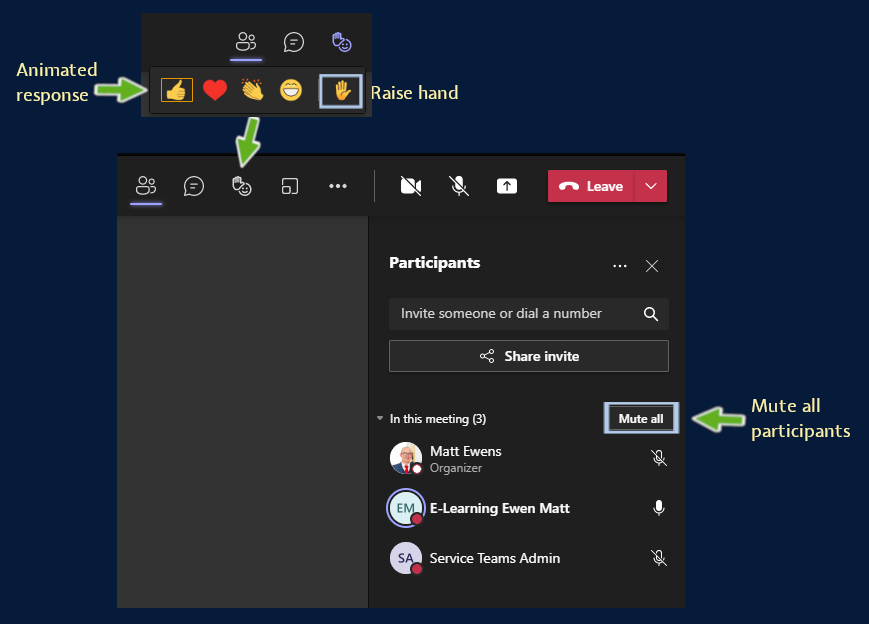
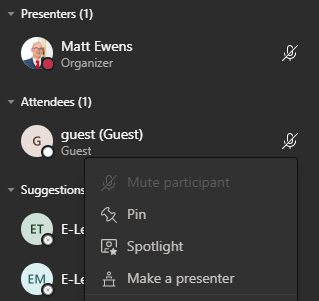
5. There are further options available for each student by hovering your mouse over their name and clicking on the three dots icon – including ‘remove participant’, individual mute options, pin and ‘make attendee’. The ‘make attendee’ option is generally used if you want to give presenting options to an external person and by making them a presenter.
Tip: please be aware that if you have not setup the meeting permissions, all students will be able to present and record the meeting. It is highly recommended that you edit any Teams meetings and select the ‘meeting options’ link or you can also do this by following the below instructions
6. You can control the meeting permissions during the meeting by selecting the three dots icon and visiting ‘Manage options’ – set the ‘who can present’ drop-down to ‘only me’.
7. If a student has raised their hand during the meeting, you will see a notification appear on the top toolbar as below (if you visit the participants area, then access more options for the student with the raised hand, you can lower their hand once their question has been answered)
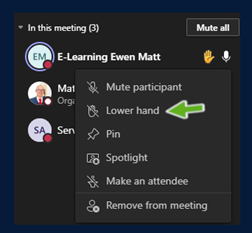
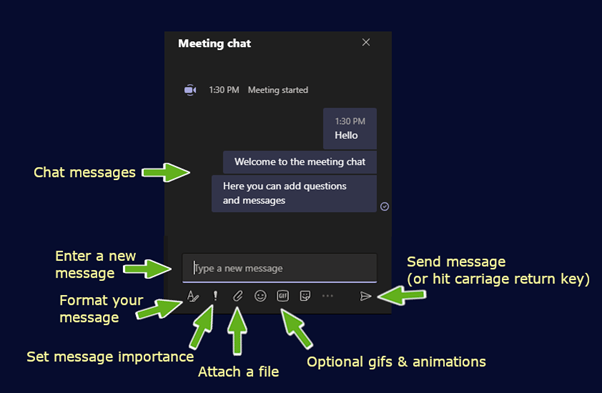
Meeting chat:
1. The meeting chat is where you can view questions from students and add responses. You can also upload documents to the chat and there are options for message urgency and accessibility via the immersive reader. View the below key for more information.
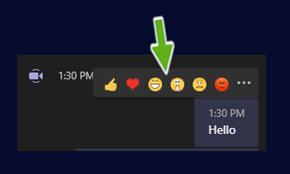
2. To add a visual response to a message, hover your mouse over the message and click on your preferred emoticon response
3. Selecting ‘more options’ will provide the following:

4. Selecting ‘Mark as unread’ adds a neat line as shown above
5. The immersive reader as shown above is a screen reader, this will open a new window and enable students with sight impairment to listen to the chat messages and they can control other aspects like text font types and colours
Formatting chat messages:
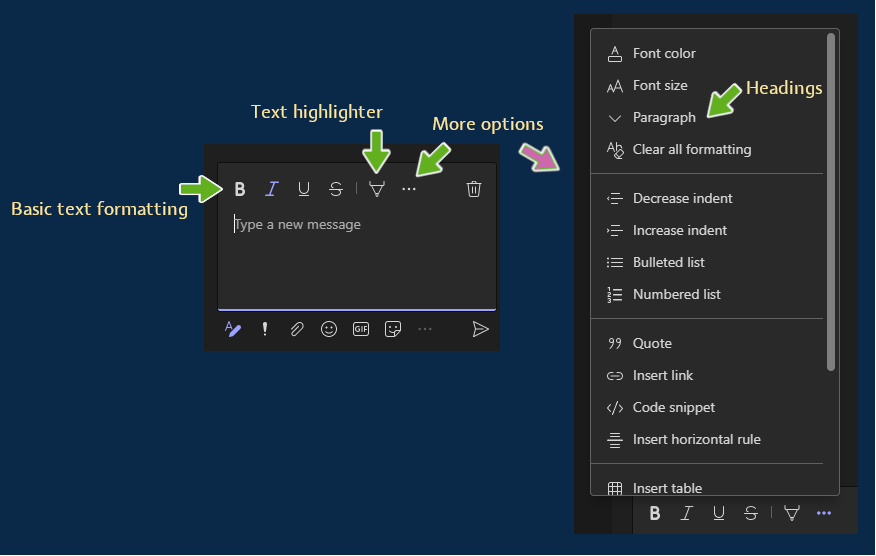
1. You can simply send a plain message to any chat, but there are additional options for formatting your messages. Take a look at the below key for more information. Click on the text formatting icon.
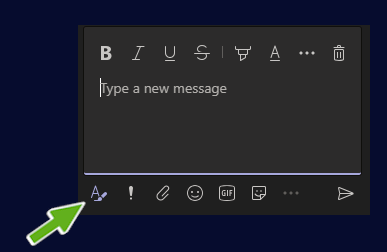
2. Type any text and click to highlight it, then use any of the standard tools to either make your text: bold, italic, underline, strikethrough. You can also highlight text and change the text colour.
3. Selecting the ‘more options’ three dots icon will pop out further formatting options for your text, including: adding tables, quotes, horizontal rules, links, headings & bullet/numbered lists
Chat importance:
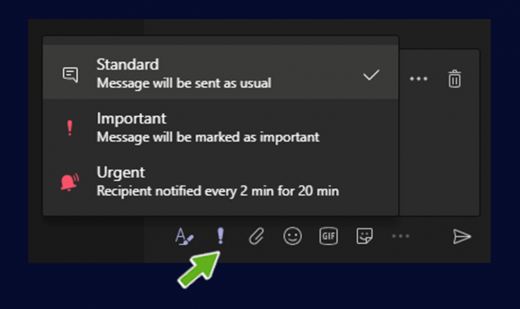
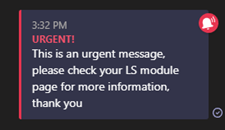
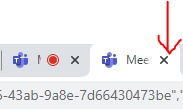
1. If you need to make a statement in the chat area, for example an important message or urgent, you can by selecting the ‘!’ icon as below.
Files:
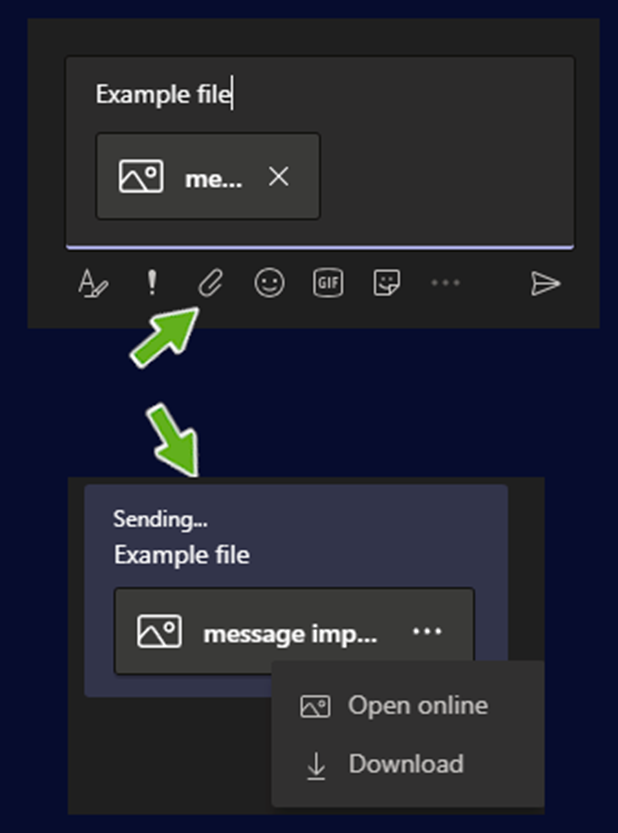
1. You can attach a file to the chat, as shown below.
More actions:
You can control various aspects of your meeting by heading into the ‘more actions’ area
Resources
Watch an instructional video to learn more
Recording your meeting
1. Check your audio/video devices are setup correctly and when you are ready to record the meeting, select ‘more actions’ and ‘start recording’
2. When you want to stop recording, go back into more actions and select ‘stop recording’
To access the recording after the meeting, you will need to check the chat space on the left-hand side of the Teams app. (We recommend following the guidance on how to download your Teams recordings and uploading them to Panopto, this is due to a Teams update which means all Teams recordings are deleted after 60 days)
3. You can then select ‘more options’ if you wish to for example to copy a link to the recording.

Note:
All Teams recordings are saved in the SharePoint/OneDrive space for the Team. They are no longer saved in Microsoft Stream.
Resources
Watch an instructional video to learn more
Making your Teams recording available in your Marjon Canvas course
In this guide we will demonstrate how to embed your Teams recordings into Canvas. It is possible to add a URL link, although note that URL links will disappear after 360 days due to a Microsoft update for any recording after this time will be deleted.
Embedding your recorded Teams session into Canvas
Embedding your Teams recording, isn’t completely straightforward as there is no ‘embed’ function in OneDrive. Therefore to do this you will need to download the recording from OneDrive and upload it to Panopto.
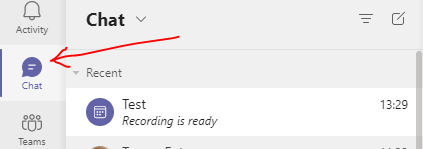
1. Go to the recording in the chat space in your Teams app (left-hand side of screen) > select the relevant chat with ‘Recording is ready’ and click on the three dots from the main screen and select ‘Open in OneDrive’ (note: all Teams recordings are also available via www.office.com and by visiting your OneDrive space > Then visit the folder called ‘Recordings’) * if you can’t find a recording in your OneDrive, this could be because you have scheduled your meetings directly from your Team in Teams – in this instance, the recording will show in the general channel and be only available to team members


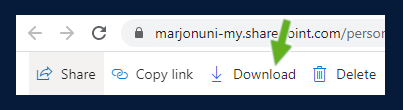
2. Click on the ‘Download’ option to download the file onto your computer. Open it up from your downloads folder and save it to a more suitable location
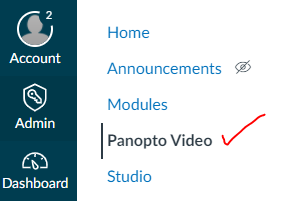
3. Login to Canvas and visit the course where you want to embed the video, via your dashboard.
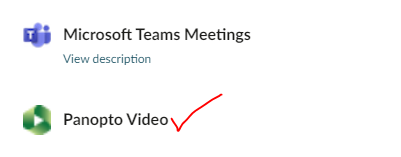
4. Go to ‘Panopto Video’
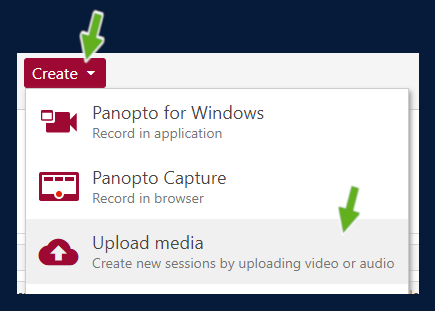
4. Click on the ‘Create’ button and select ‘Upload media’. Drag and drop your recording into the box or select it and then wait until you see the success message before closing the box
5. Head to the location where you want to embed the recorded session, such as a module
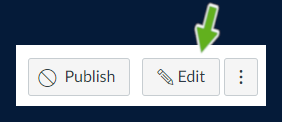
6. Click ‘Edit’ (top right-hand corner)
7. From the text editor box, select the ‘apps’ option
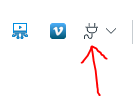
8. Next find the app for Panopto and select this > Then chose ‘Done’
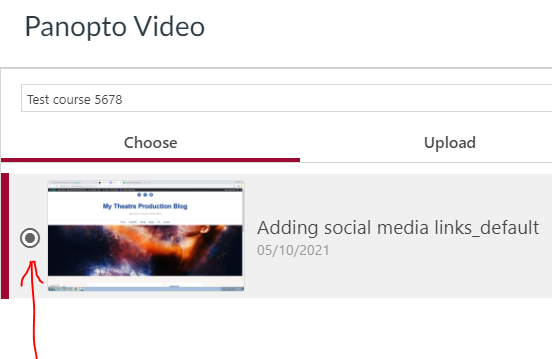
9. Select the video you uploaded earlier and click on ‘Insert’
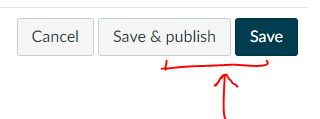
10. Either ‘Save’ or ‘Save and Publish’ (save and publish will make the resource available to view)
Resources
Watch an instructional video to learn more
Additional skills
Important considerations
Your dedicated Marjon Canvas Teams should be used to hold all meetings or sessions with your students.
Each Marjon Canvas course has its own Team, which you should use as opposed to your personal calendar. If you opt to instead use your personal calendar for meetings then student are able to potentially join as guests and this means they will not be able to view any post event content, such as recordings. All enrolled students on any given Marjon Canvas course should show as members in their Marjon Canvas Team(s). (only student members will be able to see content in their Team)
1. Head to your Teams app (or online, if for any reason you can’t download the app)
2. Click on the Teams space, this should display all your current Marjon Canvas courses

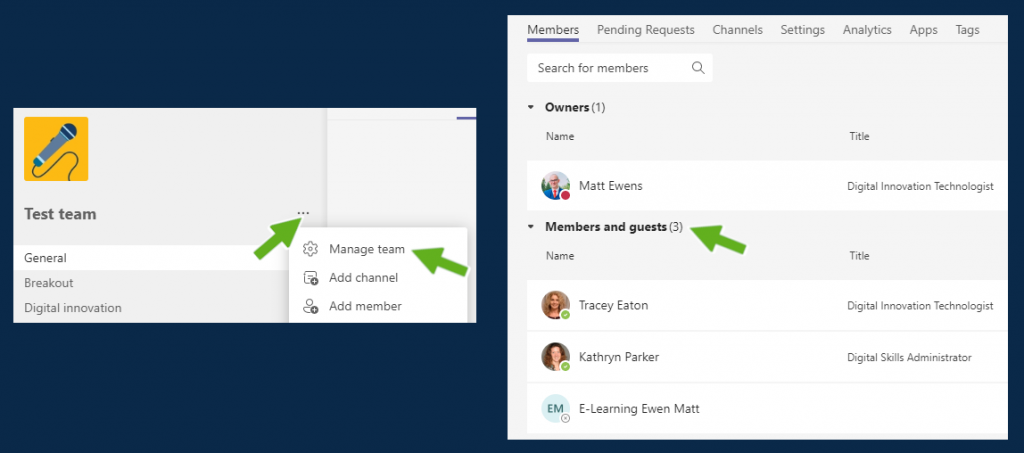
3. To view student members of your Teams, click on ‘More options’ (three dots) and select ‘Manage Team’
Setting appropriate permissions
By default any meeting you setup can be recorded by your students. Your students will also be able to share their screen. We highly recommend that you change the meeting permissions as below to prevent your students from presenting and recording.
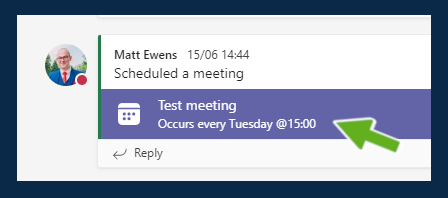
1. Once you have created your meeting or session in your Marjon Canvas Team, re-visit the meeting as below
2. Click on ‘Meeting Options’
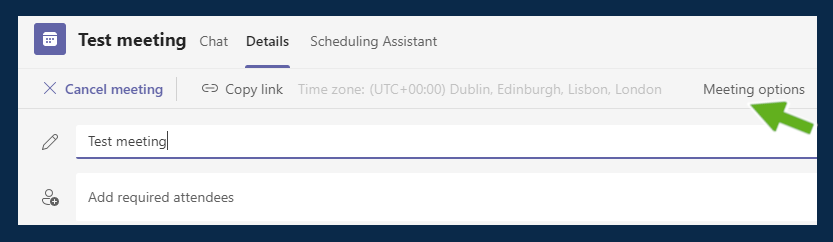
3. This should open a new browser window, change the ‘Who can present’ drop-down to ‘Only me’ and save
4. If you wish you can also change this within a live meeting or session, by clicking on more options and selecting ‘Meeting options’

Resources
Watch a tutorial video to learn more
Interactive quizzing in Teams with Quizlet
If you want to add more interactivity in the form of quizzing or a fun educational game as an activity with students in a live online Teams session, then Quizlet could be worth looking at.
Quizlet enables you to setup flashcards, tests and quickfire live educational games for your students. You can also embed different activities into your modules. This guide will cover how to setup your Quizlet space and use the live educational game option in Teams. (note the study tools are not covered in this tutorial, but there are tutorials online, such as the one from this link)
Setup
In order to setup your Quizlet, you may want to firstly create a class – this will enable you to share your Quizlets privately.
1. Go to https://quizlet.com and select the ‘Sign up’ button (go through the setup process)
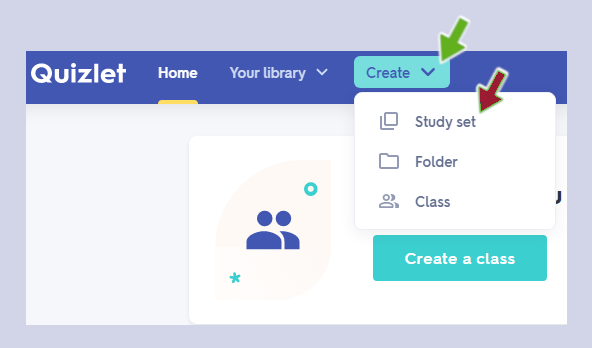
2. Once you have logged in click on ‘Create’ then select ‘Study Set’ (close down the promotional box advertising the teacher account)
3. Enter a title for your study set and a description if needed
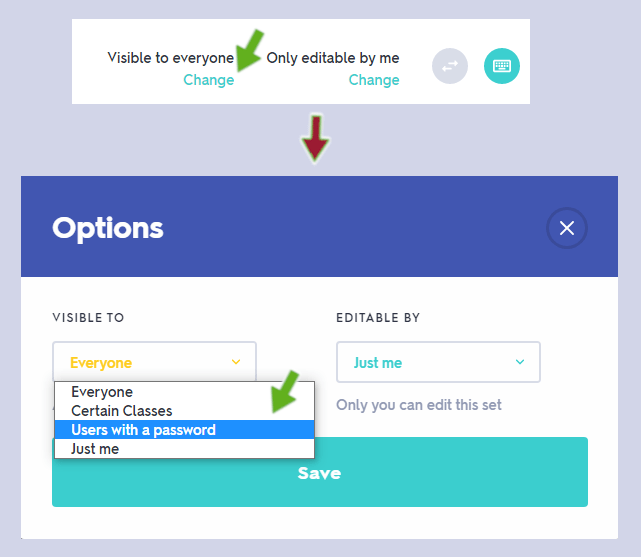
4. Next set the visibility of the set (you may wish this to only be visible to your students with a password for example)
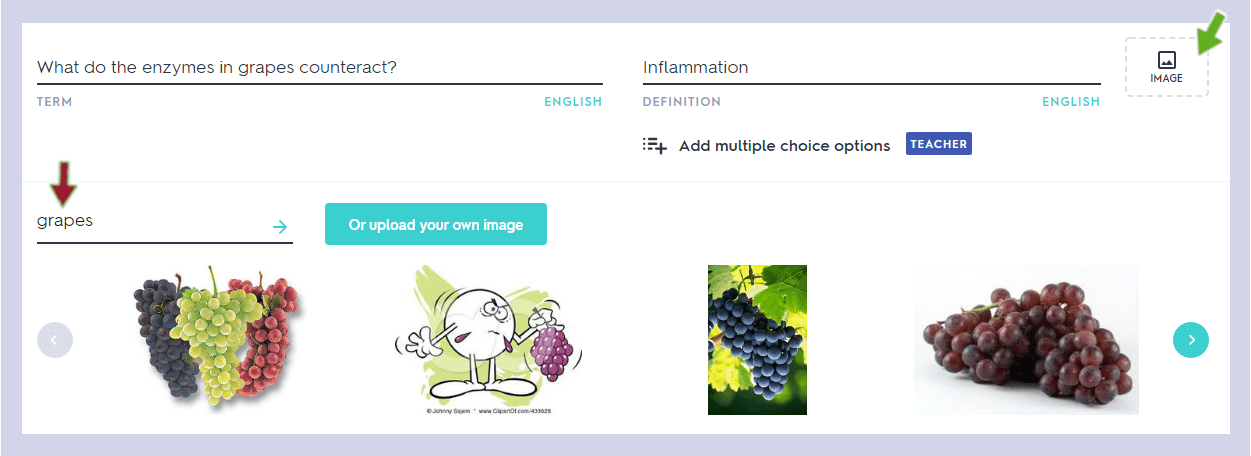
5. Next you need to start entering ‘terms’ and ‘definitions’ – if you think about this as a quiz, ‘terms’ = question – ‘definitions’ = answer
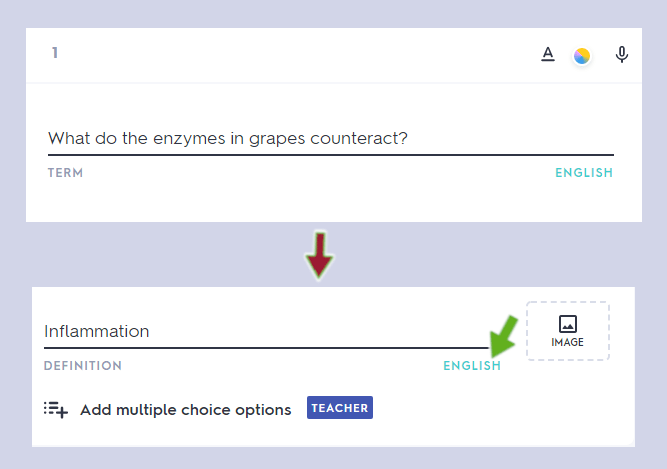
6. Complete all the empty cards and then add one more by selecting ‘+ ADD CARD’ (we need x6 cards in total to be able to facilitate a live educational game) – (You can add images if you wish & before the quiz starts students will be able to flip the flash cards to reveal the answer to ‘rehearse’ before the start. If you don’t want to allow students to rehearse, activate the quiz as soon as all the students have joined)
Image tip:
If you do select the image selector, if your question is quite specific it is unlikely to pull up any image options – therefore erased the question in the search box and instead type in a more generic term – for example ‘grapes’
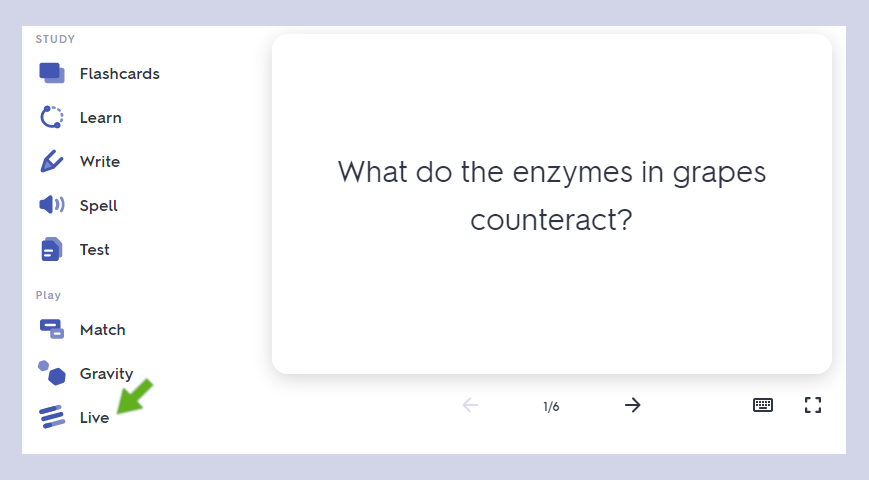
7. Once you have created all your x6 cards, click on the ‘Create’ button
8. You will be taken to the main study area, which is divided into x2 sections ‘study’ and ‘play’ – for this guide we will be using the ‘Live’ educational game option. (more on the study options later)
9. Click on ‘Live’
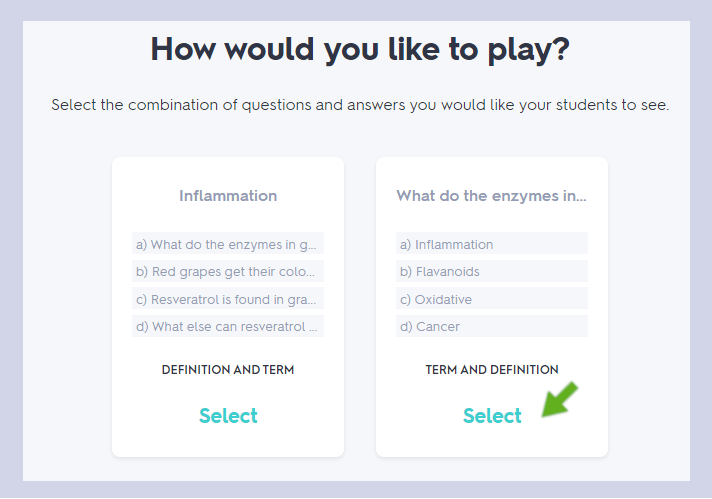
10. Select if you want your students to be placed into teams or if you want students to play the game individually (note for teams you need 4 or more students)
11. Now select the second option – ‘Term and Definition’
12. Copy the quizlet live website address and code, then paste into the Teams chat space and ask your students to join the quiz – wait until you see that all students have joined up (ask them to enter their name, not a made up name) (note you may wish to switch off the happy music via ‘Options’ at the top right of the screen)
13. Your students will need to enter the correct code to join as below

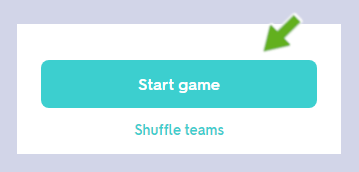
14. When all students have joined click on ‘Create game’
15. When you select ‘Create game’ students will be waiting to start and you’ll need to then click on ‘Start game’
Tip: If you want to you could share your screen to display the ‘live’ quiz and if you’re recording the session it could make for a fun ‘recap’ for students watching the recording back


Tip: ‘Continue with stats’ shows what students learned and where they may have struggled
Tip: To make the live game a bit trickier, consider adding more cards than the minimum of six.
Resources
Watch a tutorial video to learn more
Using Microsoft Whiteboard
If you are in need of adding some interactivity to your sessions in Teams, have you considered using Microsoft Whiteboard?
Microsoft Whiteboard will enable you to either display a board that you can write, add text or shapes into. You can also setup the whiteboard so that your students can collaborate on. Perhaps you want to use the space during a collaborate brainstorming session?
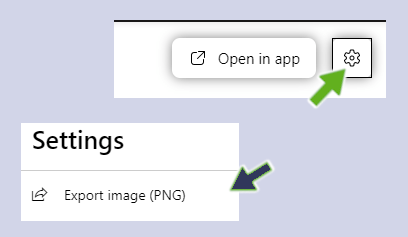
If you are recording the session, this will capture the live interactions, but you can also export the whiteboard as an image.
To use Microsoft Whiteboard during a Teams session, please follow the instructions below:
1. Open your Teams meeting
2. When you want to use Microsoft Whiteboard, stop sharing your PowerPoint presentation or other source if you are sharing
3. Click on ‘Share Content’
4. Select ‘Microsoft Whiteboard’ (it should be located on the right-hand side)
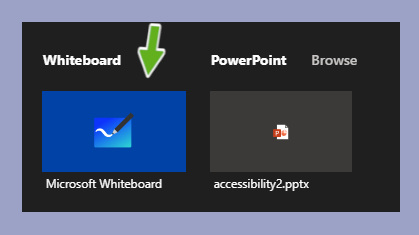
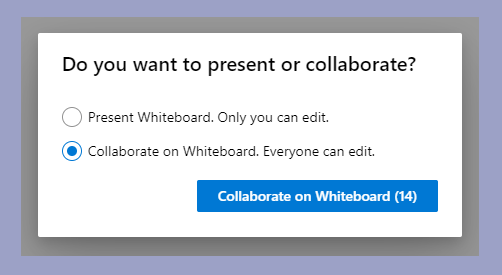
5. Once activated select whether you want only you to use it, or whether you want your students to be able to collaborate on the board
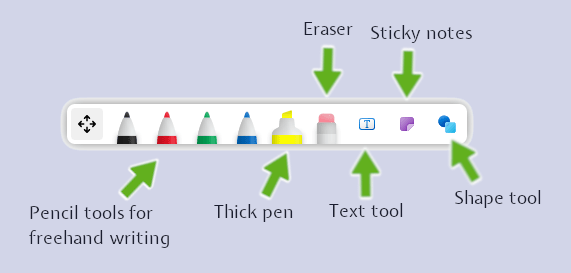
6. Take a look at the below key, which shows how the functions work.
To download your whiteboard as an image, head to the settings menu:
Watch a video tutorial to learn more
Resources
Watch a tutorial video to learn more
External access guide
This guide has been produced to help external attendees access a meeting or event at Marjon. (note: if you already have the Teams app and a Microsoft account, join using the app)
The event organiser may either invite you directly into the event/meeting or provide a joining link. If you have received an email invitation, you should see a joining link. (or you will be emailed by the organiser with a joining link)
The email invitation if you receive one, will look like the following:
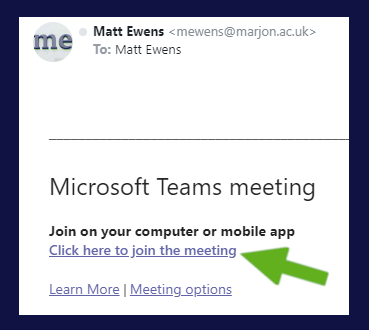
1. When you are ready to join the meeting/event, click on the joining link as above (or the link emailed to you by the event organiser)
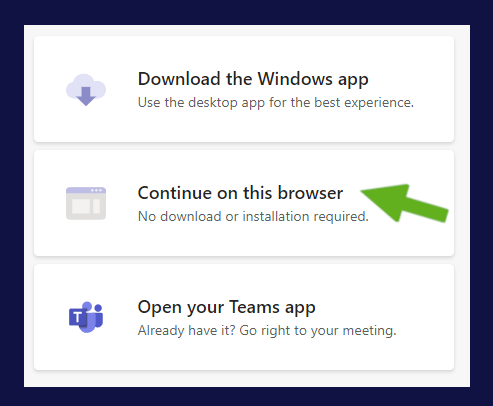
2. A new browser window will open. (At this point, if you have already downloaded the Teams app and registered a Microsoft account, you will receive an on-screen prompt to open the app)
3. Select the middle option presented on-screen to ‘Continue on this browser’ (selecting the top option will mean that you will need to register a new Microsoft account)
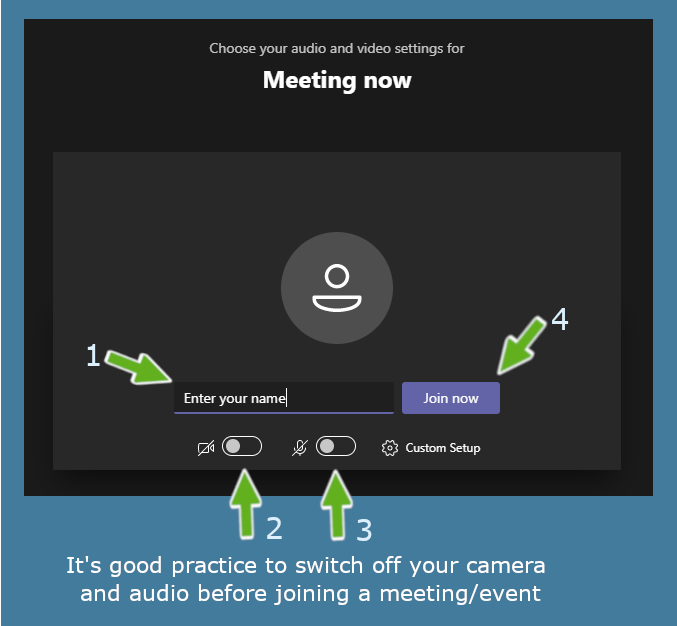
4. After you click on the middle option you should be taken to the joining screen, where you should enter your name in the box. (It is always good practice to disable your microphone and web camera before joining the meeting)
5. When you are ready to join click on ‘Join now’
6. When the organiser is ready and the meeting/event is due to start they will approve your request to join and you will join the meeting/event
Resources
Watch a tutorial video to learn more
Difficulty accessing Teams recordings?
Are your students contacting you to say that they can’t access Teams recordings?
This could be due to a couple of reasons:
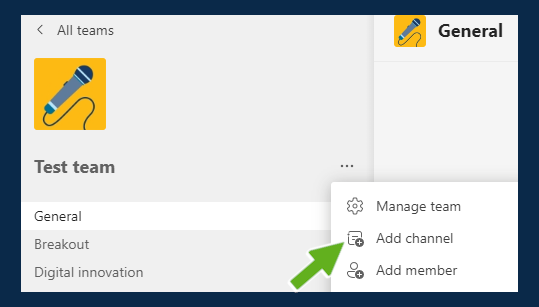
1. The student(s) may not be members of the Marjon Canvas course Team.
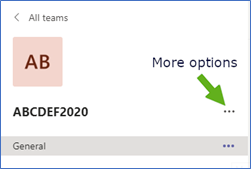
You can easily check this, by visiting the module Team and clicking on the three dots adjacent to the Team name:

2. To add a student to your team, either select the above step 1 and then select ‘Add member’ or within the ‘Manage team’ area select the blue ‘Add member’ button.
If the student is a member of the Marjon Canvas course Team, but still can’t see the recording, this could be due to them not being logged into their Marjon account. Students can check this by visiting www.office.com and by clicking the top right-hand corner of the screen on their avatar. This will show which account they are logged into. (if they are logged into a personal account, they will need to log out and login with their Marjon account)

If your students are still having issues you should contact digitalinnovation@marjon.ac.uk
All members of your module team will have access to the recordings, but you can also directly add users to recordings by visiting the recording permissions as below:
1. Go to your Marjon Canvas course Team > find the recording and click on it (or if from your personal calendar, visit the chat space where you made the recording)
2. Your recording will open within the Team SharePoint space (or in your personal OneDrive, if you created the meeting outside of your module team) > Click on the ‘Share’ button.
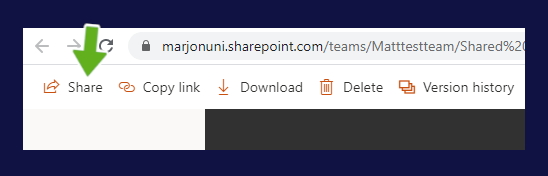
3. Next click on the three dots (more options) link and select ‘Manage access’

4. If the recording was made from the module team, it should automatically be configured with access granting member viewing rights as below:
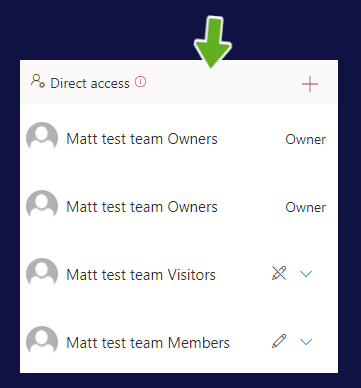
5. If recorded via your personal calendar, then the permissions will appear as below and any invited participants should show in the ‘People you specify can view’ area as below

6. Clicking on the downward facing arrow in the above example will show invited access.
7. If you need to add any Marjon account holders to the recording (either a Teams Marjon Canvas recording or a meeting made from a personal calendar), click on the + button for Direct access as below: (set access to ‘Can view’ > Enter email address > Click ‘Grant access’)

Resources
Watch a tutorial video to learn more
Breakout Rooms
Breakout rooms is now available for academic staff to use for online meetings and this guide will show how to create a breakout room or rooms.
Access a Word guide for Teams here. (or view the online guidance from Microsoft here)
Creating breakout rooms
1. Open Microsoft Teams
2. Go to your Marjon Canvas course Team and activate your meeting (you can only setup breakout rooms within a live meeting)
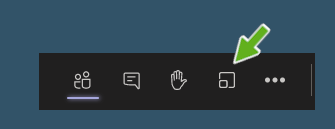
3. Click on the breakout room icon (next to the raise hand icon)
4. Select the number of rooms you need for your breakouts (you may want to assign different students to different breakout room groups for example)
5. Select how you would like to assign your students, if it’s automatic they will be assigned to the rooms and they will automatically open when you open them
6. If you wish to manually assign students, you will need to add them yourself
7. When you are ready, select ‘Create rooms’
How to manually add students to your rooms
1. To manually add students your students will need to be joined to the meeting
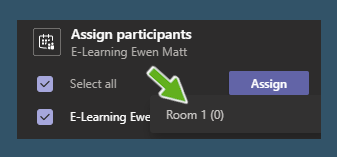
2. Select the ‘Assign participants’ drop-down menu

3. Check the boxes next to the students you want to assign to a particular breakout room > then click on ‘Assign’
4. A drop-down list of your rooms will appear, click on the room that you want to add the student(s) to
5. Your student(s) will now be assigned to the room(s) – to check this, click on the arrow for the room to expand it
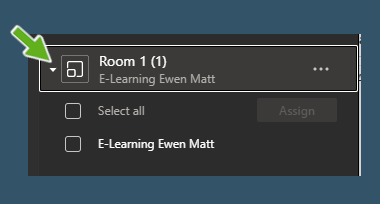
(You can re-assign students to other rooms at this point if you need to by checking the box next to their name and selecting the ‘Assign’ button)
How to activate your breakout room(s)
1. To ‘open’ or activate your breakout rooms hover your mouse over the ‘closed’ area and click on the 3 dots icon
2. Select ‘Open room’ from the available options
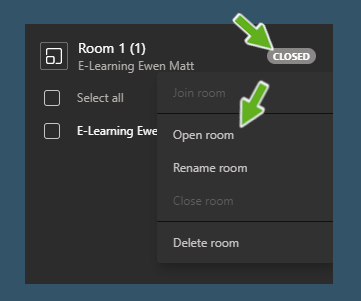
3. The students in those breakout rooms that have been opened will then leave the main meeting and their breakout room will open – they will be able to share content, have conversations and can record
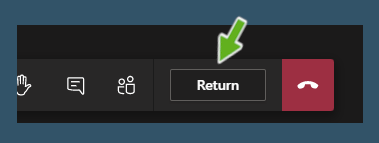
4. When your students are ready to re-join the main meeting, they should select the ‘Return’ button in their breakout room
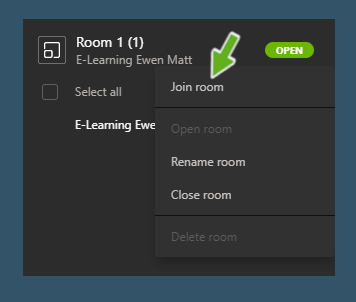
5. As owner you will also be able to join any breakout room if you need to. To do this click on more options for the room and select ‘Join room’ (note this will put the main meeting ‘on hold’)
Make an announcement
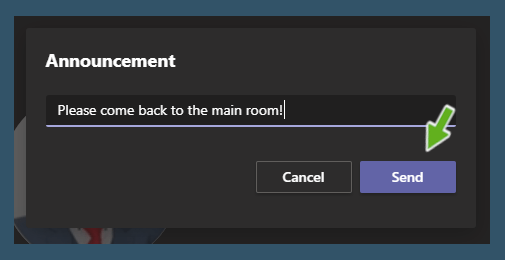
If you need to let students know that they need to come back to the main meeting or for any other reason, you can make an announcement which will display in all breakout rooms.
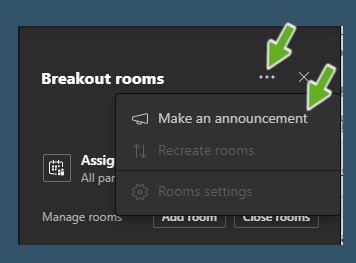
1. Click on the more options (3 dots) adjacent to the ‘Breakout Rooms’ heading at the top > Then select ‘Make an announcement’
2. Enter your announcement message and select ‘Send’
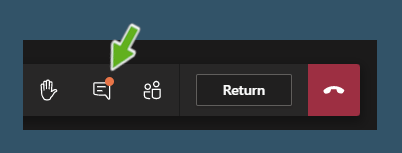
3. Your students will receive a notification in the messaging area for their breakout room
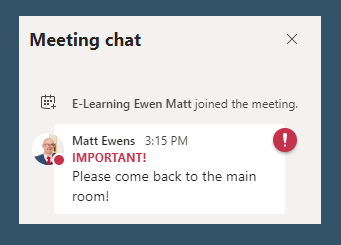
4. When your students click on the messaging area – they will see the announcement message
Resources
Watch a tutorial video to learn more
Creating a breakout room
Creating multiple breakout rooms and manual assignment
How to make a guest a presenter
If you need to invite a guest into a session in Teams and want to give them the ability to present, the below instructions will show you how. (note this works if you add the guest as a guest member into a module team as well)
Outlook method (via personal calendar)
1. Open your Outlook calendar
2. Create a New Event & enter the required details > add the external email address in the invitation box > Click the slider to enable ‘Teams meeting’ > Then select ‘Send’

3. Once your meeting has been setup, your externally invited presenter will receive an email with a joining link.
4. When it is time to start the meeting, your guest will join and you will receive a message within the session to accept their entry into the meeting. Once you have accepted their request you can make them a presenter.
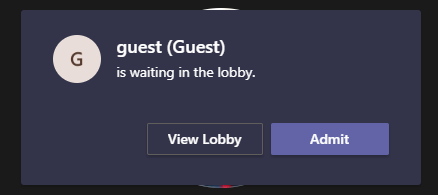
5. Select the participants area and click on the three dots next to your guest and select ‘Make attendee’
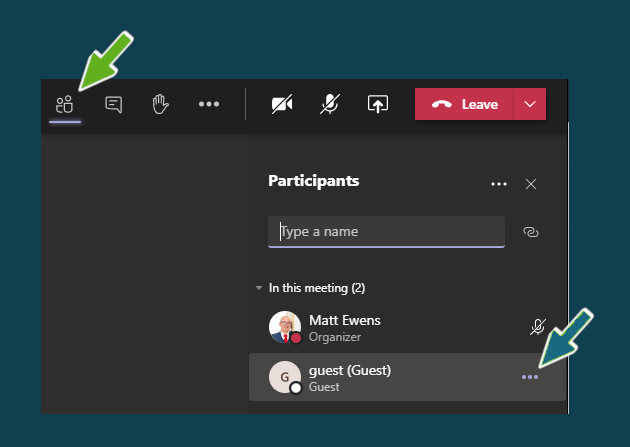

(Note once you select this, you will see a message on screen, click on the ‘Change’ button to activate their role change.)
6. Click back on the three dots next to your guest and you now have the option to ‘Make a presenter’
Note: Guests are unable to record & will not have access to post event chat or recordings (recordings can be made available by downloading from Stream and uploading to your My Folder)
Resources
Watch a tutorial video to learn more
How to include video audio when presenting
If you want to play a video whilst presenting in Teams to enable your viewers to hear the audio in the video, how do you do it? Or indeed, if you want to pre-record a lecture in Panopto and include the audio from YouTube video?
There are several methods that you can use to play audio from a video whilst presenting and the below instructions will help you to ensure that a) your audience can hear any videos you play whilst presenting and b) that the audio is captured during a recording.
Microsoft Teams
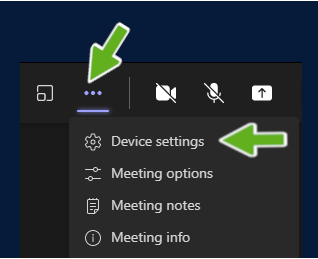
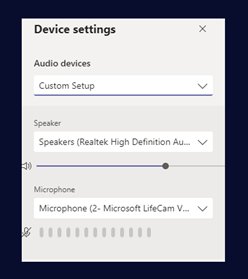
1. When in a meeting, select the three dots icon at the top of the screen > Then select ‘Device settings’.
2. Ensure that the speaker settings are setup with your computer speaker system & your microphone is set to your web camera.
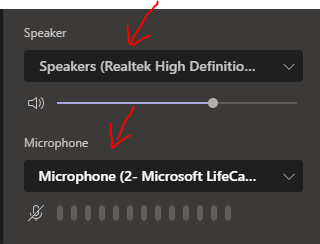
The reason why this needs to be setup in this way is because you will be recording the output from your speakers, if your speaker settings are set to a headset for example, then the sound from a YouTube video will not be recorded.
3. Select the ‘share’ option.

2. Click on the slider for ‘Include computer sound’.
Now if you record and play a YouTube video or video from another source, the audio from that video will be captured in the recording.
Panopto
If you use either the webcast feature or the desktop recorder (opens anyway if recording a webcast) and you wish to play a video from YouTube or online. You’ll need to enable the following settings:
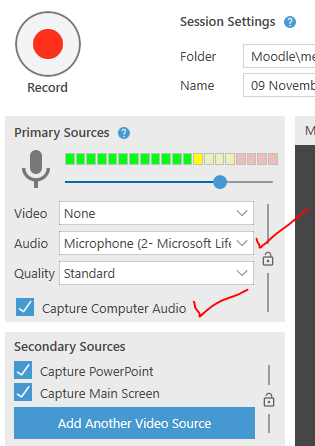
Make sure you double check the ‘Audio’ input. In the above example this is set to my web camera not my headset & mic.
Panopto capture
If you use Panopto to capture screencasts via the Panopto capture method then you need to enable the box in the screen sharing section as below:
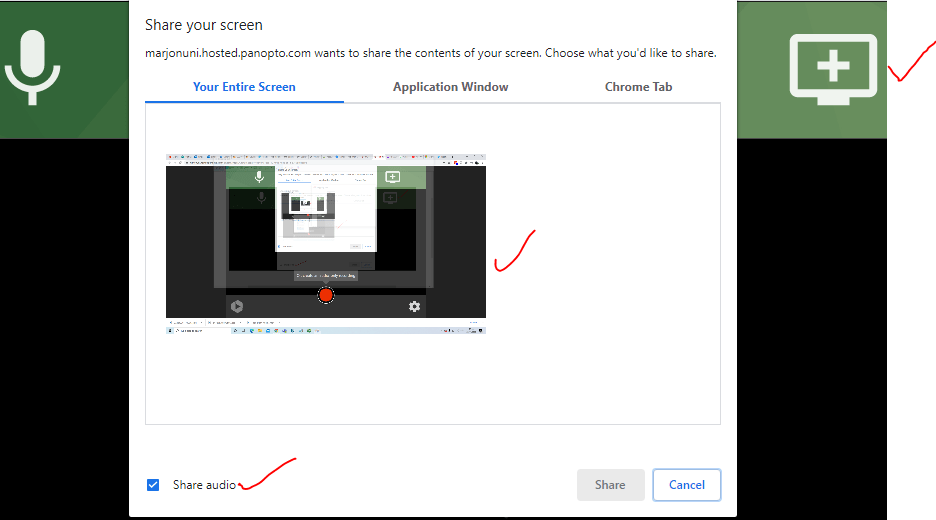
(access Panopto capture via https://marjonuni.hosted.panopto.com – select ‘Create > Panopto Capture’)
Resources
Watch a tutorial video to learn more
How to raise hand, manage presenters & download attendance list
Teams have recently provided three updates for the tool, which provide greater functionality within a live session.
Raised hand
The raise hand option allows students to virtually ‘raise their hand’ within a session. When they activate this a notification is sent to the organiser of the session/meeting and a number will appear above the participants icon on the toolbar. As the organiser this feature could be really useful if you’re busy delivering a presentation, but not able to keep an eye on the text conversations.

If you click on participants icon, you can then lower the student’s hand once you have answered their question.

Tip: You may wish to structure your online Teams lecture by starting with an introduction to the tool & online etiquette (for example switching off mic/video during presentations to limit background noise) – letting students know about raising their hand will help minimise disruption for attendees.
Manage presenters
When creating any online meeting you can restrict who can record and present. This is particularly important in terms of ensuring that your presentations and online meetings run smoothly. You can set this up prior to a session by following the guidance in this post: Important considerations when creating and running team sessions/meetings
Or, you can now change this on the fly whilst in a live session. Follow the steps below:
1. Click on the participants icon on the toolbar
2. There is a ‘manage permission’ icon – with a tick and a cross, click on this
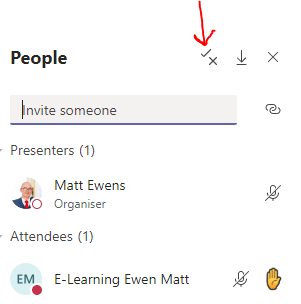
This will open a new browser tab with further options.
3. On the ‘who can present’ drop-down, select ‘only me’ and ‘save’
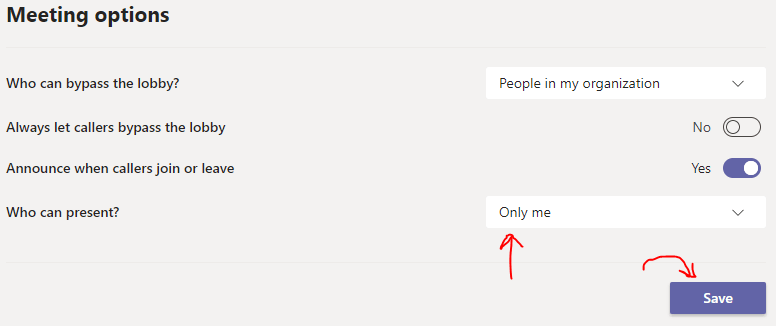
4. When you have saved the correct permissions, close the tab in the browser.
This ensures that students are unable to present or record.
Download attendance list
During a session, or when it has finished and all participants or students have left, you can access the full attendee list from the participants area. This will download an Excel document, with details of the activity from the session.
1. To do this, click on the participants area on the toolbar
2. Select the download button

Resources
Watch a tutorial video to learn more
How to use channels
Do you find your general channel getting quite busy? If so, you could use additional channels to help break-up content and make it easier to organise content and information.
1. Login to Teams (preferably using the dedicated Teams app)
2. Navigate to a Marjon Canvas course team
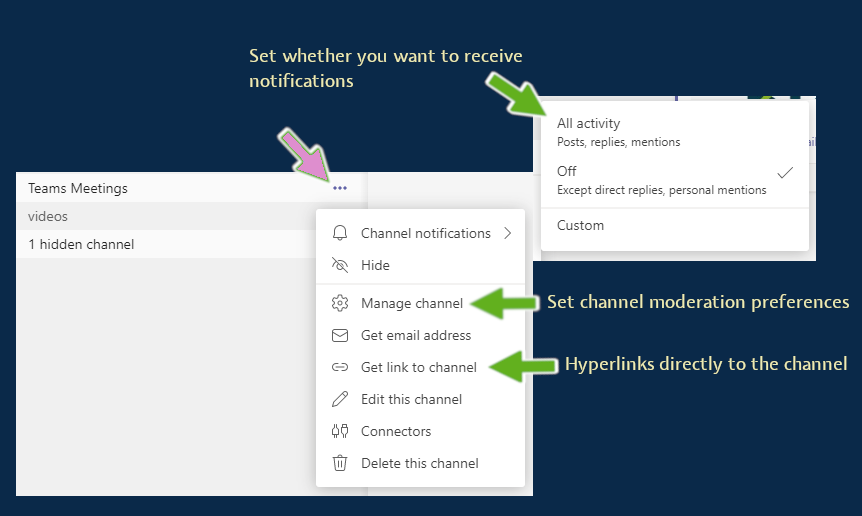
3. Click on the more options (three dots) adjacent to the team name > Select ‘Add Channel’
4. Give your new channel a name (for example ‘meetings’) > Tick the box to ‘Automatically show this channel in everyone’s channel list’ and click on ‘Add’
You can schedule meetings from the new channel and have further options available by hovering your mouse over the new channel on the left-hand side – see below key for descriptions on the functions.
Resources
Watch a tutorial video to learn more
How to hide your web cam background
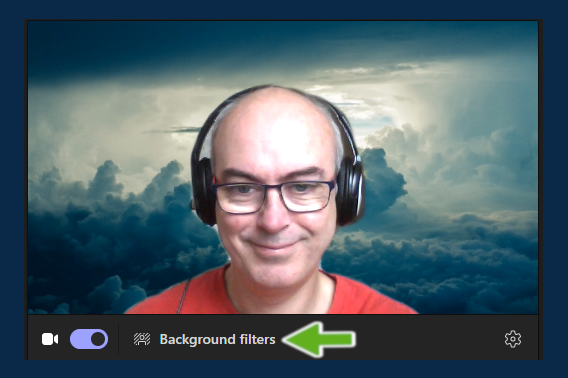
1. Login to Teams and activate your meeting
2. Before entering the meeting, click on the ‘Background filters’ option
3. You will see a number of background options, click to add one
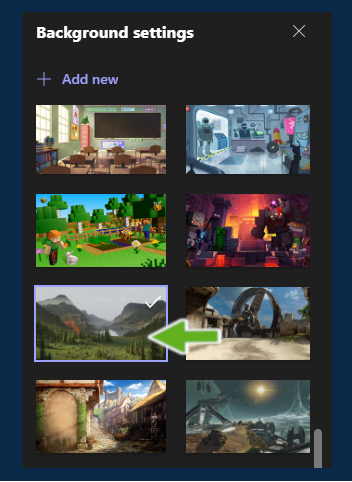
4. Alternatively you can also upload your own background by selecting an image from your computer
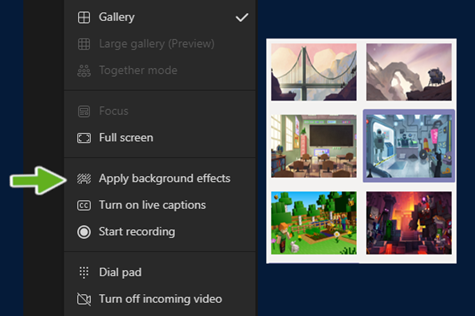
5. If you have already joined your meeting, you can also change your background by clicking on the three dots (more options)

6. Then select ‘Apply background effects’
Resources
Watch an instructional video to learn more
Accessibility: Automatic captions & the immersive reader
Automatic captions
1. Activate your teams meeting or session
2. Direct your students to select the three dots or more actions/options in Teams (note this service is not available if using Teams in the browser)
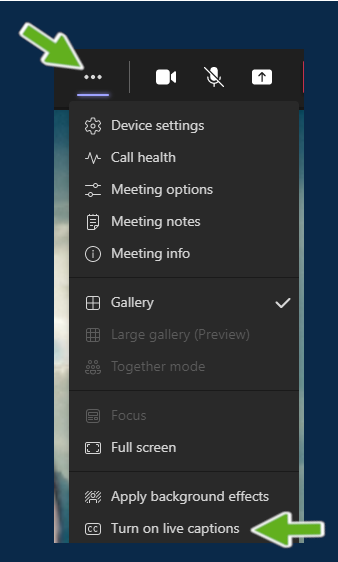
3. Switch on ‘Turn on live captions’
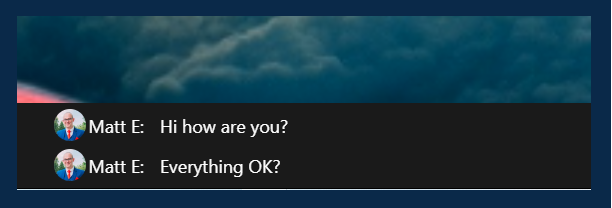
This will convert all speech into text that will appear within a bottom bar on the screen as below:
Resources
Watch an instructional video to learn more
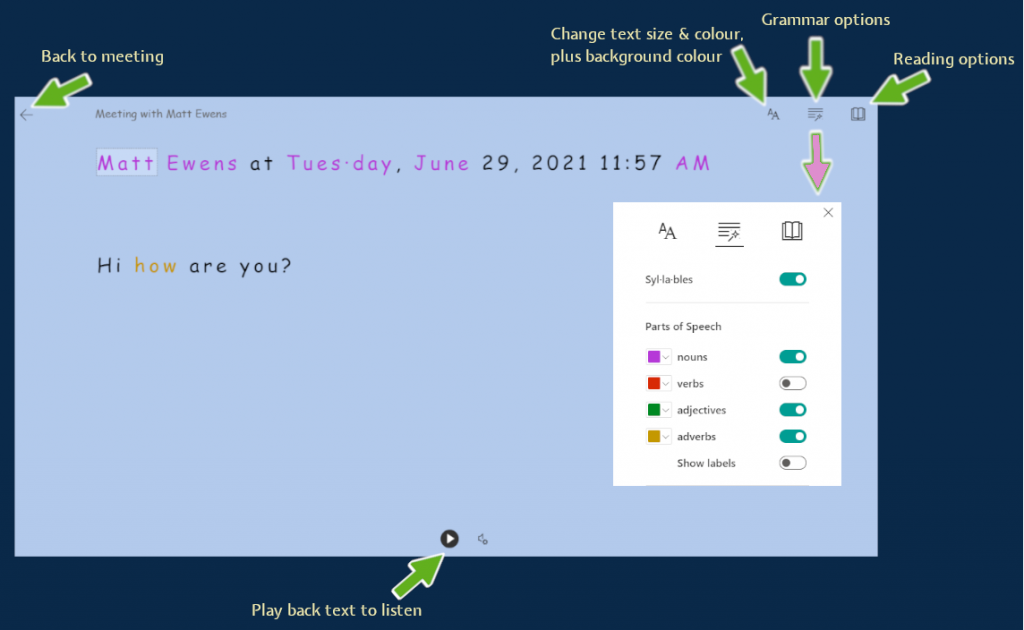
The immersive reader
The immersive reader can be used by any student to view text in a more accessible way. So when the student activates the immersive reader they can make the text larger, change the background colour and also play back the text, which will read out all text chat.
1. Hover the mouse over any chat text content & click on the three dots
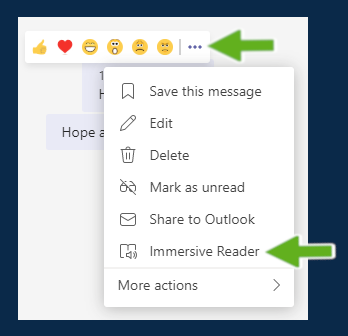
2. Select ‘immersive reader’
3. This will load the immersive reader as shown in the below key
Resources
Watch an instructional video to learn more
Message formatting & importance
In-meeting message formatting
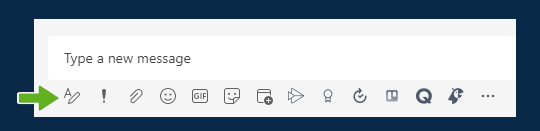
Did you know that before you send any message in a chat space, you can format the text, add images, links or headings?
1. Before you type you message, click on the formatting icon
2. You can now format any text to make it bold, italic, underline, etc. You can also click on the three dots (more options) to add hyperlinks, tables, headings, increase the font size & more as below:
3. When you have completed the text formatting, click on the send button
Resources
Watch an instructional video to learn more
