Turnitin is still the primary assessment tool used within Marjon Canvas courses. The main difference being that in order to create a Turnitin assignment, you will need to add it as an external tool. Marjon Canvas additionally has its own assessment system available through assignments and quizzes. (you can chose to use Canvas assessment, but all exams MUST be setup using Turnitin.
Academic Staff – Guides and Videos
Introduction to Turnitin Feedback Studio
Background
Turnitin is an online submission system that has been used at the University for a number of years. It enables students to submit their assignments via Marjon Canvas and allows tutors to mark online using a range of tools, for example: inline, bubble and quick mark comments, rubrics, general comments and audio feedback. Turnitin also checks against 45+ billion webpages, 337+ million student papers and 130+ million articles to provide a summary of matching or highly similar text found in each submitted paper.
What is Turnitin Feedback Studio?
Turnitin Feedback Studio is the new updated version of Turnitin that will be used for online submissions at the University from July 13th 2017. Feedback Studio provides the same tools and functionality as its predecessor but has a new and improved mobile responsive interface that is simpler and more intuitive to use. It also brings together grading, feedback and similarity checking so that all can be viewed together.
Turnitin Feedback Studio Walkthrough
Whether you are totally new to Turnitin or have used it extensively in the past, the video below is worth a watch to see the new Turnitin Feedback Studio.
Marking using Feedback Studio
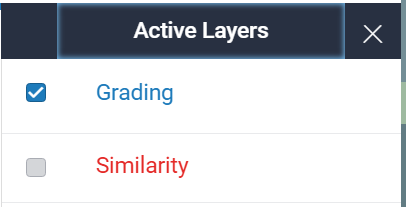
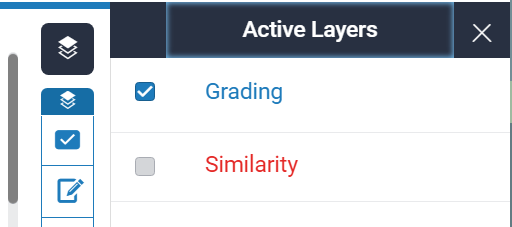
From within the Turnitin Feedback Studio you can access the ‘Grading’ layer to use the electronic grading and feedback tools.
1. Click on the layers icon ![]() and check the tick box to activate the Grading layer.
and check the tick box to activate the Grading layer.
2. The Grading tools can then be accessed from the Grading controls on the right toolbar.
![]()
3. The Grading layer contains several tools that academic staff can use in grading and assessing work. This tutorial will cover the use of:
* Bubble comments
* Highlighted text comments
* Inline comments
* QuickMark comments
* General comments
Comments
A comment is equivalent to a note that a tutor may write in the margins of an essay. A comment might be:
“This is a very good introduction, you’ve clearly identified the focus for the essay and how you intend to answer the question”
A comment can be up to one thousand characters in length.
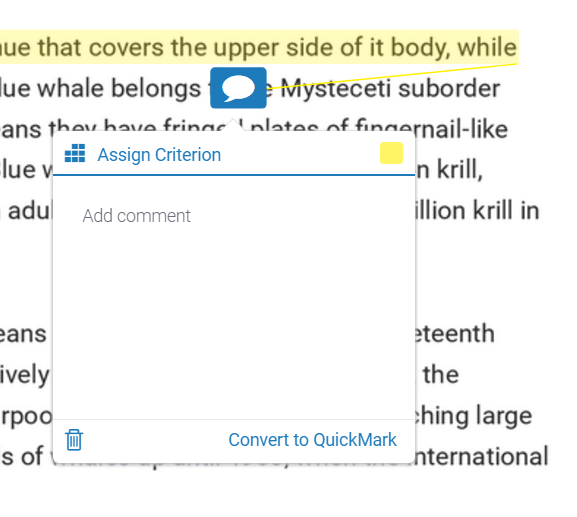
Adding a bubble comment to a paper
4. Click on the ‘Layers’ icon ![]() and tick the checkbox to view the ‘Grading’ layer.
and tick the checkbox to view the ‘Grading’ layer.
5. Click the point in the paper you want to add the comment to and select the ‘Bubble comment’ icon from the pop up (Centre button).
6. Type your comment into the pop up window which appears.
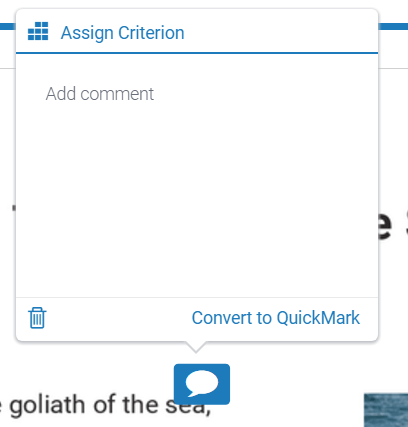
7. Click out of the pop up to save your comment.
8. The comment will be added to the paper as a hover-over bubble

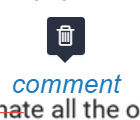
Editing or deleting a comment
Comments can be deleted by clicking back on the bubble to open the pop up and clicking ‘trash can’ icon

Highlighted text comments
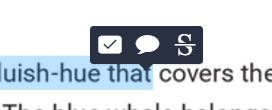
A tutor can associate a highlighted section of text with a comment, to reference a specific area of text
1. Highlight the text you want but clicking and dragging
2. Release your mouse to bring up the comments pop up and select the type of comment
3. Enter the comment into the text field of the comment bubble. Within feedback studio you can add some text formatting to comments, including bold and italics, you can also include hyperlinks using the link button.
4. Select a highlight colour from the 5 colour options
5. Click out of the pop up to save the comment
6. The comment icon will appear where the highlight was made
7. You can now drag the comment icon away from the highlight and it will be associated with the highlight by
a connecting line
![]()
Striking through text
1. You can strike through text within the Feedback Studeio by selecting the text and releasing your mouse to bring up the comment pop up
2. From this pop you can select the Strikethrough button 
3. To delete the strike through hover over the text you have applied it to and then click on the trash
can icon that appears
Adding an Inline comment to a paper
Inline comments ‘overlay’ paper text and so are suitable to use at the beginning, end or between paragraphs of a submitted paper
1. Make sure you have the grading layer active
2. Click on the place on the paper where you want to add the comment
3. This will bring up the comment pop up and you can select the text comment button ![]()
4. When you have finished, click elsewhere on the paper
5. You can edit or delete an inline comment by clicking directly on the text or trash can icon
6. To move an inline comment click and drag on the comment text
QuickMarks
Turnitin has a number of built in ‘QuickMark’ comments that you can use when marking
1. To open the ‘QuickMark’ panel click on the ‘QuickMark’ button on the right hand side ![]()
2. You can add ‘QuickMarks’ directly form the side panel by clicking on and dragging the ‘QuickMark’ onto the paper.
3. Alternatively you can click on the point in the paper where you want to add the ‘QuickMark’ and select ‘QuickMark’ from the 4. comment pop up ![]()
5. QuickMarks are stored in ‘sets’. The image below shows an example QuickMark Set
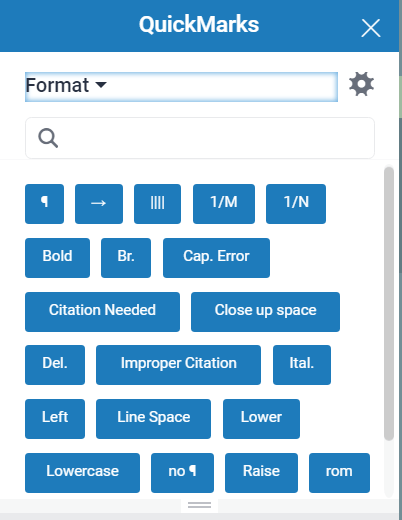
6. To change to another set, click the down arrow next to the name of the ‘QuickMark’ set and select the set that you want from the list
7. You can also add a ‘QuickMark’ to highlighted text. To do this, highlight the text and click the ‘QuickMark’ button from the pop up. You can then drag the ‘QuickMark’ comment away from the highlight text and it will still be associated by a connecting line
General comments
The general comment tool allows for a longer, general feedback. Content that you would normally write on the Coursework Report Form can be entered here.
The general comments area can be used to record a shadow mark, if required (as this is not captured elsewhere) and can also be used to capture second markers comments, although you may consider clearly identifying this for students, e.g. First marker name and comment, second marker name and comment.
1. Click on the general comments icon in the right sidebar
![]()
2. Enter your name and comment within the text field
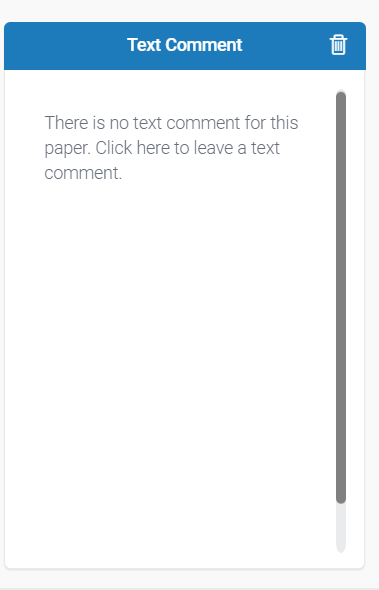
3. Click away from the text comment box to save your comment
Allocating a grade
When you are ready to give the paper a final grade, click in the grade box at the top right of the screen
You can now manually type in a grade
Click outside the grade box when you have entered a grade (it will save automatically)
Feedback Studio Originality Report and the Similarity Layer
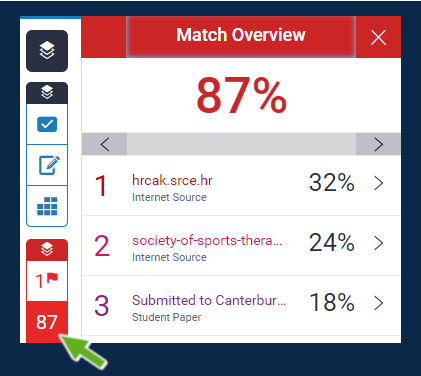
Originality Reports provide a summary of matching or highly similar text found in a submitted paper. Turnitin checks against 45+ billion web pages, 337+ million student papers and 130+ million articles from academic books and publications.
The colour of the report icon indicates the Similarity Index of the paper, based on the amount of matching or similar text that was uncovered. The percentage range is 0% to 100%. The possible similarity indices are:
blue no matching text
green one word to 24% matching text
yellow 25-49% matching text
orange 50-74% matching text
red 75-100% matching text

How to access an originality report
To access the originality report for a submitted paper:
1. Click the assignment on your Marjon Canvas page
2. Click a student paper to open it
3. Then check the ‘Similarity’ layer checkbox from the ‘Layer’ button (note this is likely to be checked by default)
Originality report contents
The Originality Report is separated into three main areas:
Similarity Sidebar – Shows the Similarity Index for the report
Paper text – The submitted paper’s text in its original formatting. Matching text is highlighted in a color that corresponds to the matching source listed on the right side of the Originality Report
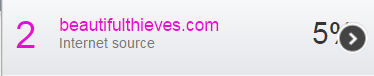
Matching sources sidebar – The list of matching sources for the highlighted areas of the paper text to the left. The sidebar also displays the Filter and Settings (exclusion options) and the Exclusion List

View mode icons
The view mode icons allow users to switch between the Originality Report viewing modes: Match Overview and All Sources view. The default viewing mode is the Match Overview.
1. To change the view mode for an Originality Report to the All Sources view, click on the All Sources icon
2. The sidebar will automatically update to the All Sources view mode

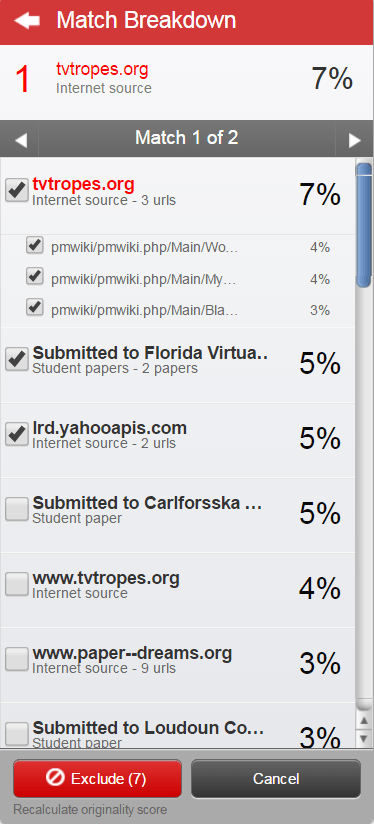
Match breakdown mode
By default the Originality Report opens in Match Overview mode. In some cases, matches to smaller areas of similarity may be obscured by larger matches and not shown on this view mode.
1. To find the underlying sources click on the arrow icon to view the underlying sources
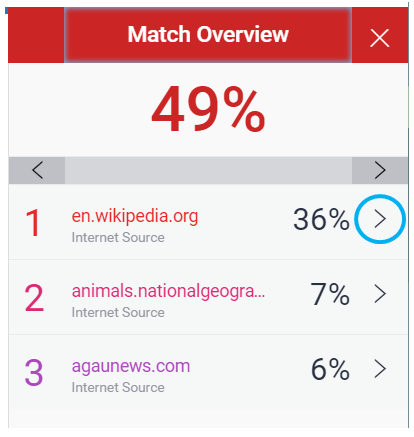
2. In this mode all sources that are obscured by the selected top source are listed below the top source. Click on a source to display the highlights for the match
3. The highlight for the top source match will become lighter and the match to the selected underlying source will be displayed with a darker highlight
4. To return to the Match Overview mode click on the back arrow next to Match Breakdown at the top of the sidebar ![]()
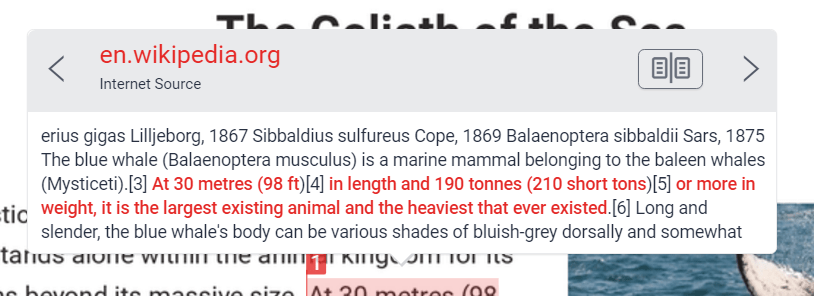
Direct source comparison
Direct Source Comparison allows a user to quickly compare matching text to the source in the Turnitin repository. Matches to other student papers are not available for Direct Source Comparison viewing unless the students’ are enrolled in your class. Direct Source Comparison can be accessed from the Match Overview or the All Sources view mode of the Originality Report.
Users can either view the Direct Source Comparison as a glimpse within the paper or as the Full Source Text within the sidebar. The glimpse only provides the matching text within context of a few outlying sentences from the source while the Full Source Text loads in the sidebar and contains the full text of the source and all the match instances.
1. To access a direct source comparison click on a highlighted area of text on the left hand (student paper) side

2. A pop-up window will appear above the highlighted text displaying the matching text within the source of the match
3. To view the matching text within the full source text click on the ‘Full source text’ button ![]()
4. The full source text will load into the sidebar
5. If there are multiple matches to this source, click on the arrow icons to quickly navigate through the match instances
6. To exit the ‘Full Source Text’ view click on the ‘X’ button
Watch a video tutorial to learn more
Excluding specific matches from the originality report
There may be situations in which you want to exclude a particular source/match from the originality report for an assignment. This will mean you are able to view/mark the assignment without the similarity score/report being affected by particular sources.
From within the Turnitin Originality report window you are able to select and remove specific sources from the overall report and the match view.
Excluding Matches
1. Open the Feedback Studio and then select the Match Overview on the right hand-side of the window, from here you can identify the sources you want to exclude and use the arrow to open the ‘Match Breakdown’ view.
2. At the bottom of this panel you will see the option to ‘Exclude Sources’, selecting this button will allow you to individually select the sources to remove.

3. Once you have selected the sources, by checking the tick boxes, click on the ‘Exclude’ button at the bottom to recalculate the originality score without the selected sources.
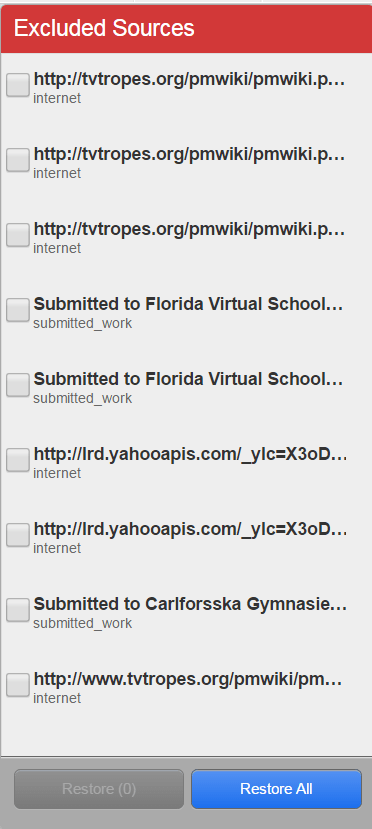
Resetting/Including excluded matches
If you decide you no longer want to exclude a source or want to reset the originality report to its original result (this may be particularly useful if there are multiple markers on the same assignment) you are able to do this from the ‘Excludes Sources’ panel from within the originality report view mode.
1. From the Originality report view open the ‘Excluded Sources’ panel using the “stop sign” icon.
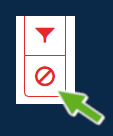
2. This will open a panel displaying all of the sources currently excluded from the originality report, use the check boxes to select which sources to include or use the ‘Restore All’ button to reset the report to include all sources.
Watch a video tutorial to learn more
Turnitin for iPad App
Turnitin for iPad is an App that enables you to use Turnitin to grade student submissions on your iPad both on and offline. It contains several tools that academic staff can use in grading and assessing work. These include: QuickMark comments, highlights with comments, bubble comments, inline comments, strike through text, voice comments, general comments and rubric grading. The Turnitin for iPad App is available as a free download in the Apple App Store.
Important: The Turnitin for iPad App should only be used on courses where there is one marker as the app is not designed for use by multiple markers on a course
Using the Turnitin for iPad App
Marking a paper withe the Turnitin for iPad App
Accessing feedback via iPad
Thanks to a recent update (Mar 18) you can now access feedback using the Turnitin app without needing a code.
To do this:
1. Download the latest Turnitin app from the iOS store
2. Go to the module and Turnitin assignment you wish to view
3. Open the feedback studio
4. Click on the submission information icon in the bottom right-hand corner of the toolbar
5. Enter your email address and confirm, then press the ’email me’ button.
6. Open the email in your iPad from Turnitin
7. When you’re ready, click on ‘Add class’
8. The app will automatically open the class
How to get the Turnitin for iPad App
Once you have generated your unique 16 digit class code, you are ready to download and begin using the Turnitin for iPad app.
1. Go to the App Store and search for the ‘Turnitin for iPad’ App
2. To begin the download/install process, tap the ‘Open’ button
3. When asked which Turnitin you use, you need to select Turnitin UK
4. You will also be asked how you usually access Turnitin. For this question, you should select Integrated LMS (as you usually access Turnitin through Marjon Canvas – our Learning Management System)
5. Before you can go any further, you will now need to enter your unique ‘class code’
6. The final step in setting up the Turnitin App is to enter a 4 digit passcode. This will act as a password for the App so that no one else using your iPad can access your student assignments and grades etc on Turnitin
Using the Turnitin for iPad App
When using the App to grade assignment submissions for the first time, you will need to be online in order to download submissions. The App will automatically download submitted papers in the background; so that you can then mark submissions offline (see the Mark Offline section for synchronisation information). This section will take you through the steps needed to access your student submissions and also how to access a fantastic interactive Turnitin for iPad tutorial.
1. Tap the Turnitin icon on your iPad to launch the App
2. You will be prompted to enter your 4 digit passcode – note: you will see your ‘account(s)’ in the background
3. Once you have entered your passcode, the passcode box disappears
Note: Tap the blue ‘Try Tutorial’ button to access an interactive tutorial that shows you how to use features in the App to mark and grade a paper as though it were an actual student submission
4. To access student submissions the first step is to tap ‘University of St Mark and St Jo…’ in the ‘Accounts’ pane
5. Next you need to tap the module that has the submissions you want to access

Note: In this example there is only one module showing, but all modules that you have generated a code for will show here
6. You will be taken to the Assignments pane which displays the name of the assignment, submission date and a progress bar that shows the number of submissions out of total expected and how many have been graded
7. Tap the progress bar and then tap the right hand side of the screen to view submissions
8. You will see that assignments are organised into three categories: ungraded, graded and not submitted
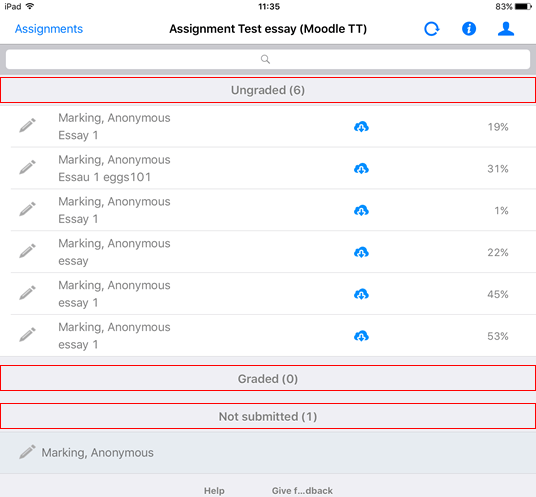
9. Tap an assignment title in the ‘Ungraded’ section to open it. You are now ready to mark and grade the paper
View the originality report
1. To view the originality report tap the ![]() icon
icon
2. Then toggle the originality report to ‘On’
3. Matching text will be highlighted
4. Tap the originality percentage and then toggle originality report to ‘Off’ to hide the originality source matches
Marking a paper with the Turnitin for iPad App
The comment and grading options when using the App are the same as in the regular Turnitin environment. This section will show you how to use the different comments when marking a student paper.
Add a QM(QuickMark) comment
1. Tap on the paper to open up the comment options and then tap the QM icon ![]()
2. Tap the comment you want to add and it will appear on the paper
3. To move the comment, tap and drag
4. To select a different QMSet, tap the ![]() icon and select a QM set from the list
icon and select a QM set from the list
Add a highlighted QM comment
1. Tap and hold the text to highlight it. You will see that it highlights the line of text in blue
2. To reduce or extend the selection, simply tap and drag the ‘markers’
3. With the text selected, tap the QM icon, then tap a highlight colour to select it
Add a ‘bubble’ comment
1. Tap on the paper and then tap the ‘bubble comment’ icon ![]()
2. Enter your comment and then tap elsewhere on the paper to save
3. Follow instructions in section above to highlight a bubble comment
Add an ‘inline’ comment
1. Tap on the paper and then tap the ‘text’ icon ![]()
2. Enter your comment
3. Tap anywhere in the paper to save the comment
4. Tap and drag to move the comment
Add a general comment
1. Tap the ‘pencil’ icon (top right corner)
2. Enter your feedback
3. Tap ‘Done’ to save
Add a grade
1. Tap the ‘pencil’ icon (top right corner)
2. Tap the ‘Edit Grade’ button (to the left of the ‘general comments’ area)
3. Enter a grade
4. Tap outside the grade box to save
Work offline
The ‘Turnitin for iPad’ App allows you to download papers that you can mark and grade either on or offline. Whenever your iPad is connected to the Internet, any changes will be automatically synchronised with Turnitin every 5 minutes. If you have been working offline and then connect to the Internet, there is also a ‘Synchronise Now’ option
Rubrics and Grading Forms
Rubrics and grading forms overview
Rubrics and grading forms are great tools for tutors to use to aid consistency in marking and to share with students so that they have a clear understanding of the criteria and associated points that their work will be marked against.
In Turnitin you can choose from 3 rubric types or can opt to create a grading form:
- Standard rubric – Used for numerical scoring. This type of rubric allows you to enter scale values and criteria percentages. The criteria percentages combined must equal 100% as each criterion represents a percentage of the student’s overall grade.
The rubric score is then calculated as: assigned scale value ÷ 100 × criterion value - Custom rubric – Descriptive scales and criteria can be entered and each rubric cell can be allocated its own point value as well as written feedback.
The rubric score is calculate as: sum of selected cell values ÷ sum of the highest cell values x point value of the assignment - Qualitative rubric – Used for providing feedback without the use of numerical scoring. The scale and criteria used for this type of rubric are more descriptive than measurable. Although no score is entered in the rubric, an overall mark can still be entered.
- Grading Form – Grading forms can be used to provide free form feedback and scores to evaluate student work based on defined criteria.
Note:
Turnitin rubrics do not allow for marks within ranges to be selected but as a workaround for this you can use a Grading form and simply enter the mark ranges into the description fields. When marking with the grading form you can then refer to each mark range and enter a mark into the score box.
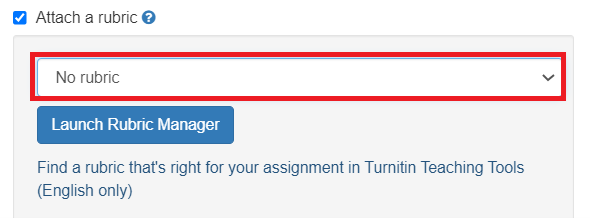
Attach an existing rubric to an assignment
How to attach an existing rubric to an assignment
If you have created any rubrics for previous Turnitin assignments at Marjon, you can access and reuse them.
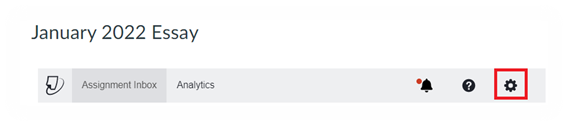
- Click Assignments in your course navigation menu
- Locate and open the Turnitin assignment that you want to add a rubric to
- Click the cog icon to access the Turnitin settings
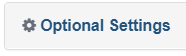
- Scroll down and click Optional Settings
- Click into the Attach a Rubric check box to select it
- Click the down arrow to see a list of the rubrics you have already created
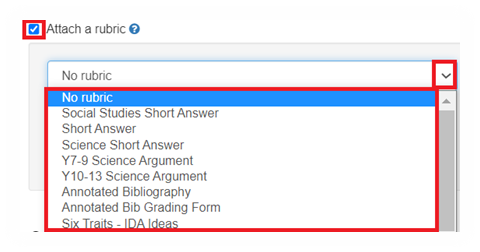
- Select the rubric you want
- Then scroll down and click Submit
The rubric template and types of rubric available
Turnitin provides a rubric template for you to create new rubrics. This section shows you how to access the template and explains the different types of rubric available.
How to launch the Rubric Template
- Click Assignments in your course navigation menu
- Locate and open the Turnitin assignment that you want to add a rubric to
- Click the cog icon to access the Turnitin settings
- Scroll down and click Optional Settings
- Click the Attach a Rubric check box to select it
- Click the Launch Rubric manager button
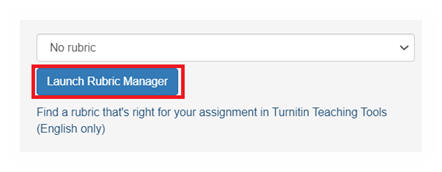
- Click the ‘view available rubrics and rubrics options’ button

- Then click Create new rubric

This will open the template for you to select a rubric type and edit and add details.
Types of Rubric available
Towards the bottom of the template you need to select one of the three available icons to indicate the type of rubric you want to create
Option 1 – Standard Rubric
Enter scale values for each column and weight your criteria rows using percentages![]()
Option 2 – Custom Rubric
Enter any value directly into each rubric cell![]()
Option 3 – Qualitative Rubric
A rubric that provides standard feedback but has no numeric scoring![]()
Create, attach and use a Standard rubric
Create a Standard Rubric
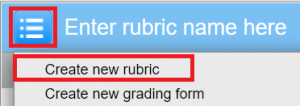
- Launch the Rubric template
- Click the ‘View available rubrics and rubric options’ icon then select ‘Create new rubric’
- Click the Standard rubric 0% icon at the bottom of the rubric template

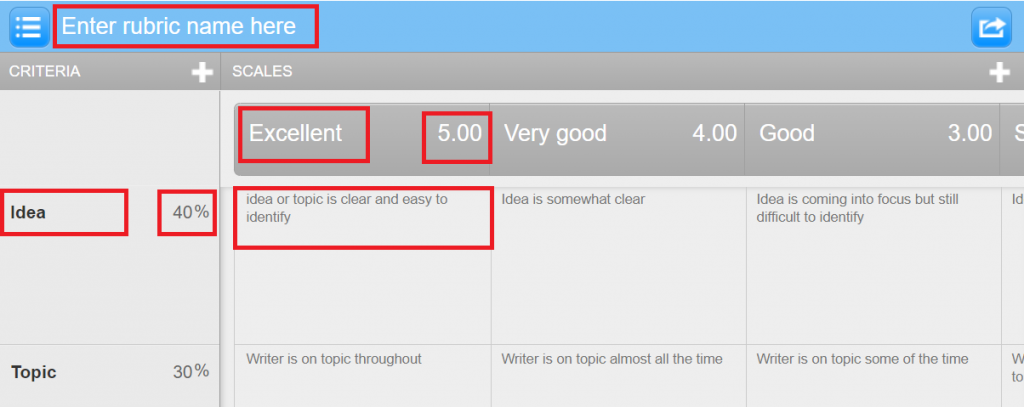
- Enter a name for your rubric
- Click on Criterion 1 to enter criterion (e.g., Knowledge & Understanding).
Note the Criterion field allows for a maximum of 13 characters so may need to be abbreviated - Click the 0% field next to criterion to enter a weighting
- Click into each Scale field and enter a scale (e.g. Fail 0 to 29, Fail 30 to 39, Pass 40 to 49 etc)
- Click on the 0 field next to each scale and enter the number of the scale (e.g. scale 1 = 100%, scale 2 = 85%, scale 3 = 75% etc)
- Repeat to add other criterion, weightings and scales
- Click Save
Example – Standard rubric
Attach the rubric to the assignment
- Click into the rubric box and select the rubric you want to attach
- Then scroll down and click Submit
How to use a standard rubric for marking
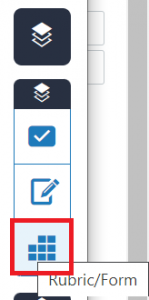
- Open the assignment
- Click the title of a submitted paper
- Click the Rubric/Form icon to open
- Click criterion titles to see descriptions at the bottom of the rubric (e.g. Knowledge & Understanding) in this example
- Use the slider to select grade boundary
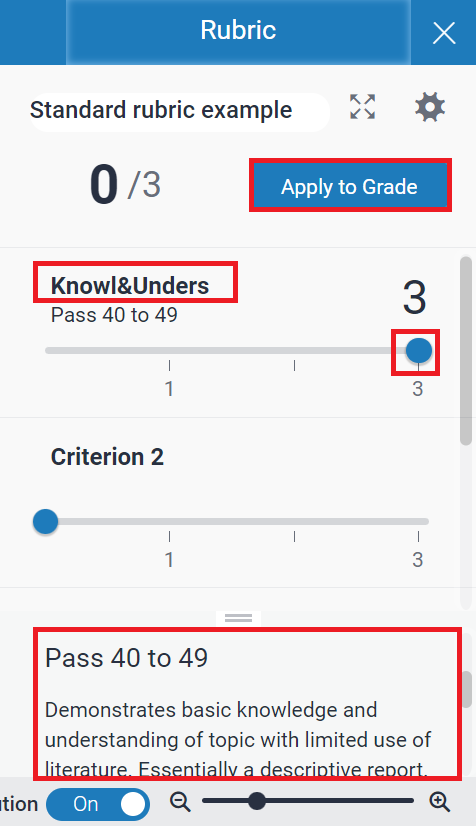
- Repeat for each criterion
- When complete, click Apply to Grade
Note: You can overwrite the grade calculated by entering your own grade into the grade box
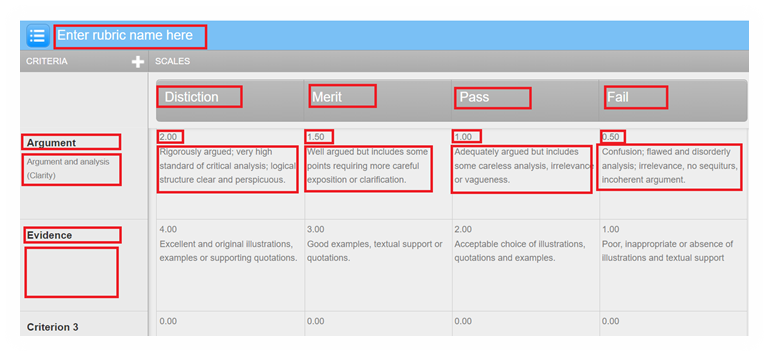
Create, attach and use a Custom rubric
Create a Custom Rubric
- Launch the Rubric template
- Click the ‘View available rubrics and rubric options’ icon then select ‘Create new rubric’
- Click the Custom Rubric icon at the bottom of the rubric template

- Enter a name for your rubric
- Click on Criterion 1 to enter criterion (e.g., Argument)
- Click immediately beneath criterion to enter a description (optional)
- Enter scale names (e.g. Distinction, Merit, Pass, Fail)
- Click into each cell to enter a value
- Click beneath each cell value to enter a description
- Click Save
Note: When marking with a Custom rubric, Turnitin will sum the cell values that you have selected, divide that total by the sum of the highest cell values and multiply this by the point value of the assignment to arrive at a score which will then be rounded to the nearest whole number.
Example – Custom rubric
Attach the rubric to the assignment
- Click into the rubric box and select the rubric you want to attach
- Then scroll down and click Submit
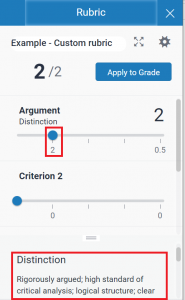
How to use a custom rubric for marking
- Open the assignment
- Click the title of a submitted paper
- Click the Rubric/Form icon to open
- Use the slider to select a scale value
(the scale description will display at the bottom of the rubric) - Repeat to select scale values for each criterion
- When complete, click Apply to Grade
Create, attach and use a Qualitative rubric
Create a Qualitative Rubric
- Launch the Rubric template
- Click the ‘View available rubrics and rubric options’ icon then select ‘Create new rubric’
- Click the Qualitative Rubric icon at the bottom of the rubric template

- Enter a name for your rubric
- Click on Criterion 1 to enter criterion (e.g., Argument)
- Click immediately beneath criterion to enter a description (optional)
- Enter scale names (e.g. Distinction, Merit, Pass, Fail)
- Click in each cell to enter a description
Note: A qualitative rubric provides standard feedback but has no numeric scoring
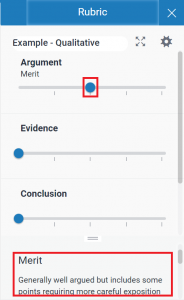
Example – Qualitative rubric

Attach the rubric to the assignment
- Click into the rubric box and select the rubric you want to attach
- Then scroll down and click Submit
How to use a qualitative rubric for marking
- Open the assignment
- Click the title of a submitted paper
- Click the Rubric/Form icon to open
- Use the slider to select a scale name
- Repeat to select scale names for each criterion
Note: Scale names selected will be automatically saved