Plyometric exercises follow the same sequence:
LANDING PHASE – A vast amount of eccentric strength is required during the landing phase. Once muscles start to experience an eccentric contraction. That eccentric contraction will then serve to stretch the elastic element of the muscle and engage the stretch reflex.
AMORTISATION PHASE –This phase, time spent in contact with the ground, is the most important. It signifies the shift from landing to take off and is key for power development. If the phase is too long, the stretch reflex is lost and there is no plyometric effect.
TAKE OFF – The take off is the concentric contraction that follows the landing. During this phase the stored elastic energy is used to increase jump height and explosive power.
Getting Ready for Plyometrics
Due to the nature of Plyometrics being a very high intensity form of training which places considerable stress on the body. Yes, it is true plyometrics can improve performance, it also can cause injury if not carried out in the correct manner. Here are the variables to consider to ensure a safe training session.
Landing
As a general rule an athlete should not be jumping if they do not know how to land. A good landing involves the knees remaining aligned over the toes, the trunk inclined forward slightly, the head up, and the back flat. Beginners should consider spending the first two to three weeks concentrating on landing and being able to move out of a landing before progressing.
Landing Surface
The landing surface should absorb some of the shock. The use of mats for indoors or if outdoors, grass or sand. Jumping on hard surfaces can lead to injury.
Strength
Without good lower body and core strength, the amortization phase becomes too long and much of the benefit of the plyometric is lost. It is suggested the need to squat one to two times body weight as a requirement for plyometrics (NSCA’s Performance Training Journal). However, simple jumps and hops with the use of low barriers could be used with most once they have demonstrated the ability to land properly.
Injury History
Those athletes with a history of lower body injury must be full rehabilitated and have medical clearance prior to starting a plyometric program. The program should start with basic running and change of direction drills including cuts, corners, and rotations before moving on to higher intensity hops, throws, and jumps.
Rehabilitation and conditioning programs are designed to return patients and athletes back to their respective activities as safely and quickly as possible based on functional specific activities. Plyometric exercises should play a critical role in this important role to develop power for performance.
How Should You Design a Plyometrics Program?
Intensity
Intensity is a measure of how hard you work. Intensity is a factor in determining the overall stress a training sessions creates. In plyometrics, each repetition is executed at maximum speed and power, if less, the stretch shortening response and plyometric effect decrease.
Contacts Per Session
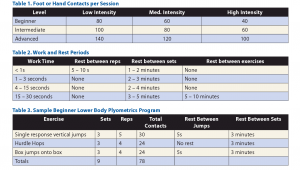
Plyometrics, (NSCA’s Performance Training Journal) recorded by the number of single foot contacts with the ground. For example, 80 contacts would be four sets of 10 repetitions with a two-legged type movement or a total of 80 steps with walking lunges. Table 1 shows the total number of contacts per training session, not the number of contacts per exercise.
Plyometric’s should not be performed more than two to three times per week unless you are alternating days of upper and lower body plyometric drills. If you are just starting to incorporate them into your current conditioning program, two sessions per week is adequate.
Rest Between Sets
Rest and recovery are crucial variables in a plyometric program. Rest refers to the time that is taken between each exercise or set. Recovery refers to the amount of time that is needed before the workout can be repeated.
Table 2 summarizes the duration of work and rest periods for a variety of work periods.
Beginner Program Table 3 shows a lower body program that is suitable for someone starting plyometrics. A dynamic warm up is required prior to the workout.
Below are some lower body plyometric drills that help to increase muscular force resulting in more power for explosive sports.
Squat jumps
Split squat jumps
Lateral bounding
Tuck jumps
Jumping to box
Depth jumps
Single leg hops
Progression
Plyometrics is a form of resistance training; therefore, it follows the principles of progressive overload. As intensity increases volume decreases. In a plyometric session, ways in which the intensity can be increased to achieve this overload include:
- Increased speed of performance
- Higher box jumps, depth jumps and bounds
- Performing single leg drills
- Adding weights to the athlete (weight vests/ankle weights etc) to increase their body weight
Examples of progression of plyometric activities for the lower extremity.
|
Beginner |
Intermediate |
Advanced |
|
Squat jumps |
Jump and reach |
Depth jumps |
|
Split squat jumps |
Medial and lateral jumps |
Box jumps |
|
Bilateral mini jumps |
Anterior and posterior jumps |
Single leg hops |
|
Skipping |
Double leg tuck jumps |
Single leg tuck jumps |
|
Lateral bounding |
Pike jumps |
Drop jump to second box |
|
Ankle bounces |
Jumping to box | Squat depth jump |
|
Shuffling |
Zigzag jumps |
|
| In place jumps |
Side to side push off jumps |
|
| Single leg push off box |
Step from box |
References
Plyometrics NSCA’s Performance Training Journal | www.nsca-lift.org/perform Vol. 6 No. 5 | Page 20-21

