Welcome to Canvas help and support. This page contains guidance and support tutorials to help you with your Canvas courses. Please note that for all technical Canvas issues, you should contact the 24 hour Canvas support line or chat feature that can be accessed via the Help link in the Canvas Global menu.
Canvas module courses 2023/24
Access and organise your Canvas courses
Access courses you are enrolled on
View/Download – How to access and organise your Canvas courses
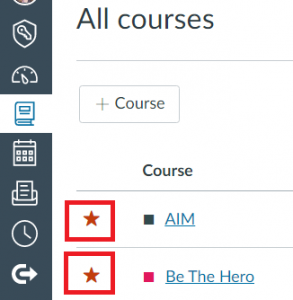
The Canvas Dashboard displays cards for up to a maximum of 20 courses. If you are enrolled on more than that, you can access all courses you are enrolled on by clicking Courses (in the global menu), then scrolling down and selecting All Courses (located beneath published courses)
![]()
You will then see a list of all courses that you are enrolled on.
Add courses to Dashboard
If you are enrolled on more than 20 courses, you can select which of them you want to appear on your Canvas Dashboard by clicking the star icon just before each course name. This will then display ‘starred’ courses only in the dashboard.
To remove a starred course from your Dashboard, go back into Courses -> All courses and click the star to deselect it.
Note: If you change your mind about using the star system, you will need to deselect the star icon for each course.
Update! If you decide to star courses, the dashboard will display a lot more than 20 courses. You just need to be mindful that the more you star the slower it will be to load.
Prepare your homepage
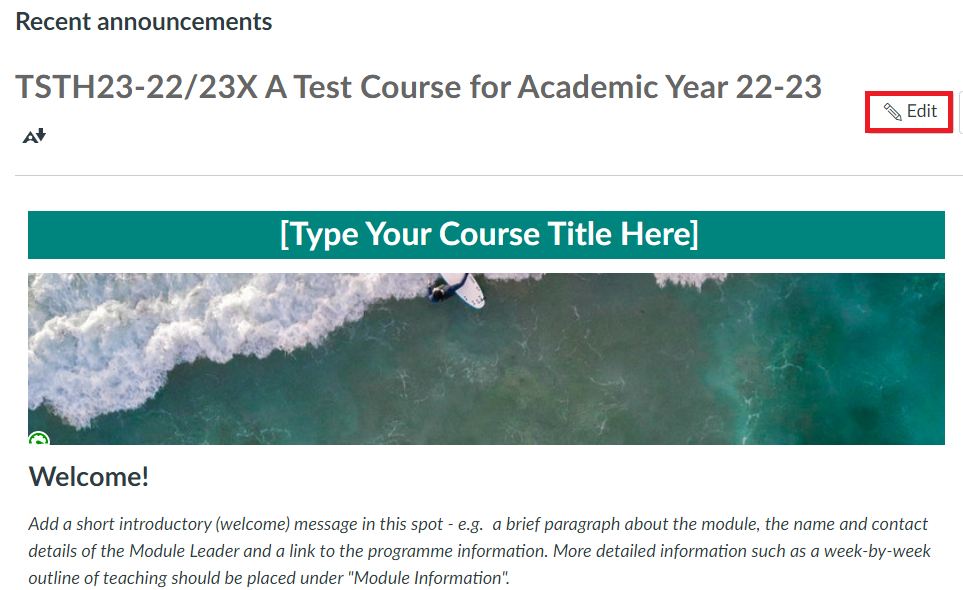
(2023/24 Module courses in Canvas are based on a template that includes a homepage recognisable by its Marjon Sea colour theme. You will need to edit the homepage to enter a course title, change the banner image (optional) and add a welcome message.
View/download – Preparing your 2023/24 homepage
To carry out edits to the page you need to first click the Edit button
Course title
Click into “Type your course title here”, delete placeholder text and enter your course title. Since the course title appears just above it you could either repeat the title but without the module code, use a simplified title or simply leave it blank. It’s your decision.
When you have done this, continue editing or scroll down and click the Save button (bottom right)
Header image.
This is intended to be a place where you can put a decorative image. The initial image is simply a placeholder. Your options are to:
Delete the image.
If you don’t want an image here, click the edit button then, click on the image to select it and press the ‘Delete’ key. Then click the “Save” button
Replace the image with one from the Canvas Commons:
Follow the instructions below or for more detailed guidance and video look at the Import a header image from Commons in the Images section
- Open your Canvas course homepage
- Click Import from Commons from the menu on the right side of your homepage. If you can’t see the menu, click ‘Home’ and it will appear.
- In the Search bar enter one of the following tags:
-
- marjon header image
- marjon course header
- marjon banner image
- marjon course banner
This will display all Marjon header/banner images for you to browse and select from
- Click the title of the image that you want to import
- Then click the Import/Download button
- Enter the name of the course you want and select it from the course list that appears
- Then click the Import into course button
The image will import into the files area of the course you selected
- Open your Canvas course homepage
- Click the Edit button
- Click the existing header image to select it and press delete on your keyboard
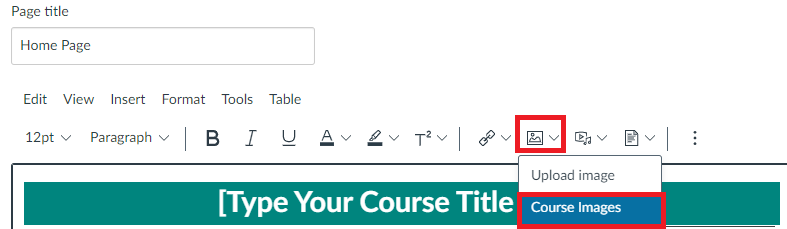
- Click the image icon in the rich content editor and select course images
- Locate and select the imported image. This will add it to your homepage.
Before clicking Save, the image needs to be made accessible and responsive.
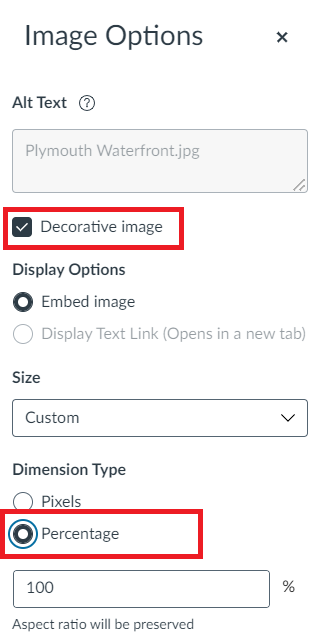
- Click the image and select image options
- Select ‘decorative image’
- Select percentage as dimension type
Note:
- The Decorative image option will cause screen readers and other assistive technologies to ignore the image as it has no meaningful content (if it does have meaningful content then you should instead fill in the “Alt text” box with a description of the image).
- Changing the Dimension type to percentage will make the image responsive and cause it to resize as the display is squashed or stretched.
Replace the image with one of your own.
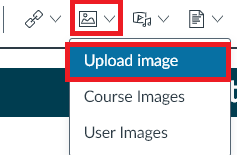
If you have an image on your own computer that you would prefer to use, then start in the same way as above but this time select “Upload Images”
This gives you a box into which you can drag and drop an image file from your computer
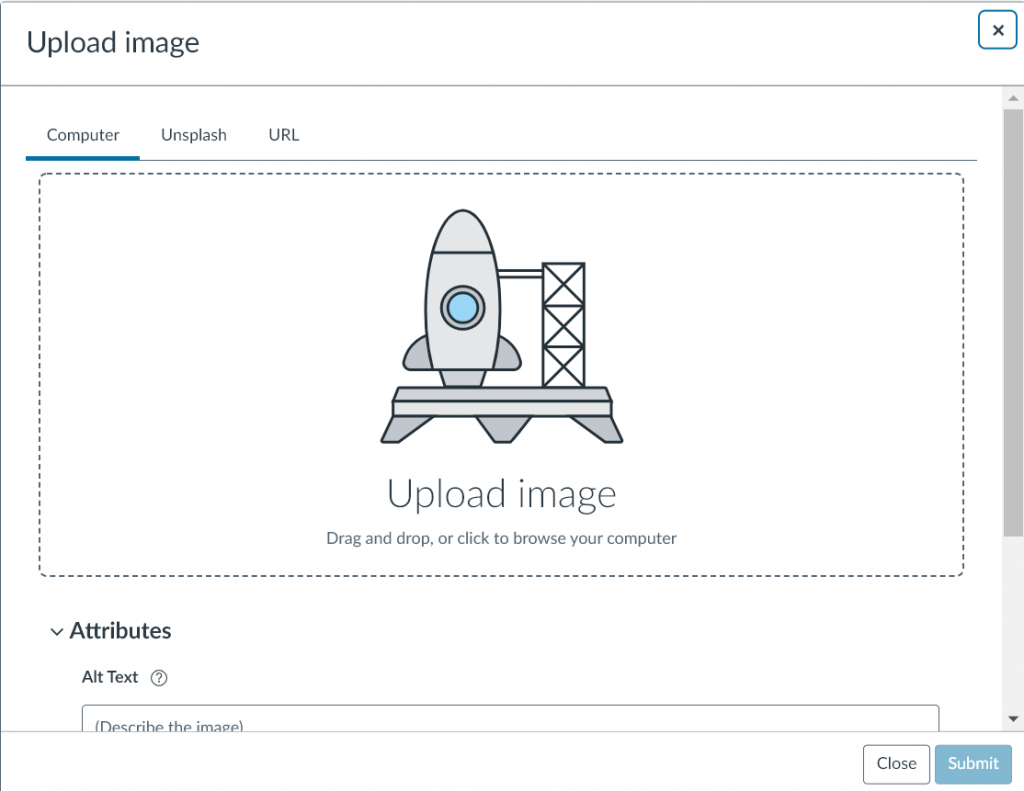
After you have done that, you can continue to set the Image Options as above, then scroll down and click the Save button.
Note: If adding your own image please ensure that it is a suitable header size so that it doesn’t push other content down. Ideally w800px x h150/200px. For further help, refer to ‘Header images for Canvas courses’ in the section below.
Welcome message.
Replace the welcome message with one of your own. It’s important not to put huge amounts of text here. If there is a lot more introductory text that you need to add please consider adding a new page to the Module Information section. If needed, you can setup a link from your welcome message to this more detailed page.
Scroll down and click the Save button
Import content
If you taught a module in the previous academic year, you will be able to import some of the content into your new Canvas module course.
It is important that you do not bulk import as some content will need to be excluded.
View/download – Importing content from last years module course
Begin import process
1. Open your new module course and click the ‘Import Existing Content’ button on the right side of the page

Note: If you don’t see any buttons to the right, click the “Home” link on the left.
2. Select “Copy a Canvas Course”
3. In the “Search for a course” box, start typing the module code. A list of search results will appear from which you can select the module you require
4. Ensure that “Select specific content” has been selected (not “All content”)

5. Click the Import button- You will be taken to another page which tells you that this import process is ‘waiting for selection’ with a button next to it labelled ‘Select content’.
The section below suggests what to import and what to leave behind, but you don’t have to follow it exactly. If you look through the resources and you find other things, files, pages or Canvas modules, that you don’t need on the new module course then you can choose to leave them behind and stop them cluttering up your new Module. If you find there are things that you have left behind that you subsequently need in the new module course, then you can repeat the import process and just select those things.
Always remember however, at the start of the import process to select “Import Specific Content” and not “All content”, otherwise you will find yourself with serious problems on your hands.
Select specific content
1. Click the Select Content button
2. The “Select Content” dialog (shown below) divides the content into 11 categories and shows you the number of items in each category. By default, nothing is selected.
. Course settings – leave unselected
. Syllabus body – leave unselected unless you have used the Syllabus tool to create one
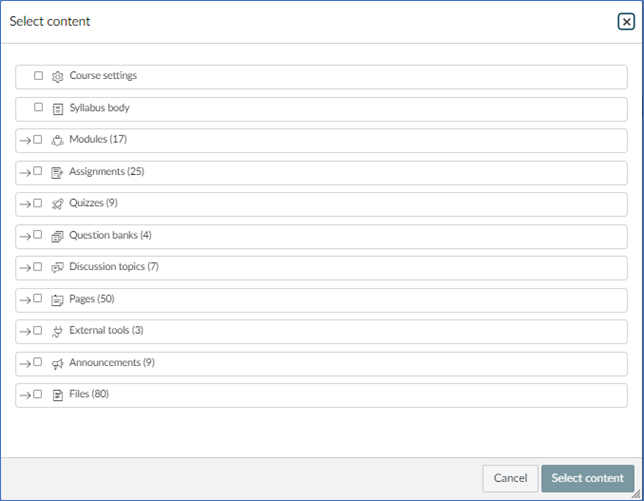
. Canvas Modules – Select all of them if you need them all but you have a choice for the four modules that already exist in the new course, i.e., “Module Information”, “Assessment Information”, “Resit & Deferred Work” and “Module Content.If you import these it will create duplicate modules and you will need to drag and drop the content out of the duplicates and up the page into the originals, then delete the duplicates. If you don’t select these then you will need to add the content to them after import. The content items exist in “Files” and “Pages” so provided you import these they will still be available for you to add to the modules.
. Assignments – Do not select these. Turnitin assignments will not import, and they will be created automatically at a later date. Only import Canvas assignments if any exist.
. Quizzes – Import all
. Question Banks – Import all
. Discussion Topics – Import all
. Pages – Import all except “Home Page”. This already exists and has been updated
. External Tools – Leave unselected
. Announcements – Leave unselected. You do not need to import last years’ messages
. Files – Import all except two folders, “Homepage Banner Images” and “Homepage Buttons”. These already exist
3. Click the “Select content” button
A page will open to show that your import is queued. This will change to “complete” when all content you selected has been imported into your new module course
4. Click Home to return to the homepage or modules to see/check content
Finally, just to note that it takes a lot of words to describe the process of importing content, but it can probably be done more quickly than you can read these words, particularly after you have been through the process once or twice.
How to relink homepage buttons
Canvas module courses are based on templates that include a homepage with button images that link to modules (sections) in the underlying course page. If any of the button links get broken, for example if you delete the underlying module that the button is initially linked to, it is simple to relink to a replacement module in the underlying course.
View/download: How to relink homepage buttons
Remove broken link
- Go to your homepage and click Edit
- Click onto the button image
- Select Remove link

Re-link to the relevant module
- Make sure the button is selected
- Click on the down arrow next to Links in the rich content editor and select course links

- Click modules to expand the section

- Then locate and click the module that you want to link to (e.g. module information)
- Scroll up and click X to close

- Then click the Save button
The button will now be linked to the module you selected
Images
Import a header image from Commons
The Marketing Team have put together a collection of header/banner images for you to select from and use on the homepage of your Canvas courses. The images are stored in Canvas Commons and have tags to enable you to locate them. They are available to all Plymouth Marjon rather than Public (Any Canvas Commons user)
View/Download – Import course header from Commons
Browse and import a header image
- Open your Canvas course homepage
- Click Import from Commons from the menu on the right side of your homepage. If you can’t see the menu, click ‘Home’ and it will appear.

- In the Search bar enter one of the following tags:
- marjon header image
- marjon course header
- marjon banner image
- marjon course banner
This will display all Marjon header/banner images for you to browse and select from

- Click the title of the image that you want to import
- Then click the Import/Download button
- Enter the name of the course that you want and select it from the course list that appears
- Then click the Import into course button

A message will display to let you know that the import has successfully started
The image will import into the files area of the course you selected
Replace the existing homepage header with the imported image
- Open your Canvas course homepage
- Click the Edit button
- Click the existing header image to select it and press delete on your keyboard
- Click the image icon in the rich content editor and select course images
- Locate and select the imported image. This will add it to your homepage
- Click the X icon to close the ‘Add image’ box

Before clicking Save, the image needs to be made accessible and responsive.
Make the image accessible and responsive
- Click the image and select image options
- Alt text is not required so please select ‘decorative image’
- Select percentage as dimension type. This will make the image responsive and it will resize according to the device it is being accessed on.
- Click Done to save image option selections
- Click Save, to save changes to the homepage.
Header images for Canvas courses
A selection of header images have been stored in Canvas Commons and are available for you to use in your courses, but if you want to source different copyright free images or already have an image that you’d like to use, it’s important that header images for Canvas courses are landscape (banner style) with an ideal size of width: 800px and height 150 – 200px.
So how do you achieve this?
Some websites allow you to specify custom height/width measurements of images you want to use and if you have your own images they can be cropped to a ‘banner’ size in an image editor such as MS Paint. This guide shows you how to download a custom size image from the Pexels website and how to crop an existing image to the required header size for your Canvas course.
View/Download Header Images for Canvas Courses
Pexels images
- Go to pexels.com
- Search for an image
- Click an image to select it
- Click the down arrow next to free download
- Select Custom and enter width and height (e.g. 800 x 150)
- Then click Download Selected Size
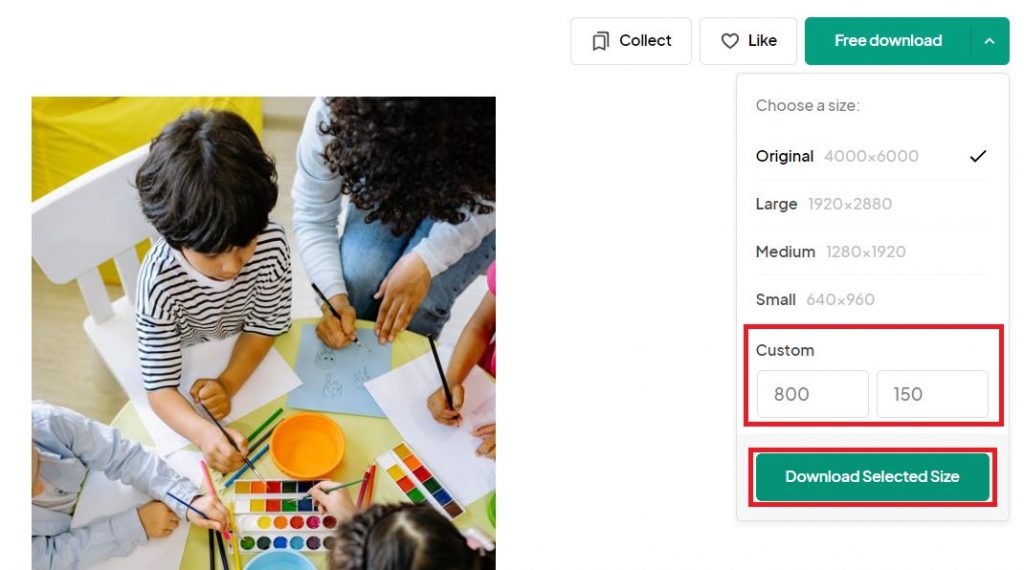
- A 800 x 150 section of the original image will be selected to create a new header size image

- Go to your downloads folder to access the image
MS Paint
If you have an image of your own or have downloaded a copyright free image that is a regular size but you’d like to use as a header image, you can edit it in MS Paint.
- Open MS Paint
- Click file – open
- Navigate to your image, click the image to select it and click open
- To check the original image size, click Resize
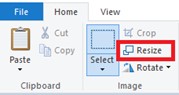
- Then select Pixels
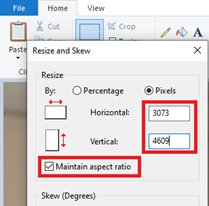
- Ensure that the Maintain aspect ratio checkbox is selected
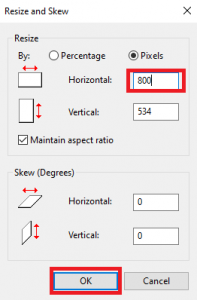
- In the horizontal’ measurement enter 800 and click OK
- Now that the image has a width of 800px, use the select tool to select the ‘header size’ area of the image that you want to
keep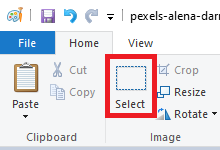
You will see the size of the area you are selecting as you drag your mouse to make the selection. In this example an area of 800 x 200 has been selected.

- When you have selected the area, click the ‘crop’ icon
You will then be left with a header size image for your course

- Click file – save as, enter a name, and save the image
Copyright free images and videos
Finding suitable images (and videos) to use in presentations, posters, websites, blogs etc., can be a time-consuming task and while a simple internet search can bring back millions to choose from, many will have copyright which means that you are not allowed to use them and will be breaking the law if you do.
So, what images and videos can you use and where do you find them?
Images and videos licensed under the Creative Commons CCO are free to use. There are lots of websites that provide free images/videos and we have selected some to share with you:
- Pexels – free stock photos, royalty free images and videos shared by creators
- UnSplash – free images and photos that you can download and use for any project
- Pixabay – free images, illustrations, videos, and music
- Freerange Stock – Free photos and illustrations licensed for commercial use
- Lifeopix – Free high-resolution photography. Share and download images freely. Search for pictures by colour or format
- StockSnap – Free stock photos
- Wikimedia – Free to use images, audio and video files
- Burst – Free stock photos
- KaboomPics – free stock photography that includes a colour picker and option to search for landscape or vertical images
- Gratisography – Free unique and quirky images
Canvas Tools & Apps
Canvas - Icon Maker
Icon Maker is a new feature in the Canvas rich content editor (RCE) that can be used to create simple and reusable icons directly within Canvas Pages, Announcements, Assignments, Discussions, Classic Quizzes and the Syllabus.
It allows you to create appealing visual icons that can be used as:
- A visual cue for learners to associate an image with an action
- A way to develop visual interest and chunk content
- A design element that provides a cohesive look to your course
View/download the guide: Canvas – RCE Icon Maker
Create a Page within a module
- Go to the module that you want to add the Page to
- Click the + icon

- Select Page from the dropdown menu, click Create Page and enter a Page name

- Scroll down and click the Add Item button
Open Icon Maker
- Open the Page and click Edit
- Locate Icon Maker in the rich content editor, click the down arrow and select Create Icon Maker Icon

This will open the Icon Maker settings
Add Icon details
- Enter a name for your icon
- Alt text – Add a description of your icon OR
- Click into the Decorative Icon checkbox to disable it
Note: The general rule of thumb is that if information provided by the image is given using adjacent text, or the image has been used to make the website more visually attractive, it is decorative. Alt text is required if the image provides additional information.
In this example the icon has been marked as decorative
![]()
Select and edit Icon shape
- Icon shape – select from square, circle, triangle, diamond, pentagon, hexagon, octagon or star
- Icon size – select from extra small, small, medium or large
- Icon colour – select from the colour palette:
![]()
- Outline size – select from none, small medium and large (optional)
- Outline colour –Select from the colour palette (optional)
Edit Icon Text
- Text – Add text to your icon (this will be visible to users)
- Text size – select from small, medium, large or extra large
- Text colour – select from the colour palette
- Text background colour (optional)
- Text position – select to have text displayed in the middle of the icon, the bottom third or below.
Note: If you opt to have text in the middle of the icon be mindful of accessibility and ensure there is an appropriate colour contrast.
Select Image (optional)
- To add an image to your icon, click the Add Image drop down menu and select single or multi colour image

Note: If you choose a multi colour image, you have the option to change the colour
- Click Apply – this will close the icon editor and add the icon to your page (which will still be in edit mode)
Edit the icon
If you need to edit the icon, click to select it, and then click edit to open the icon settings.
![]()
Add and edit existing icons
If you are creating a set of icons and want to edit the original rather than starting from scratch each time or you have built a collection of icons that you want to use on other pages (e.g., resource, read, watch, task) you can do so as follows:
- Open the Page (or other resource) that you want to add the icon to
- Click Edit
- Click into the Page at the point that you want the icon to display
- Locate Icon Maker in the rich content editor, click the down arrow and select Saved Icon Maker Icons
- Click the icon that you want, then click X to close Add Icons

- If you need to edit the icon, click to select it and then click edit to open icon settings
- Make your edits
- Scroll down and click Apply
Accessibility
When you publish the Page, icons display with a low accessibility score

To fix this, click the red accessibility speedometer and select the indicate image is decorative option
Useful Links
Canvas Syllabus – Create a weekly overview of your module
Syllabus is accessed from the course navigation menu and can be used to share an overview of the module course with students. It is a great way to provide students with either a general or a week-by-week overview of the course including any notes, details and links.
Syllabus also includes a Course Summary (lower half of the page) that is automatically populated with details of assignments and other course items that have a date or time assigned to them.
*Sharing the Course Summary with students is optional and can be turned on/off.
This guide shows you how to add a weekly overview to the Syllabus and how to make it available in the course navigation menu for students to access.
View/download the guide: Canvas Syllabus – weekly module overview
Add a weekly overview to course syllabus
- Go to your Canvas module course
- Click the Syllabus link in the course navigation menu
- Click Edit
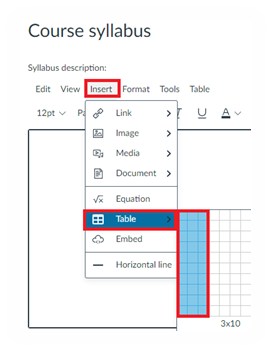
- Click Insert -> Table, then move your mouse across cells to create a table
- Enter column headings and information (see example below)

- Click the Update Syllabus button to save
Make the Syllabus visible in the course navigation menu
- On your Canvas module course, scroll to the bottom of the course navigation menu
- Click the Settings link
- Click the Navigation tab

- Locate Syllabus in the hidden menu items section
- Hold down your left mouse button and drag to the location you want it to appear in the course navigation menu

- Then, scroll down and click Save
Canvas Quiz
How to set up an online exam
The Canvas Quiz can be used for formative assessment and is also used for online exams. This guide takes you through the steps required to create an online exam and add questions to it.
View/download Canvas Quiz – How to create an online exam
Where to create your Quiz
On your Canvas module course page, you can create your Quiz in the Quizzes section and add it to a module later or you can create it directly in the Course Module that you want to add it to.
To create a Quiz in the Quiz section
- Go to your Canvas Module Course
- Click Quizzes in the course navigation menu
- Click the +Quiz button (top right)
To create a Quiz in a Module
- Go to the Course Module that you want to add it to
- Click the + icon

- Select Quiz -> Create Quiz -> Enter Quiz name
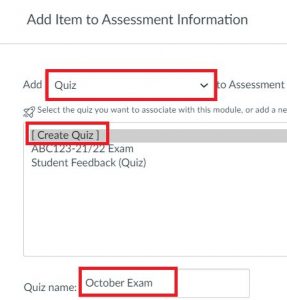
- Then click the blue Add Item button
Note: If you created your quiz in the quizzes section of your course, it will appear in the list for you to select.
Quiz Settings
To access the quiz settings:
- Click the Quiz to open it, then click Edit (This will open the settings tab)
- Quiz Instructions – Enter information/instructions for students
- Quiz type – leave as default (graded quiz)
- Assignment group – leave as default (assignments)
- Shuffle answers – tick the checkbox if you have multiple choice questions and want possible answers to be shuffled
- Time Limit – tick the checkbox and enter time allowed for students to complete the exam
- Allow multiple attempts – Students are usually only allowed one attempt for an exam so leave unchecked
- Let students see their quiz responses – optional
- Let students see correct answers – optional
- Require an access code – enter a password (optional)
- Assign to – the quiz will be assigned to everyone by default
- Available from and Until – enter dates/times (students will not be able to access the quiz outside of the times set
New Question – How to add new questions to your quiz
- Click the Questions tab at the top of the page
- To create a question for your quiz, click + New Question

- Select a question type from the drop-down menu – In this example a multiple choice question has been selected
- Enter your question in the text box
- Then enter possible answers. By default, the correct answer is the first answer, but this can be changed by clicking the green
tick to deselect it and clicking another response to select it as the correct answer
Note: The default setting is for four possible responses. If you only want three, you need to delete the fourth possible answer by clicking the ‘trash can’ icon. Similarly, if you want more than four possible answers, you can click ‘Add another answer’.
![]()
- Click Update Question, to save it
- Repeat steps to add more questions to your quiz
New Question Group – used to randomise questions
To randomise the order of multiple-choice questions, you need to create group(s) to add questions to. If all questions are worth one mark, they can be added to one question group. If some are worth one mark and others two or three marks, separate groups will need to be created for each. When creating a group, questions from your question bank can be added or you can create new questions within the group.
Create a question group
- Click +New question group

- Enter a name for the question group, select how many questions are to be selected from it and enter points per question.

Link to a question bank
- If you have already created question banks containing questions with the same mark values, click Link to a question bank

- Click to select the question bank you want
- Click the Select bank button
- Then click Create Group
Create questions in a group
- If you want to create questions to add to the group, click the +icon

- Follow steps shown in ‘How to add new questions to your quiz’ section (above)
- Repeat steps to create more question groups – e.g. groups for questions worth 2 marks, 3 marks etc.
Find Questions – Add questions from your question banks
- If you have already created or imported any quizzes into your course you can add questions from your question bank by clicking Find Questions

- Select a question bank to view individual questions
- Click the checkboxes to select the questions you want to add
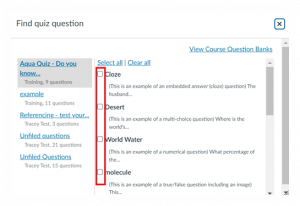
- Then scroll down and click Add Questions
Watch the video
Canvas Quiz – How to create a quiz for an online exam
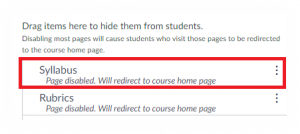
How to hide marks from students (Quizzes and other graded assessments)
Note: Assessments created in Canvas (e.g. Quizzes, Turnitin Assignments, Canvas assignments, graded Discussions etc.) all go into Gradebook so it is important to set the grade posting policy to manual to prevent students from seeing grades before they have been released.
Most question types used in a Canvas Quiz are self-marking so when a student submits their responses, they immediately see their overall mark. This is fine for formative assessment, but when a quiz is being used for an online exam, students shouldn’t see their marks until they have been entered into the relevant Turnitin assignment and released on a specific post-date.
This guide shows you how to hide marks from students using the ‘Grade Posting Policy’ for specific quizzes and assignments or for all of them and also how to release grades.
View/download guide – Canvas Quiz – How to hide marks from Students
Hide marks for all Canvas Quizzes on your course
- Login to Canvas and go to your course
- In the course navigation menu (on the left) click Grades
- Click the cog icon (top right)

- Click the Grade Posting Policy tab
- Select the Manually Post Grades checkbox
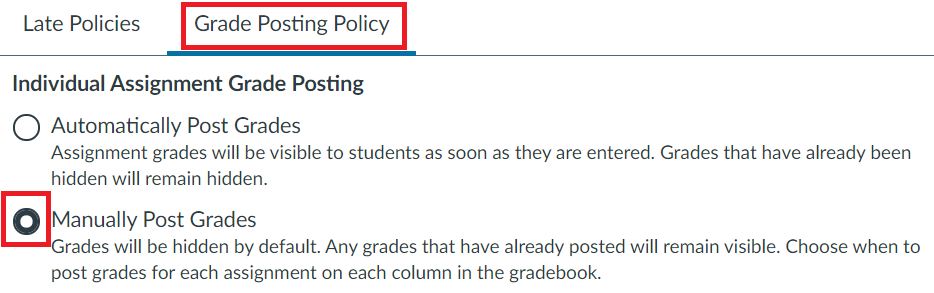
- Click the Update button to save changes
Hide marks for individual Canvas Quizzes on your course
- Follow steps 1 and 2 above.
- Locate the quiz that you want to set the Posting Policy for
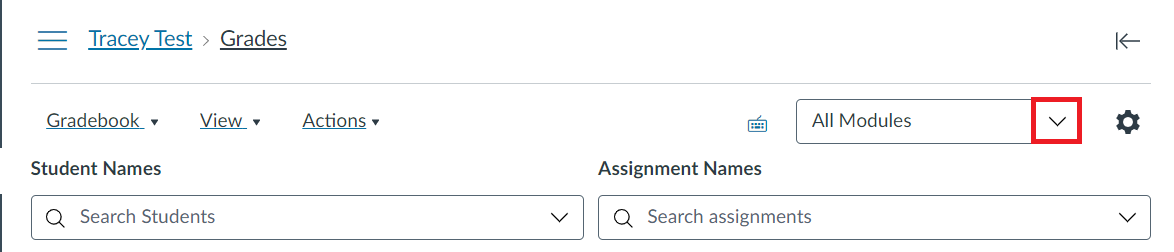 Note: If you can’t see your quiz, click the down arrow next to All Modules and select the module that your quiz is in.
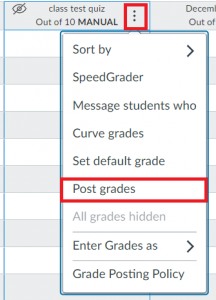
 - Click the 3-dot icon next to your Quiz title and select Grade Posting Policy

- Select manually

- Scroll down and click Save
Note: If you set the Grade Posting Policy to post grades ‘manually’ for all quizzes/assignments on your course, you can then change the policy for individual quizzes to post grades ‘automatically’ – e.g., if they are being used for formative assessment.
How to post grades to students on release date (School Admin only)
Note: School administrators are responsible for posting grades for summative assessment exams and will only do so when they have completed other related tasks
To release grades to students:
- Click Grades (in the course navigation menu)
- Locate the Quiz
- Click the 3-dot icon
- Select Post grades
Students will then receive an automated email notification to let them know that grades have been released.
How to set up extra time or attempts for online exams
When using a Canvas Quiz for online exams, you may need to setup extra time for students requiring additional time and/or rest breaks. The steps below show you how to set this up.
View/download the guide: Canvas Quiz – How to setup extra time and/or attempts
Setting up additional time and/or attempts
Before you can do this, you will need to publish the quiz (exam)
Note: Although published, students won’t have access until the open date/time that has been set
- Publish the quiz (if you haven’t already done so)
- Click on the quiz link to open it
- Then click Moderate this Quiz (top right)

You will see a list displaying enrolled students
- Locate the student you need to set additional time for
- Click the pencil icon at the end of the row

- Enter the extra time you want to allow – e.g. 20
Note: You can also allow extra attempts here by entering a number in the box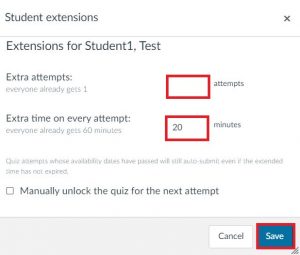
- Click Save
- Repeat the process to set up additional time/attempts for other students
Note: It’s important that the Quiz open/close times allow for any additional time you have set – e.g., the window of time is long enough or you have set different open/close dates/times for specific students.
Watch the video
How to set up different open/close dates/times
Students will have access to a quiz based on the open/close date/time that has been set, but in some cases the quiz will need to be open for a longer time than has been set, at a different time or on a different date.
A reason for this might be that you have set up extra time for students requiring additional time and/or rest breaks, and need the exam to be open long enough to honour this – i.e., it doesn’t close before students have used their extra time.
To preserve the initial open/close date/time and not have to offer an extended window of time for all students, you can set different open/close dates/times for individual students.
View/download the guide: Canvas Quiz – setting different open- close dates and times
The guidance below takes you through the steps to do this:
- Click the quiz link to open it
- Click the edit button (top right)
- Scroll down to Assign to section
The default setting will display the open/close date/time set for everyone (e.g. all students enrolled on the module course)

- Click Add

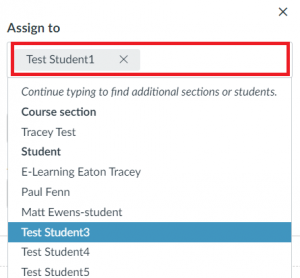
- Then click in the Assign to box – a drop down list of all enrolled students will display
- Select student names from the list
- Enter the open/close date/times that you want the quiz to be available to the selected student(s) for.
In the example below, the quiz is available on the same date as it is for everyone else, but for student 1 and student 3, it will open at 10.00 and close at 14.00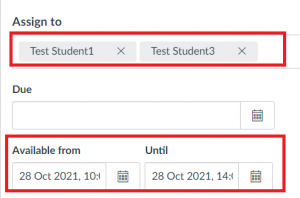
- Repeat steps 4 – 7 to set up different availability for any other students (if needed)
- Scroll down and click Save
Watch the video
How to override marks and grades
In self marking Canvas quiz’s, marks are awarded for responses that match the correct answer. This is accurate for most question types, but there may be occasions when you need to override the mark awarded – e.g., if students need to enter their response, spelling mistakes result in the answer being marked as incorrect.
This guidance below shows you how to override marks for individual questions and how to override the overall grade.
View/download Canvas Quiz – How to override marks and grades
How to override marks for individual questions
- Login to Canvas
- Go to your course
- Click the Quiz link to open it
- Click the 3-dot icon
- Click show student quiz results

- Select the student to see their quiz responses

- Locate the question that you want to override the mark for

- Enter the mark to be awarded

- Scroll down and click Update Scores
How to override the overall grade for a quiz attempt
- Login to Canvas
- Go to your course
- Click Grades in the course navigation (on the left)
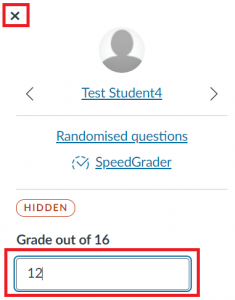
- Locate the student and click the current grade

- Enter the grade you want to award here, then click anywhere out of the box

- Or click the grade and then click the arrow icon

- Enter the new grade, then click the X icon to close
- The new grade will be saved automatically
Digital Innovation – Training Session Videos and Resources
Canvas - Discussions
The Canvas – Discussion session covers:
* What Canvas Discussions are
* Discussions options
* Ideas & examples
* How to create Discussions
Canvas - Studio
The Canvas – Studio session covers:
* Introduction to Studio
* Create collection & upload media
* Add annotations and captions
* Record in Studio
* View user insights for videos
