January 2019 archive
Are you entrepreneurial spirit? Do you often have business ideas in undersupplied markets, and do you think you could create a profitable project to serve the same market? Do you have all these ideas, but you never get them done? So this article is for you.
At a time when millennials find it difficult to generate income to be self-sufficient, there seems to be great receptivity from this generation to create businesses that complement their full-time employment. A Deloitte study came to the conclusion that two-thirds of these young people consider creating such a business.

The extra remuneration at the end of the month is not the only motivation. This also goes through the feeling of accomplishment and for trying to migrate his professional life to a project of his own, where he has the possibility to lead and employ a team.
However, although a lot of people believe that it has this entrepreneurial spirit, the path between the idea and the creation of the project can be intimidating enough to halt the development of the potential business.
The goal is to try to figure out what are the barriers that are discouraging you from taking your business forward. Dorie Clark, author of “Entrepreneurial You”, “Reinventing You” and “Stand Out” identified and shared in the Harvard Business Review four potential challenges you may encounter when you plan to create a part-time project:
1. Focus on the wrong steps
When looking at the process of creating a business and the path that has to be tackled until this is “standing”, we can have dozens of problems for which we still have no answer. The last phrase’s keyword is YET. For example: thinking about how you are going to create an attractive website without having any programming experience will only slow you down. Clark, at an early stage of the project, should not focus on such problems.
Of course, you will eventually need an internet site that is appealing to your customers, but first, you need to evaluate other, more important components before investing in this strand. In the first phase, the key is to focus on the main aspect of your potential business: customers.
At this point, you can focus on the Lean Startup methodology, which evangelizes the creation of a small, low-cost test with a minimum viable product to gauge whether there is interest – or not – in what you are going to try to sell. An example given by Clark is that of a book: instead of spending money to edit it without knowing if it will sell, you can make an online publication to try to understand the public’s receptivity to the subject you are going to address.
2. Lack of confidence
Still, at an early stage, lack of qualifications can be a cause for concern. You may not have studied management or had any experience running a business. If you believe that a lack of trust can make it difficult to develop your project, it is important that you evaluate the skills of people already in the market – something that can be done via LinkedIn.
If after this evaluation you realize that you have more qualifications than the people who are in the area you are likely to have a good knowledge base needed to learn the components of the business you are still unaware of. In the opposite situation, where your skills are below average, you can always find a business partner that complements the skills needed to develop and launch the project (source: successpedia.info).
3. Lack of commitment
The idea of creating a business can bring new excitement to your life. However, as you begin to have to perform the most boring tasks, the risk that this emotion begins to fade is great. At this point, it is important to realize that what sets apart your part-time business and your full-time job are the obligations.
According to a study carried out by Gretchen Rubin, 41% of people have extreme difficulty in managing the obligations they create with themselves, but they feel motivated to take action when others depend on them.
If this is your case – and you are taking the project forward yourself – you can always turn to people close to you to help you stay on track and achieve goals.
4. Difficulties in time management
How often do you hear someone complaining about lack of time? The truth is that these people are quite likely to be overreacting. A study by Laura Vanderkam found that when people say they have 70-90 hours of work a week they are exaggerating at least 20% of their work hours.
The “lack of time” excuse for your part-time business to be unsuccessful may be valid for most people, but it is important to know that if you manage your time well, you are most likely to be able to take your new project forward. The goal is to find a routine that exploits your maximum productivity potential. This way, you will be able to be active in the dead hours, create more and perform your work in a smarter way, which will certainly open space in your schedule for a new project.
We know that cats are very clean animals, but sometimes, especially males, urinate outside the litter box that we prepare for their needs and leave marks in other parts of the house. But why do they do it? Can we avoid this? They effectively have their reasons for doing so, but we can avoid this behavior in most cases.
If you are the owner of a cat that follows this behavior that usually annoys humans and you are interested in correcting it, keep reading this article and find out how to prevent my cat from urinating at home.
Why do domestic cats urinate out of the litter box?
Surely if you have a cat urinating on the wall, on the sofa, on the chairs and other places in your house and that it is rare to do so in your litter box, you will have asked this question. We must remember that although they have been domesticated for many centuries and some prefer to live with humans, cats still have their instinct. So they will continue to do things that are strange to us or even uncomfortable. In the case of urine off-site, it can be several reasons such as:
The most common reason is to mark your territory. Cats, both male and female, but above all, mark a lot of what is yours and one way to do it is with urine. Their urine smells strong and unpleasant, but for them, it is something else and contains a high level of pheromones that serves to identify them, attract each other or to achieve the opposite effect keeping them away from possible competitors. Through the urine, they know if it is a male or a female and may even know if it is an adult individual or not. In addition, in the case of marking females, males can thus identify when they are in estrus, among more things that can communicate only with urine.
It may be that for them their litter box is too close to their feeding zone and as they are very clean they will not accept using the litter box and urinate in farther places.
Another reason is that they do not find their litter box clean enough because they already have some accumulated feces and urine. It may be stress because of some new situation that you have not yet been able to adapt.
It may be that the problem is the type of sand we use. Cats are very sensitive to their tastes for things, so they may not like the smell or texture of the sand we use for their box.
You have to check if you can detect more symptoms because sometimes this behavior is due to some type of illness.
If you have several cats, you might not like to share the litter box with your companions, so we should have a litter box for each cat.
The mortar is a mixture of cement, water, and sand and is mainly used for laying bricks, run or joints or cover surfaces. Learn in this guide to prepare the mortar and know the right amounts for its preparation.
We have already talked about the preparation of reinforced concrete (or reinforced concrete or reinforced concrete). This time we will explain how to prepare the mortar, or cement as it is more commonly known.
Types of cement:
There are several types of cement, Portland cement being the most used these days. There are also other types of cement for specific uses. Fast drying cement, refractory cement (for high temperatures), sulfate resistant cement (for sewers and water networks), among many others.
Mortars with hydraulic lime and sand are still used today, although they are falling into disuse. There is also another type of mortar, consisting of Portland cement, sand and hydraulic lime, called bastard mortar. Although it is less resistant it is more suitable for restorations of old houses, since it binds more effectively in walls of mud and partition.
Additives for mortar:
Other additives may be added to the mortar, that is, to the mixture of cement, sand, and water, to give it other characteristics than the original ones.
The most used additives in the mortar are:
- Additives plasticizers: This type of additive makes the mortar softer, giving it a greater adhesion to the surfaces where it will be applied.
- Anti-shrink additives: This type of additive makes it less likely to shrink (or shrink), thus reducing the likelihood of cracking.
- Additives accelerators: With this type of additive, the drying of the mortar becomes faster.
Additional notes on mortar:
As we have already said, the mortar is made with the mixture of water, sand, and cement. Always use clean water to provide greater strength. As for sand, fine sand is preferred for towing, while coarse sand (or gravel) is preferred over a surface.
The mortar is used to place bricks or concrete blocks, to coat interior or exterior walls or to repair cracks.
There are mixes for sale that are already prepared, simply adding water to prepare them.
Depending on the work to be done, so we should add more or less sand, as we will see later. With respect to the quantity of water, it is usual to use half the weight of water, relative to the weight of the cement. All these proportions may vary, depending on the type of cement used, the moisture of the sand, the temperature and the consistency of the mixture.
How to prepare mortar, cement or concrete:
Use the mortar until two or at most three hours after its preparation, remembering that you will not be able to save what is left over.
If it is necessary to prepare large quantities of mortar, it is preferable to do so in a concrete mixer.
Quantities of water and cement to be used, depending on the work to be done:
- Brick placement or joints: 1 part cement and 2.5 to 3 parts sand;
- Floor covering or interior walls: 1 part cement and 1.5 parts sand;
- Coating of exterior walls or work done in humid places: 1 part of cement and 1 to 1,5 parts of sand;
- Watertight coatings: 1 part cement and 1 part sand.
How to mix water, sand, and cement:
For small quantities:
- On a flat surface, on wooden boards, for example, put the amount of sand needed and lay the cement on top.
- Begin to wrap this mixture with the help of a shovel, starting from the bottom, until a dry mixture and a uniform color.
- Now drill a hole in the middle of this mixture and add water and mix everything together.
(add a plasticizer additive, allow this mixture to stand for a few minutes)
The mortar mixture should be consistent and homogeneous, between dry and wet. To check if the mortar “is in place”, place a little on a trowel. If it does not fall, it means you are at the right place.
You can also check if it is at the point by placing the trowel in the mortar. This should not sink.
Another way to check is by making a small ball in the hand and check that it does not break or water comes out of it.
For large quantities:
- As already mentioned, it is advisable to use a cement mixer for large quantities of mortar. First, pour 70% of the water needed for the rotary tank.
- Then mix the cement and sand in the required amounts.
- Let the rotary bowl turn until the mortar is ready. Add more water if necessary.
I hope you’ve learned how to prepare mortar, cement, or concrete. If you like, you have another article on the preparation of reinforced concrete (or reinforced concrete or reinforced concrete).
More article: how to cut cement board
Playdough is the flexible fun of mass-like substance that has been a long time favorite in most families – and still is today. But there can be consequences with the traditional “Play-doh” that most of us played with children. Although it seems harmless, many products, such as playdough, can be dangerous, especially if it stays in the mouth. Let’s talk about the health concerns of most shop bought playdough before we talk about how to make homemade playdough.
What’s In Hasbro Play-Doh?
According to a statement on Hasbro, maker of Play-Doh, website: “The exact ingredients of the Play-Doh compound are proprietary, so we can not share them with you. We can say that it is basically a mixture of water, salt and flour. It does NOT contain peanuts, peanut oil or milk byproducts. It DOES NOT contain wheat. ”
According to Hasbro, “Play-Doh is composed non-toxic, non-irritating and anti-allergic except as noted: Children who are allergic to wheat gluten may have an allergic reaction to this product. In addition, due to the high salt content in the compound Play-Doh, the product may be harmful to pets if ingested. ”
Related: How to Get Playdough Out of Carpet
Wired Magazine goes into more detail with some of these facts about each ingredient:
Flour and Water
There was a patent in 1965 that drew him to the harsh winter of wheat, which contains a lot of “bindy, elastic gluten”; New Play-Doh formulations allow for wheat, rice, rye and even tapioca. So it is not gluten free, which means that if your child has a gluten or wheat, allergy and Play-Doh gets in the mouth (in some cases absorbed through the skin), it can cause him or her to develop an allergic reaction .
Salt
The salt is used to bind extra water so that it has the density it needs. If it contains too much water, it will be soapy.
Amylopectin
This principle keeps the dough malleable, helping it to avoid agglomeration. In fact, it is a starch-based plant.
Mineral or vegetable oil
Mineral or vegetable oil helps to keep the playdough moist while avoiding adhesion.
Fragrance
There is not a lot of information on the fragrance, as Hasbro maintains this hush hush, but there are potentially synthetic scents as well as allergic reactions (or worse) can occur due to these ingredients that make up the “Play-doh” smell.
Aluminum Sulfate
This ingredient helps harden wheat gluten molecules. It contains a bitter taste, which can help keep you out of the curious mouth.
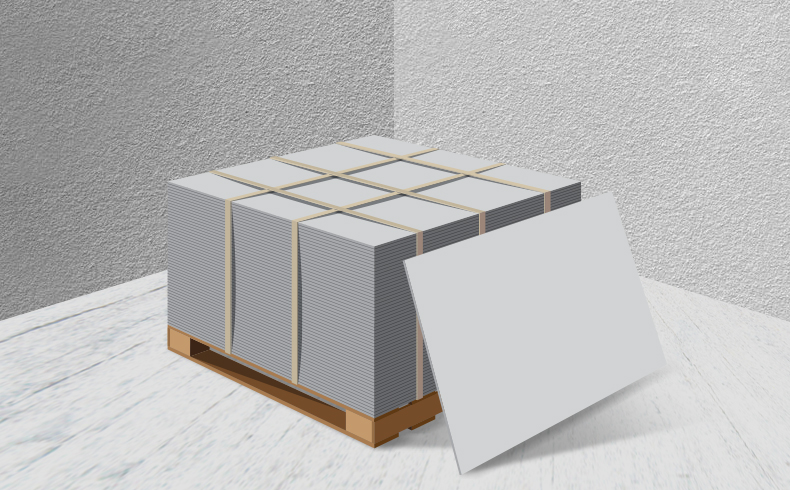
Without the need for specialized labor, the construction of walls with cement panels is easy to carry out and reduces deadlines
With simple installation, the cement boards provide higher speed in the construction of walls. Although it does not require specialized labor, the most critical procedure is to ensure that the spacing between parts is respected. Check out!
Step by step construction with cement slabs
– The procedure of building walls with cementitious parents begins with the placement of steel structures.
– Next, markings must be made on the structures, indicating where the cement slabs will be fixed. It is important to make sure that the parts will be at least 1 cm away from the ground.
– It is also advisable to draw on the cement plates some points that show the regions that will be drilled to receive the screws. The indication is that the attachment starts at the tips of the plates the distance is 5 cm from the side of the horizontal edge and 10 cm from the side of the vertical edge, the other anchorages follow every 30 cm throughout the end and also to the center at each upright of the structure (figure below).
– Using a screwdriver, start fixing the cementitious panel following both the indications made on the structures and those drawn on the plate itself. Screws must be attached to all stud bolts.
– With the first plate fastened to the frame, mark a distance of 3 mm between the parts and perform the fastening of the next panel following the same steps as the previous one. It is important to be careful that the bolts of the two plates are not perfectly aligned, as this creates a tension with enough force to damage the part.
– The treatment of the joints begins with the cleaning of the region, and the removal of the larger materials is done using a spatula. With the absence of imperfections, a coating is applied primer recess of the plate, located approximately 15 cm from each side.
– With the first dry, prepare the cementitious mass that will be applied to the joints. This mortar must be totally homogeneous.
– The mortar is applied in the recess region of the piece, filling an area of about 8 cm.
– After the grout has dried, glue a joint treatment tape that is 5 cm wide. This tape, which needs to be completely stretched, serves to guide the execution of the new layer of mortar. It is necessary to completely cover the tape with the mortar.
– For the third coat, repeat the second coat procedure. The only difference is that the joint treatment tape should be 10 cm instead of the previous 5 cm. In this step, after covering the entire tape, the joint should be completely level. The healing of this stage takes 24 hours.
– In hot environments, cracks are likely to appear in treated joints. In this case, we recommend a new coat with the 10 cm tape and wait another 24 hours for the new cure.
– To finish the treatment of the joints, apply the finishing mass. After one day of execution, it is possible to sand the entire surface to prepare it to receive the final finish, which can be any type of coating available in the market.
Cement sheets can be used as room partitions or wall closures, even on facades.
To decorate the house so that it gets its way there are two ways: An extremely expensive and another super cheap. Just choose. The best option for you is simple and inexpensive room decor that combines economy and beauty in the decor.
If you choose the most expensive, it will achieve an amazing decor, but it sure is much better to find a cheap decoration that is to your face and leave your room this r super cozy. It is possible to get one that you can do and without having to spend almost nothing.
You can use objects that you have at home or even buy without spending a lot, choosing pieces that together form a unique decoration for your room, it will not always be easy to get a simple and cheap living room decoration for your home, but this is the reason for writing this post, get ideas that fit your style.
Choose the best simple and cheap room decor for you
Nothing better than leaving our house with our face spending very little known to use cheap and beautiful decoration.
It’s easy, see the post and learn how to decorate a room simple and cheap.
Cheap decoration for the simple and small room
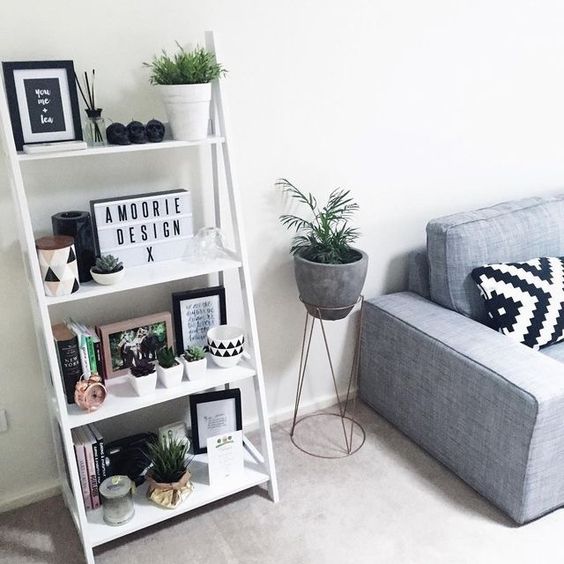
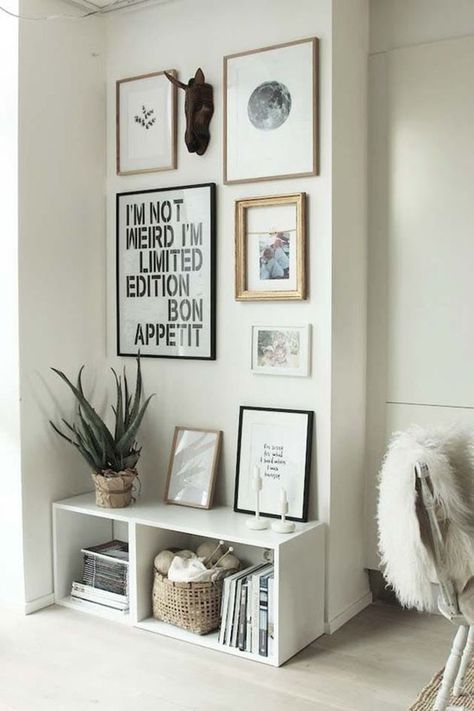
For small places, the best tip you can get is to know how to use vertical spaces, with shelves and furniture that do not take up unnecessary space.
Another tip for those who want a simple decoration for small a room is to use decorative pictures or posters on the wall, so you save space and manage to make your living room beautiful.
Related: Cheap Living Room Sets Under $500
A cheap decoration trend for small rooms, is lighting with rails of some 4 or 5 lamps, is super modern and easy to make, check out some photos below.