This blog post will show you how you can organise your sites, whether staff or student.
As a member of staff, if you have a class you will see all your students’ blogs as a drop-down list under your ‘My Sites’ area. This can mean that the drop-down list becomes unwieldy and long.
If you are a student and have had to create blog sites for modules from previous years and have been subscribed into groups for previous work, then your drop-down list may also become long.
To remove old sites from your account, there are several options available. You can simply hide old sites, this means that if you need to revisit old content for ideas, you still have access to it. You can also remove old sites from your account and also remove yourself as a user from a site.
Hiding sites from your ‘My Sites’ drop-down list
- Login to Edublogs
- Click directly onto ‘My Sites’
- You will be taken to all the pages that you are a user on or have created
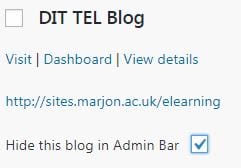
- To hide any old sites from the drop-down list, simply check the ‘Hide this blog in Admin Bar’ box and it will automatically be hidden from the list. Go through all your sites until you’ve hidden all the old ones, leaving only the sites you need for your current modules.
Removing sites from your ‘My Sites’ drop-down list
- Follow steps 1-3 as above
- This time check the box next to the title of the site that you want to remove
- Go to the Bulk Actions drop-down menu and select your preferred option, so if you want to delete a site or remove yourself as a user from a site. Removing yourself as a user from a site is most likely option if you were subscribed to a group activity to see your group’s blogs.
Please note that if you delete a site it will archive it and the original creator of the site will not be able to access it. The preferred option if you are subscribed to someone else’s blog is to simply hide it from the drop-down list or select the ‘Remove me from selected blogs’ option.
