DIT hint of the week: Organising your Edublog sites Pt3

Which site is mine?

A recent issue has come up specifically for students that are subscribers on their peers’ blogs that have exactly the same site title.

The below screenshot shows what this looks like:

Organising your sites

In the above example there are several sites called ‘Global Childhoods’ – this can make it difficult to determine site identity.

To solve this problem, login to Edublogs – hover your mouse over My Sites, click on the first site called ‘Global Childhoods’ – you will either see two different viewpoints.  One will show all options for posts/pages, site settings etc.  This means that this is your site because you have all the available options to edit content.  See the below example screenshot:

settings

This will be the view you will see if it’s a site that you created


For any sites where you are only a subscriber, you won’t be able to edit these as they belong to another member of your group.  So if you click to view a site where you are a subscriber, it will look similar to the below screenshot: (So you can see that all you can do is view your peers’ site.)

site

So when you have located your own site (see screenshot captioned: This will be the view you will see if it’s a site that you created), go to ‘Settings’ > General.

settings

Change the ‘Site Title’ to include your initials – for example ‘Global Childhoods – JS’

Scroll down the page and ‘Save Changes’

This will mean that the next time you hover your mouse over ‘My Sites’ you will be able to quickly identify your own site.


DIT hint of the week: Organising your Edublogs sites Pt 2

As a follow up to the organising your Edublogs sites post from last week, in this post we will look at how you can control the menu for your site using two different methods.

When you first create an Edublog site, you’ll notice that within the posts and pages section there are example posts/pages.  Usually called ‘sample page’ or ‘Hello world’ for example.  I always recommend that these example posts/pages are deleted, unless you have been setup with a specific template that has been tailored to your module.

When you then start creating your blog site, you may want to have a home page, about me, CV, Reflections, Contact.  It really depends on how your tutor would like you to setup the blog and what they require in terms of the pages you need.

All blog sites are setup so that when you create a page, the new page (once published) will automatically appear in the top navigation menu.

Most blogs are also setup so that any post your publish will also automatically appear on your home page.

But what if you find that the navigation order is not what you want, so for example you have a page called ‘placements’ and after this page is your ‘about me’ page, but you want the about me page to show before the placements page?

There are two methods to fix this issue, one is relatively straightforward and the other method involves a little more tweaking.

Method 1

  1. go to the dashboard for the site you wish to edit.  (hover your mouse cursor over ‘My Sites’)
  2. go to ‘Pages’ > click to edit the first page you wish to appear on the menu (this is usually ‘home’, but could be another page).
  3. Look to the right-hand side of the page and in the page attributes section enter ‘1’ in the order box.Page attributes
  4. Repeat the above steps for all your pages in order of preference, so for example if your ‘about me’ page was to come after your ‘home’ page then you’d enter ‘2’ in the order box when editing your ‘about me’ page.

    Please note that you must order every page, otherwise any pages not ordered will have ‘0’ assigned and the pages will not order as you need them to

    Instructions

The other point to mention is that you can’t order posts in the way you can with pages. This is because by their nature posts are more collaborative and most blogs are setup to display most recent posts first on your home page.

Method 2

If you want more control over your menu, for example to add a drop-down menu – you can do this by creating your own menu withing ‘Appearance > Menus’

  1. Go to the appearance > Menus area
  2. Create a new menu (call it main menu)
  3. You will see a layout that looks like the below screenshot.  Here you can see on the left, all your pages – simply check any that you want to add to the menu and click on ‘Add to menu’
  4. You will see your pages appear in your new menu.Menu
  5. You can rearrange your menu items by clicking and dragging the page up or down as above.
  6. Once you are happy with your menu, you should check the ‘Primary Menu’ box and ‘Save Menu’

The good thing about this method is that you can open up your posts and add individual posts to your new menu.  You can then drag those posts and make them appear as a drop-down menu item for any of the above pages.  Useful if you have a set of blog posts covering a different aspect of your blog that you want to highlight.

So just follow the same steps for adding a page, except using posts – but this time you can indent the post underneath a page to create the drop-down menu item, shown as below.

menu 3

menu 4

If you want to find out more about about Edublogs or need help, we have a TEL help site with Edublogs guides available here: https://sites.marjon.ac.uk/elearninghelp/

Watch the below screencast to see how the different methods work.

DIT hint of the week: Organising your Edublog sites

This blog post will show you how you can organise your sites, whether staff or student.

As a member of staff, if you have a class you will see all your students’ blogs as a drop-down list under your ‘My Sites’ area.  This can mean that the drop-down list becomes unwieldy and long.

If you are a student and have had to create blog sites for modules from previous years and have been subscribed into groups for previous work, then your drop-down list may also become long.

To remove old sites from your account, there are several options available.  You can simply hide old sites, this means that if you need to revisit old content for ideas, you still have access to it.  You can also remove old sites from your account and also remove yourself as a user from a site.

Hiding sites from your ‘My Sites’ drop-down list

  1. Login to Edublogs
  2. Click directly onto ‘My Sites’

    my sites

  3. You will be taken to all the pages that you are a user on or have created
  4. To hide any old sites from the drop-down list, simply check the ‘Hide this blog in Admin Bar’ box and it will automatically be hidden from the list.  Go through all your sites until you’ve hidden all the old ones, leaving only the sites you need for your current modules.

    hide your site

Removing sites from your ‘My Sites’ drop-down list

  1. Follow steps 1-3 as above
  2. This time check the box next to the title of the site that you want to remove
  3. Go to the Bulk Actions drop-down menu and select your preferred option, so if you want to delete a site or remove yourself as a user from a site.  Removing yourself as a user from a site is most likely option if you were subscribed to a group activity to see your group’s blogs.

Please note that if you delete a site it will archive it and the original creator of the site will not be able to access it.  The preferred option if you are subscribed to someone else’s blog is to simply hide it from the drop-down list or select the ‘Remove me from selected blogs’ option.

DIT hint of the week: How to create interactivity using Padlet in sessions

In this blog post, we are going to look at ways you can effectively use technology – specifically smartphones to inject interactivity into your sessions.

What is Padlet, what are you talking about?

Padlet is an online browser-based tool that enables teachers to create interactive boards online, whether these are documents or just web spaces where students can all directly engage and share their content.  The spaces can be private spaces, just for you and your students and some of the benefits include being able to embed spaces straight into LearningSpace and also the ability to share Padlets by using the Marjon QR code reader.

Padlet uses

If you want students to collaborate in a live session, for example share images taken on their smartphones related to a field trip exercise – they can do this using your Padlet board.  All they’d need to do is zap the Padlet QR code, using the Marjon QR code reader and then find the media they want to share and this will automatically appear within the Padlet board on-screen.  This could be a great way of interacting with students and all that would be required is the setup of the Padlet board and access via a browser.  Students don’t even need the Padlet app on their smartphone to be able to engage with it.

How do I make this happen?

It’s very easy to setup Padlet, follow the below steps:

  1. Visit https://padlet.com
  2. Create a new free account
  3. Select + Make a PadletMake a Padlet
  4. Select a template or from the list of options, or start with a blank (The shelf format is used in this example)Padlet template
  5. Select from a range of wallpaper types, themes and stylesDesign
  6. Next select the privacy options, for example add a password to protect the wall and then start the Padlet.

To add a section, just double click on the board and enter a title and in the below example we’ve added an image to start things off.

Shelf format

When you’ve setup the board how you want it to be, you can then share it with you students.  To do this go to ‘Share’ at the top right-hand side of the screen and select the ‘Share/Export/Embed’ tab.  You’ll notice a QR code has appeared.  Ask the students to open the QR code reader in the Marjon app and then zap the QR code on screen.

QR code

tip: if you click on ‘PRINT CODE’ this will display the QR nice and big on-screen.

Remember to setup your desired privacy options in the previous tab, before opening up the sharing options to students

When students scan the code they’ll be able to add their media to the Padlet and this will automatically appear on screen during the session.  The beauty of this tool is that the students do not need a login or account to access and it works seamlessly by using the Marjon mobile QR code reader.

Padlet on phone

Embed a Padlet into LS

If you wish to embed the Padlet board into LearningSpace, follow the below instructions:

  1. In Padlet click on ‘Share’ in the top right-hand side of the page then ‘Share/Export/Embed’
  2. Click on ‘Embed in your blog or website’ and copy the embed code
  3. Login to LearningSpace and navigate to the module where you want to embed the Padlet
  4. Turn Editing on and then setup a new label.
  5. In the label text box toolbar, select the toolbar toggle to open more optionsToggle
  6. Click on the code icon to open the coding boxCoding
  7. Paste the copied embed code into the box and select ‘update’ – then Save and return to course and turn editing off.

The only potential drawback of using a free account is that you are limited to 3 boards or Padlets, so if you need to keep them you can only have 3.  You can get around this by exporting a Padlet as an image, PDF or CSV file – or simply wipe the content when it’s no longer used and rename the sections.

If you’d like any help setting up your Padlet space or are interested in a demonstration, please contact the MeLT team.

DIT hint of the week: Organising your Edublog sites

This blog post will help you to manage all your Edublog sites so that you can save time and save scrolling through lots of pages to find what you need.

Do you find it difficult to find your Edublog sites? 

Are you frustrated by having to scroll through pages and pages of sites until you find the one you need?

If the answer to any of the above questions is ‘yes’, then read on to find out how you can remove old sites from the drop-down list and also create separate lists to make it a bit easier to manage your sites.

Managing the sites that appear in the drop-down ‘My Sites’ list

1. Click directly on the ‘My Sites’ button and this should take you to all the sites you have.

My Sites button
My Sites rollover
(note: ignore the drop-down menu, instead click directly on the above My Sites button)

2. To remove the unwanted sites from the drop-down list, just tick the ‘Hide this blog in Admin Bar’ checkbox for each of the blog sites that you want removing from your My Sites drop-down list.

Organise my sites image
If you still have too many sites in your My Sites drop-down list after removing sites from the list, you can create separate lists to help manage your sites.  To do this follow the below steps.

1. Navigate to your ‘reader’ area
2. On the bottom right-hand side of the screen you should see ‘My Lists’

My lists
3. Click on ‘Create new list’ > add a title for the list
4. In the bottom box add the URL for any sites that you want including in the list, separated by a carriage return and click on ‘Create’

Create lists
Once the list has been created, you’ll need to visit the settings to be able to see all the sites attached to it.

5. Click on the little cog icon for the list > You can then visit any site, by clicking on the title of the site.

Manage sites

6. To add more sites, just copy and paste the URL into the ‘Add sites to this list’ box and click on ‘Add Sites’

You may like to then create a browser bookmark for your list page, so you can quickly access it.  In addition, you may like to create multiple lists for different areas.

DIT hint of the week: Twitter tips

This DIT hint will help you to make better use of Twitter.

Do you find that your Twitter feed is constantly filled with content that’s updating all the time and it’s information overload?

Fortunately there are many ways that you can filter content to make your Twitter experience more manageable.

Twitter lists

Twitter lists are a really useful way of creating different lists for different topics or areas of interest – for example, if you created a list for ‘top researchers on speech & language therapy’ you can then add all the people to this list that tweet about this particular area.  Then rather than one huge wall of content, you can use lists to create mini walls for different things, which helps to filter content and make it more relevant.  Lists can also be added to social media aggregators, like TweetDeck to help manage your social media.

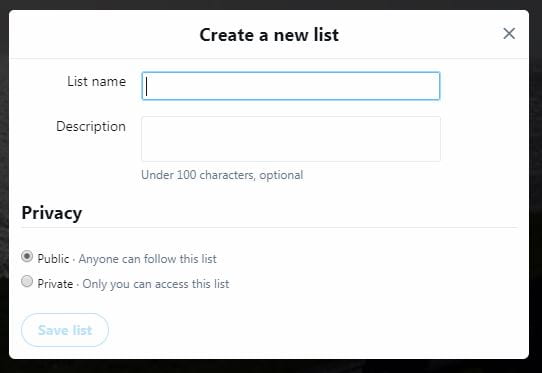
To create a list login to your Twitter account:

Create a list
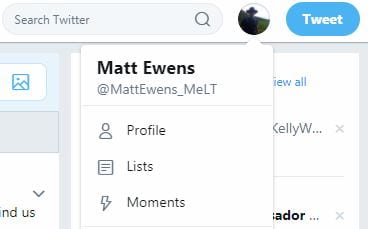
1. Go to your profile icon, Top right-hand side of the screen and click.  This should open up further options
2. Click on ‘lists’
3. There should be an option to ‘Create new list’ – click on this
4. Enter a list name and description if relevant and select whether you want the list public or private
5. Save list

Create a new list
To add content to your list, you’ll need to find and add the people to it by following these steps:

Add to a list
1. Visit the profile for the person that you want to add to your list and click on the three dotted user actions menu on their profile (next to ‘follow’ or ‘following’)
2. Select ‘Add or remove from lists’
3. Check the list that you want the person to be added to and they will automatically be added

Added to a list
You can also perform a generic search for people and add them to lists, for example if you conducted a search for ‘speech and language therapy’ you’ll see a list of ‘top’ tweets about this area and if you scroll down the list, you may find someone that you’d like to include in your list.  You can also search for hash tags if you want to target specific search terms directly.  (this means that people will have inserted the tag into their tweet, for example #speechandlanguagetherapy)

So within the results pulled up from your search, you can click on the account for anyone that you like and add them in the same way.

Helen Twitter pageThen to access your list, just go to your profile and select lists to view them.

Matt's listsTo edit your list, just visit the list page and you can edit it.  You also have three tabs to filter by ‘Tweets’, ‘List members’ and ‘List subscribers’.

View list details

Monitoring your Twitter lists and activity

If you find that monitoring your many lists is tricky, why not try TweetDeck?  This is linked into Twitter and will display by default your tweets, messages, activity and notifications. (you’ll need to be logged into Twitter) You can also add your lists and they’ll appear as columns.  This viewpoint may suit you better and you can also schedule Tweets through this program as well.

Twitter has support pages here on how to use TweetDeck.

TweetDeck

DIT hint of the week: Panopto keyboard quick controls

As you all know from the 29th of January Replay automatically captures scheduled content including Lectures, Practicals, Seminars and Workshops in teaching spaces equipped with automatic recording equipment.

Teaching rooms with Replay will have posters on the doors to remind staff and students, but you can also quickly control the recording by using the keyboard quick controls as shown below.  If you have any concerns about a recording, please get in touch with the team.

In addition please see the guides below for information on the editing options and the REPLAY system.

Editing a recording
How Panopto works
REPLAY/Panopto In Session Controls

Replay keyboard quick controls

Replay keyboard quick controls

DIT hint of the week: How to reduce video size easily

Have you ever captured a video either on a video camera or on your smartphone, then tried to upload the video to Edublogs, only to be faced with the below message?

Failed video message
Whoops, you’ve exceeded the maximum upload limit… What now?

To fix this problem, follow the below steps:

1. Visit the following website and download the Handbrake software.
2. Once downloaded, open the software and you’ll see a batch option and a single file option, select the single file option

Single file option in Handbrake

3. Open the large video file you want to reduce the file size for and the Handbrake editor will appear as below

Handbrake video editor

Browse button
4. Select the above ‘Browse’ button and select the location where you’d like the optimised video to be saved and enter a file name, for example ‘optimised video’ and hit save.

Optimised video
5. You can select the ‘video’ tab to further reduce video size, using some of the advanced settings if you find the video is still too large, but if you just click on the ‘Start Encode’ button, this will usually reduce the file size as required.  So just hit the ‘Start Encode’ button and Handbrake will process the video and when finished, your optimised video will be available to upload to Edublogs.

Encode button

Need further help?

If you’re still struggling, why not watch the below video tutorial, which also contains advanced settings to help you further reduce video size if required.

DIT hint of the week – quickfire embedding with Edublogs

In this quickfire hot hint of the week, we’re going to show you how to embed a YouTube/Vimeo video into an Edublogs page.

It’s very simple, but will save you a lot of time trying to find embed codes.

To embed a video into your Edublogs page, just find the video you want to include on YouTube, copy the URL, either from the browser or via the share link below the video.  Go to your Edublogs page or post edit screen and simply paste the URL into the page/post!

(Vimeo acts in exactly the same way, so just copy the URL and paste it!)

DIT hint of the week – How to use Audacity to remove noise from an audio file

Have you ever recorded an interview or captured film and then found that in the editing process your audio file is distorted?  This DIT hint will take you through some basic steps to help you clean up your distorted audio file.

The first point to make is that it’s always a good idea to firstly check all your recording equipment and microphone to ensure that they are setup correctly, so that clean audio is captured in the first place.

Sometimes it’s not that simple, you may be in a hurry or you may have forgotten to get a set of headphones to monitor the sound.

How to use Audacity to remove distortion

To try and make this easier, I will make available an audio file that I recorded with distortion that you can download yourself and have a play with to clean up.

(Please note that this isn’t perfect and the aim of this blog post is to provide a relatively quick and simple solution – if your audio file needs to sound professional, you’ll need to potentially re-record it)

  1. To begin with, please download the following audio file: http://bit.ly/2mudRAO (note the content is irrelevant, please ignore what I am talking about!)
  2. Open up Audacity, then go to File > Open > Select the downloaded audio from the location you saved it on your computer.
  3. You should see a small waveform, play it and just listen to the distortion in my voice.Bad audio wave
  4. You need to firstly zoom into the waveform a bit because we’re going to select a small sample of the waveform for analysis – so go to View > Zoom in. (you may wish to zoom in two or three times)
  5. Next click with the left mouse button and drag it over a small section of the waveform.
  6. With the selected section, go to Effect > Noise Reduction.  This will open the Noise Reduction pane and you then need to click on ‘Get Noise Profile’.
  7. It may appear that nothing happens, but that’s okay. Now this time, go to Edit > Select all.
  8. Go to Effect > Noise Reduction > At this point you’ll need to be wearing headphones so that you can listen to the audio previews.  Leave the standard settings in step 2 and click on Preview.Cleaned up audioAt this point you may think that it still doesn’t sound too good.  You’d be right!  The advice I can give is to play with the settings in step 2 and keep previewing your audio file.  It took me about three minutes to get the preview to sound acceptable and my settings can be seen below.Noise reduction settingsYou may well be able to further improve this track by tweaking the settings and previewing the sound. 

Have a go and when you’re happy click the OK button and it will process the changes.