[Back to Student Training page]
Welcome to the Edublogs training resource site. Here you will find access to all the guidance and support you need to learn how to use Edublogs and create an engaging blog. Open the below tabs to follow the guidance, or alternatively watch the video tutorials & instructional content available. We recommend you follow all the ‘Essential Skills’ training & additional guidance for intermediate and advanced training can be found below essential skills.
Essential skills
How to login & create an account
1. Visit the Edublogs home page: http://sites.marjon.ac.uk
2. Click on ‘login’ (either top left or right of the page)
3. Click on the blue button labelled ‘Use Marjon ID’
4. Enter your standard username and password and click on ‘Login’

To access a blog you have already created, click My Sites (top left) locate your blog title and click to open

If you need to create a new blog, rather than login to your dashboard, scroll down the Edublogs home page after logging in – then click on ‘Get a Blog’.
You can also create a new blog once logged into your dashboard by clicking on ‘My Sites’ directly and then clicking on ‘Add New’.
Note: For module Edublogs, your tutor will send you a joining link to create your blog
If you are unable to login, please contact a member of the Digital Innovation Team: digitalinnovation@marjon.ac.uk
How to create a new blog site for your assessment
As part of your module assessment, your lecturer should send you a joining link to enable you to create your blog.
1. Click on the joining link provided by your lecturer
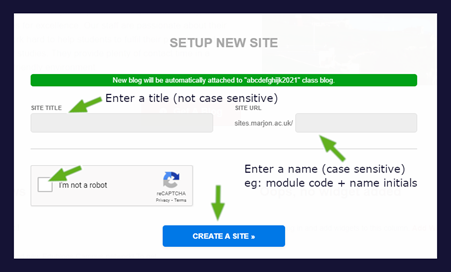
2. When you click on the invite link, it will take you to a page like the below screenshot
3. Simply complete the below details (for site title enter a relevant title and include your name initials, for example: ‘Thematic Learning M.R.E’ – for site URL, please enter the module code and you name initials without any spaces and lower case, for example: abcdemre – check the box for ‘I’m not a robot’ and then click on ‘Create a Site’
Your new site will process and you will be taken into your site dashboard in Edublogs.
Your site will automatically be added to your tutor’s class.
Resources
How to create a non-assessed blog site
Use this resource to create your own blog site or website outside of your assessment for your university degree. You may wish to create your own site to promote a passion or hobby, or it could be something else.
Once you have logged in and activated your Edublogs account, you will be able to create a new blog. Note: Your tutor should send you a joining link for any module-related assessments. Please follow the guidance as indicated by your tutor on your module blog setup.
If you want to setup your own website, or blog outside of your degree, please follow the steps below:
1. Enter a site name (this must be all lower case and no spaces)

Note that the site name is the url address, for example like www.google.co.uk
2. Next enter the site title, this can be changed later if you like. Enter a meaningful title for example: Health & Wellbeing

3. For the privacy, you can opt to hide your blog from Google, make it public or private as below:

4. Next, select a template by clicking on it (note that you can change the template later – this is recommended)
5. Scroll down the page until you see the ‘Create Site’ red button. Click on this
6. You should then click on the red hyperlink for your site title (example screenshot below)
7. Your site will then process and setup – please keep the window open during this process
8. You will then be taken to your dashboard for your new site
Resources
Watch an instructional video tutorial to learn more
Request help on Teams
How to work effectively
Once you have logged in to Edublogs and created your first blog, you should follow this guidance to help you to work more effectively.
1. Hover your mouse cursor over the icon of a singular house
2. On the ‘visit site’ option, right-click on the mouse and select ‘Open link in new tab’

By doing this you can switch between the editor or the dashboard for your blog and the live site.
Another useful tip:
If you are visiting the live site, you can return to the editor by clicking on the icon that looks like a speedometer.

Resources
Watch an instructional video tutorial to learn more
Organising your sites
If you have created a number of sites or have created sites throughout your course and don’t need to see old sites from your ‘My Sites’ list, you can hide these. You may have also been required to subscribe to your other blogs as part of group work and if you no longer need to see other people’s blogs once those group activities have ended – you may also want to hide those sites as well.
To hide any old sites from the My Sites list, follow these instructions:
1. Once logged into Edublogs click directly onto ‘My Sites’

2. This will take you to all the sites you have either created or subscribed onto
3. Find any old sites and check the box ‘Hide this blog in Admin Bar’

4. Click on ‘Save Changes’
Resources
Watch an instructional video tutorial to learn more
Understanding the difference between pages and posts
Pages
Pages are static, meaning that they are non-collaborative, so visitors are unable to comment on a page.
Posts
Posts are collaborative, so visitors can leave comments. (no comments are ever published until approved by the site owner)
The standard setup for every new blog created will be so that any post that is published will automatically appear on the home page.
If you’re creating a blog outside of your studies, then you could create a blog to reflect your online portfolio as a means to showcase your interests. Or it may be that you want to create a community related to a hobby or business interest.
Resources
Watch an instructional video tutorial to learn more
How to create a page
1. To create a page, head to ‘Pages’
2. Click on ‘Add new’
3. Enter a title for the new page, for example ‘About me’ > Click on ‘Publish’
Note: Any new page created will automatically appear on your site navigation (you can change this by creating your own menu, this will be covered in the intermediate Edublogs guide)
Resources
Watch an instructional video tutorial to learn more
How to create a post
1. To create a page, head to ‘Posts’
2. Click on ‘Add new’
Enter a title for the new post, for example ‘Reflections on day 1’ > Click on ‘Publish’
Note: Any new post created will automatically appear on your home page.
(you can change this by creating a blogs page and visiting ‘Settings’ > ‘Reading’ and set the Posts page as the blogs page. This will make all the blog posts appear on your blogs page. You’ll also need to create your own ‘Home’ page – then set this in the settings area as a ‘static page’.
Resources
Watch an instructional video tutorial to learn more
Download an accessible Word guide
Editing pages & posts: Add images, videos & upload files
Once you have created a page, for example ‘About me’ – you’ll need to add content to that page.
1. Head into an empty page
2. Click into the empty box and start typing!
Use this space to talk about yourself in the context of the blog and think about the following aspects:
* Why have you started a blog?
* What do you hope the achieve from the blog?
* What are your interests in relation to the blog?
* What will the theme or focus of the blog be?
* What are your aims and goals related to the blog and the subjects you are talking about?
* Be personable – so write in a way that reflects your personality
Things not to include:
* Try not to waffle on about unrelated things and write too much text as people’s eye will get tired more quickly reading from a screen
* Limit the use of bad language and text-speak or use of abbreviations
* Separate lengthy text into easily viewable paragraphs & use text formatting if needed to make the text clear to read
Adding images
3. Click the mouse at the point where you’d like the image to be

4. Click on ‘Add Media’
5. Upload your image by click on the ‘Upload Files’ tab

6. Click on ‘Select Files’ > Find your image > ‘Open’

7. When the image has been uploaded, look on the right-hand side of the screen
8. Enter a suitable title for your image (you can leave the caption blank, this is only used if you want to add text underneath the image – this can be useful for citing images, referencing or adding ex. Text)
9. ALT text should always be added to all images before adding to your pages/posts. ALT text enables visitors that have sight problems or disabilities to hear what is on their screen if they are using a screen reader. A screen reader will voice whatever is entered as the ALT text – for example ‘this is an image showing Plymouth Hoe’
10. The description is just for your own reference, you can leave this blank if you like
11. Set the alignment to ‘right’
12. Set the size to either ‘Medium’ or ‘Large/Full size’
13. Click on ‘Insert Into Page’

14. Your image should be showing to the right-hand side of your text

15. At this point, please ensure you have ‘Updated’ your page and you are using Google Chrome browser
16. Click on the newly added image, you should see a small toolbar appear above the image (check out the key to see what the icons mean below)

Practice changing the alignment
TIP: Never expand an image beyond the size you first inserted – this will make the image pixelate and it won’t look good. If you need to make the image bigger, click the pencil and then change the size. Then you can always grab the handle bars and lower the size this way.
BIG TIP: Please never use any image that is not yours, please don’t just search on Google for an image – the image is likely to be protected by copyright law and you may be in breach of the law if you use it.
Visit: www.pixabay.com – this site contains copyright free and attribution free images for you to use (watch the premium images usually at the top as these are paid for)
Adding video
You can add video two different ways, one via a direct upload and the other is by embedding.
To embed video content from YouTube or Vimeo, you simply need to find the video you want and copy the URL into the page.
1. Visit youtube.com > find an appropriate video
2. Copy the url for the video, as in the below example

3. Go back to the Edublogs page editor and paste into the page where you want the video to be
4. Update your page and visit the live site by hovering your mouse over the house icon

Adding your own videos
1. To add your own videos place the cursor in the editor where you want the video and click on ‘Add Media’
2. Click on the ‘Upload Files’ tab > ‘Select Files’ – pick your video (this must be lower than 50mb) > Open video
3. Insert into page
TIP: If your video file is too big, you can download and use a free program called Handbrake to lower the file size. Check out this link to find out more: https://sites.marjon.ac.uk/elearninghelp/2019/03/22/handbrake-how-to-lower-the-file-size-of-videos/
Uploading files
To upload a file to your page, follow the steps below:
1. Place the cursor in the page where you want the file download to appear for your visitors
2. Click on ‘Add Media’
3. Select the file from your computer after clicking on ‘Upload Files’
4. Click on ‘Open and make sure there is a relevant title on the right-hand side of the page before clicking the ‘Insert Into Page’ button

Styling your text & using the formatting tools
You can use a variety of tools when styling the text to make it stand out more, this guide will help you to do so.
Adding larger titles on your page
1. In the page you are working on, go the top of the editor and highlight the text or enter title text as in the below example

2. Click and drag the mouse over the text to highlight it and then click on the above box ‘Paragraph’
3. Select ‘Heading 2’ > the text should increase in size as below

4. We’ll now add a bit of colour to the title
5. If the toolbar is toggled closed, click on the following icon to open up more options

6. Highlight the title text again > Click on the ‘A’ icon and select a different colour


Making text bold or italic
1. Highlight some text > click on the ‘B’ icon
2. Highlight some text > click on the ‘I’ icon – this should look similar to the below image
![]()
Adding numbered and bulleted lists
1. Click into an empty space in the editor > click on the bulleted list icon ![]()
2. Enter text, then press the return key on your keyboard to enter another list item
3. When you have added three items, press the return key again to exit the bulleted list

4. You can add a numbered list in exactly the same way as a bulleted list by selected the numbered list icon:
Adding an attractive quote
You can add a visually appearing quote, which looks good by using the blockquote tool
1. Find an empty space in the page > click on the blockquote icon:
2. Enter some text, something like the below image

3. Note: the above shows indented text, on some templates it will be more viewable in the editor
4. Update the page and visit the live site

TIP: If you visit your ‘Posts’ – try adding a new post and you can apply all the above to the post in the same way. Have a go at adding content to a new post and publish it. How does it look, what could you do to improve the look of the post?
Why not visit an example ‘About Me’ page to get some ideas: http://sites.marjon.ac.uk/aimsessionaresource/about-me/
Useful keys:


Resources
Watch an instructional video tutorial to learn more
Changing the template
To change the template follow the below instructions:
1. Go to ‘Appearance’ > ‘Themes’
2. In the top left-hand corner, you’ll see the currently selected template – see screenshot below as an example:
3. Hover your mouse over another template and click on ‘Live Preview’

4. This will load up a preview within a ‘customiser’ area – you now have two options
5. If you like the template, select ‘Activate & Publish’ if you don’t like it, click on the ‘X’ to return to the templates area

Resources
Watch an instructional video tutorial to learn more
Configuring your blog
When you first create a blog, every template is setup so that all Posts are automatically published on your home page.
Whilst this is useful in that you don’t need to worry about creating your own menu, it does have limitations when it comes to styling a blog site that is more individual.
What can you do?
Instead of accepting the automatically added pages and posts, we can control how your blog is configured.
Instead of having all your posts on your home page, you can setup a dedicated ‘Posts’ page, so that all your posts automatically get published to this page instead of your home page. The advantage of this is that you can create your own home page, which is a static page that makes for a better front for when visitors come to your site.
It is completely up to you, but if you wish to have a static home page and have your blog posts on a separate ‘posts’ page, then follow the below instructions:
1. Go to your ‘Pages’ area > Create a new page and call it ‘Home’ > Publish this page
2. Now create another new page and call it ‘Blogs’ > Publish the page
3. Go to ‘Settings’ > ‘Reading’
4. Click on ‘A static page (select below) > Select your new ‘Home’ page
5. Now using the drop-down menu select your new ‘Blogs’ page as the ‘Posts page’
6. Save changes > View the live site
What should happen is that you now see a new Home and Blogs page on your site. The home page should be empty and the Blogs page should now show all your blogs.
Resources
Watch an instructional video tutorial to learn more
Customising your blog
You can customise how your blog looks by accessing the customiser.
1. Go to ‘Appearance’ > ‘Customize’
2. Depending on the template that you are using, you’ll have different options and customisations available
3. The Amadeus theme used in this example has more available options than some of the other templates
4. Most of these are quite self-explanatory – but here is a brief explanation of the tools in the Amadeus theme

5. If you’re happy with any changes you make in the customiser, click on ‘Publish’
Resources
Watch an instructional video tutorial to learn more
Further support
Contact the Digital Innovation Team, via digitalinnovation@marjon.ac.uk
Watch a short screencast to show further help
Intermediate Training
How to navigate the platform – understanding My Sites
You may have created a blog site, but after time have wanted to come back to edit the blog and found the space confusing.
This post will help to explain how to find the site you’ve been working on and help you if you’ve accidentally created numerous sites.
Watch the below video tutorial to find out more:
How to add your posts as a home page
If you have found that when you click on your home page link, that it links to an empty page, but when you click on the title of your site, it displays all your posts. Then there is a quick solution to set your empty home page the same as the link to all your posts.
1. Go to your live site and click on the title of your blog – this will display all your posts. Copy the URL from the browser. It’ll most likely look something like this: https://sites.marjon.ac.uk/yourblogtitle
2. Go back to the dashboard of your site (an easy way to do that is to click on the icon that looks like a speedometer)

3. Go to ‘Appearance’ > ‘Menus’
4. Click on ‘Custom Links’ from the left-hand tabs
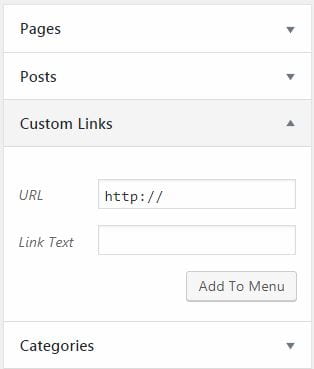
5. Paste inside the ‘URL box the URL you copied earlier
6. Type ‘Home’ inside the ‘Link Text’ box
7. Click on ‘Add to Menu’
8. Your new home page will appear at the bottom of the menu.
9. Click on the downward facing arrow next to the old Home navigation item, then click on ‘remove’

10. Now that the empty Home page has been removed, you can drag the New Home page to the top of your menu
11. Click on ‘Save Menu’
As a side note, if you’ve not created a menu before, you may need to check the box next to ‘Primary menu’ at the bottom of the menu before saving.

(Also make sure that the structure of your menu is correct. So you can add any pages or posts to your menu)
Follow the below screencast to see how this works.
How to embed videos from YouTube/Vimeo
This post will show you how to embed a YouTube/Vimeo video into an Edublogs page.
Note: This doesn’t always work if you use Internet Explorer browser, we’d recommend using Google Chrome.
It’s very simple, but will save you a lot of time trying to find embed codes.
To embed a video into your Edublogs page, just find the video you want to include on YouTube, copy the URL, either from the browser or via the share link below the video. Go to your Edublogs page or post edit screen and simply paste the URL into the page/post! Then ‘Publish’ or ‘Update’.
(Vimeo acts in exactly the same way, so just copy the URL and paste it!)
Creating drop-down menus and how to organise them
In this post we will look at how you can control the menu for your site using the easiest method.
When you first create an Edublog site, you’ll notice that within the posts and pages section there are example posts/pages. Usually called ‘sample page’ or ‘Hello world’ for example. I always recommend that these example posts/pages are deleted, unless you have been setup with a specific template that has been tailored to your module.
When you then start creating your blog site, you may want to have a home page, about me, CV, Reflections, Contact. It really depends on how your tutor would like you to setup the blog and what they require in terms of the pages you need. (Check this information with your tutor)
All blog sites are setup so that when you create a page, the new page (once published) will automatically appear in the top navigation menu.
Most blogs are also setup so that any post your publish will also automatically appear on your home page.
But what if you find that the navigation order is not what you want, so for example you have a page called ‘placements’ and after this page is your ‘about me’ page, but you want the about me page to show before the placements page?
Creating your menu
1. Go to the ‘Appearance’ > ‘Menus’
2. Create a new menu (call it main menu)
3. You will see a layout that looks like the below screenshot. Here you can see all your pages on the left-hand side – simply check any that you want to add to the menu and click on ‘Add to menu’
You will see your pages appear in your new menu.
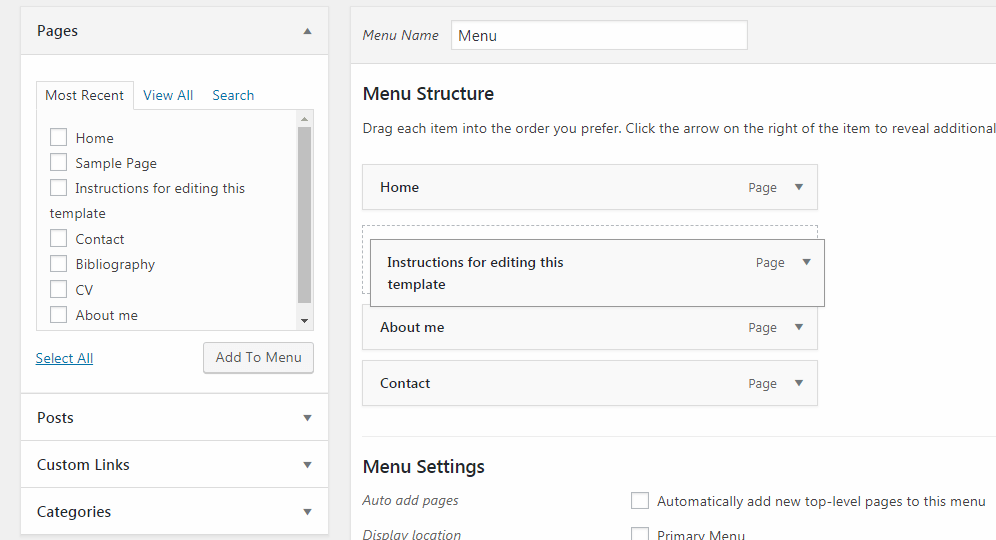
5. You can rearrange your menu items by clicking and dragging the page up or down as above.
6. To create a drop-down menu, simply click and drag the item to indent it to the right-hand side, underneath the menu item as below

note: You can add both posts and pages as drop-down items
6. Once you are happy with your menu, you should check the ‘Primary Menu’ box and ‘Save Menu’
Watch the below screencast to see how the different methods work.
Information for Graduates (Can I keep my blog?)
We have embedded the use of Edublogs into many of our degree programmes to encourage Marjon students to develop their online presence and digital competencies prior to graduating. Students have also been encouraged to create sites which can market themselves to prospective employers. We’ve always been there for Marjon students beyond graduation and as part of our ongoing digital support for alumni we’ll continue to support access to Edublogs for up to two years after you graduate. After leaving the University, users will be able to choose what happens to their websites. They’ll remain publicly available and editable or users can make them private or download the contents to be restored on another platform or just delete them. The choice is yours.
Students will also still have access to our support pages where you’ll find help with setting up a site, adding content and customisation, or look below for more help with managing your site once you’ve graduated.
Account removal
Once you reach the end of your studies at Marjon you can keep your Marjon Edublogs site for 2 years. Once this 2 years ends you will have the option to export your blog into a different platform, otherwise you account will be deleted. We hope that by continuing to use the site you will gain from the support available.
Change admin email
When you leave the University you may want to change the admin email address on your site, this will mean that you will still receive alerts and emails once you have stopped using your Marjon student email address.
To change the admin email address on your site, log into the dashboard and navigate to the Settings > General Settings options.
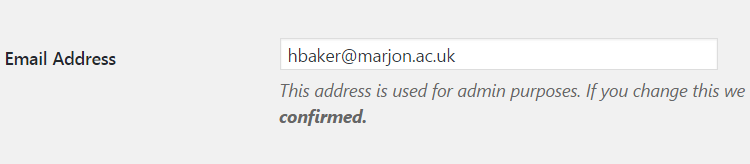
You can put in a different email address and by clicking ‘Save changes’ it will send you a confirmation email to the new email address to confirm the change.
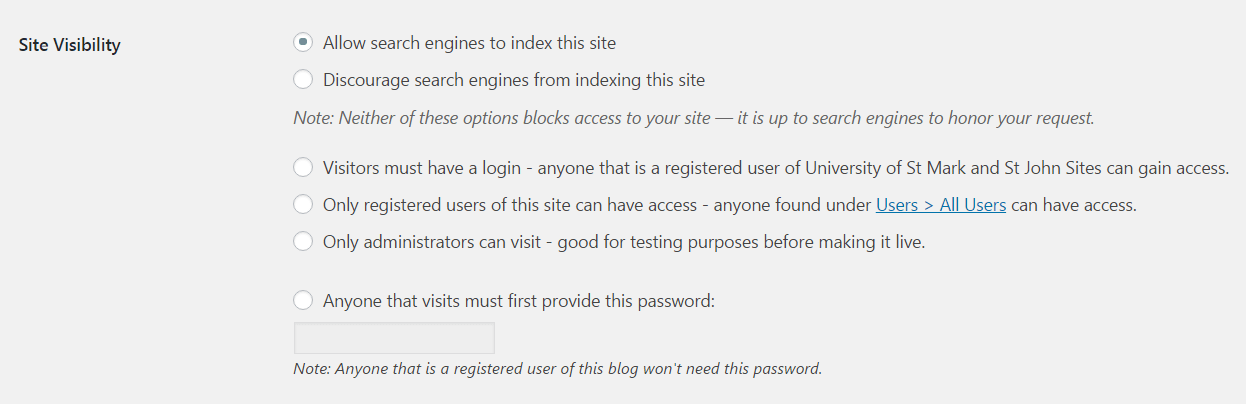
Your privacy settings after graduation
Once you graduate you should speak to your Module Leader to request your blog is removed from any classes. This will then give you access to your site and you can make it public via going to Settings > Reading Settings.
Exporting your content
Before your account is deleted the contents of the blog can be exported and then imported into another WordPress platform.
Exporting the file will create an XML file which can be imported into another platform.
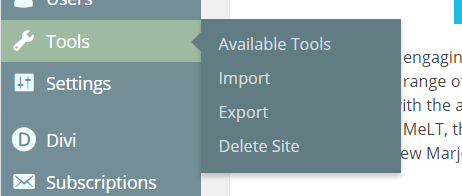
To access the Export options open the tools menu from the left hand side and select the Export option.
This will open options for you to select which parts of your blog you want to export. If you are planning to import your posts into a completely different platform, not a WordPress based platform, then you may want to only export your posts and media. Layouts and other specific content may not import into an different platform.
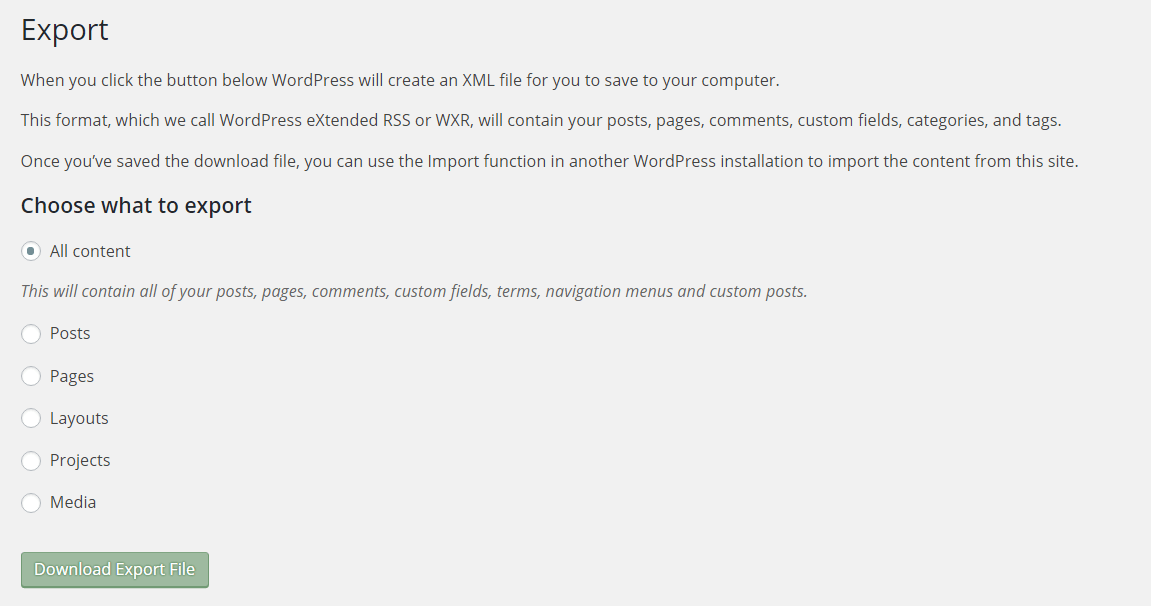
Clicking the download export file button will download the XML file directly to your computer.
You can import the contents of your blog into a free or paid WordPress account, or another platform of your choice (although the import process may be different). The theme for your blog will not be carried across, although WordPress does have a number of the same themes, it may be necessary to choose a different theme once it has been imported.
To import directly into Wordpress blog/site you can use the Settings menu, on the new blog, to select the import settings and select the file to import.
If you have any concerns, you can also contact the Digital Innovation Team via digitalinnovation@marjon.ac.uk
Resources
Watch a video tutorial to learn how to export your Marjon blog and import it into a free WordPress account:
How to customise your site
The customize options allows you to enter a live preview mode where you can customize parts of the site and see the effect without making changes to the live pages. This is the easiest way to change visual elements of your site. All of the options are also available directly from the dashboard. Once you have made changes using the customiser, make sure to select the ‘Save & Publish’ options to make your changes live.
Site Identity
The site identity options allows you to change the title and tagline of your site. The tagline will normally appear under neath the title in the header of your site. By default it is set to ‘Just another University of St Mark and St John Sites site’ and this can be changed within these settings. You can also add a Site icon, this is the image that will appear next to the page name in the browser tab or as the image displayed as an app icon.

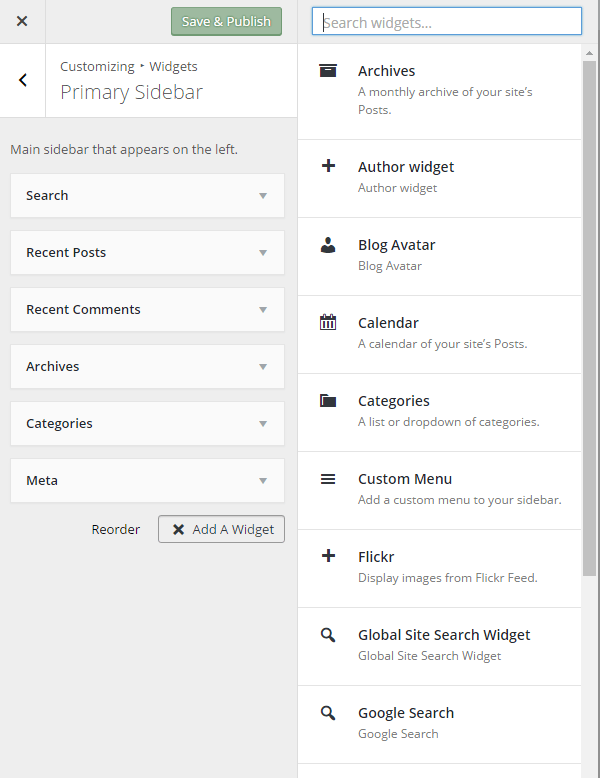
Widgets
Widgets allow you to edit the content shown in the sidebars of the site. There are a wide range of widgets to choose from including; custom menus, custom HTML and featured posts. To change the widgets in each sidebar you need to first choose which sidebar you are editing.

This will open a list of the widgets currently active for that sidebar and allow you to change and add different widgets from the list.
Background
With a lot of the themes you will be given the option to change the background of the site, this may vary between simply changing the background colour or adding a background image. Often this will be found in the customizer but sometimes can instead be found in ‘Theme Options’.
Colours
Most themes will allow you to change the colour scheme of your site using the colour options in the customiser. Within the customiser it will generally give further information about where the colours will be used and allow you to see them in the live preview on the right hand side.

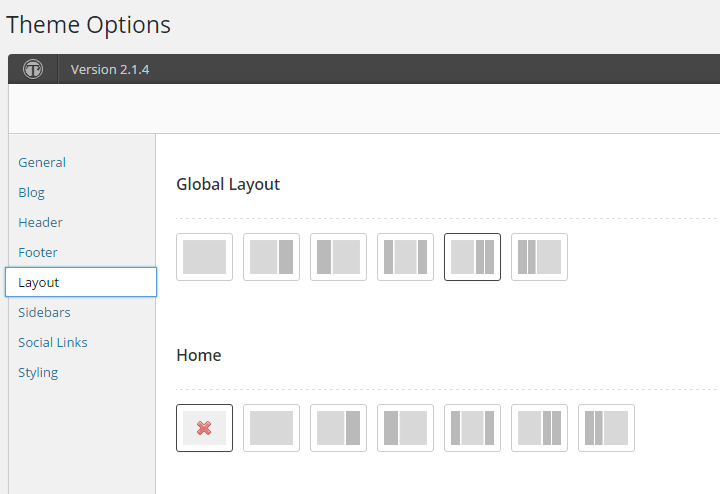
Layouts
You might also be given options to change the layout of pages on your site. This will allow you to choose the location of your sidebars. This will often be found in the theme options.
Resources
Watch a video tutorial to learn how
Advanced Training
Downloadable guides
